Hiding the Nearpod Navigation Link in Carmen

Many of you may have noticed a new navigation link on the left side of your Carmen courses called “Nearpod.” For those who use Nearpod in their classrooms, this may be a great addition to your course. However, if your students don’t need the Nearpod navigation link, there is an easy way to hide it.

The Nearpod navigation link is currently showing by default on the left-sided navigation on all College of Nursing Carmen courses, but it can be hidden if it is not necessary for your course.


If you want to hide this navigation link, the first step is to click “Settings.”


Next, click the “Navigation” tab.


Here, you can see that there are two sections where navigation links can be sorted. The top section is for navigation links that you want to be viewed by students. The bottom section is for navigation links that you want to hide from students. Since Nearpod is in the top  section, it is currently able to be viewed from the student perspective.


Left click on the Nearpod box and drag it down to the lower set of navigation links. Notice the note in the Nearpod box now, “Page disabled, wont appear in navigation.” This verifies that students will no longer be able to see this navigation link.


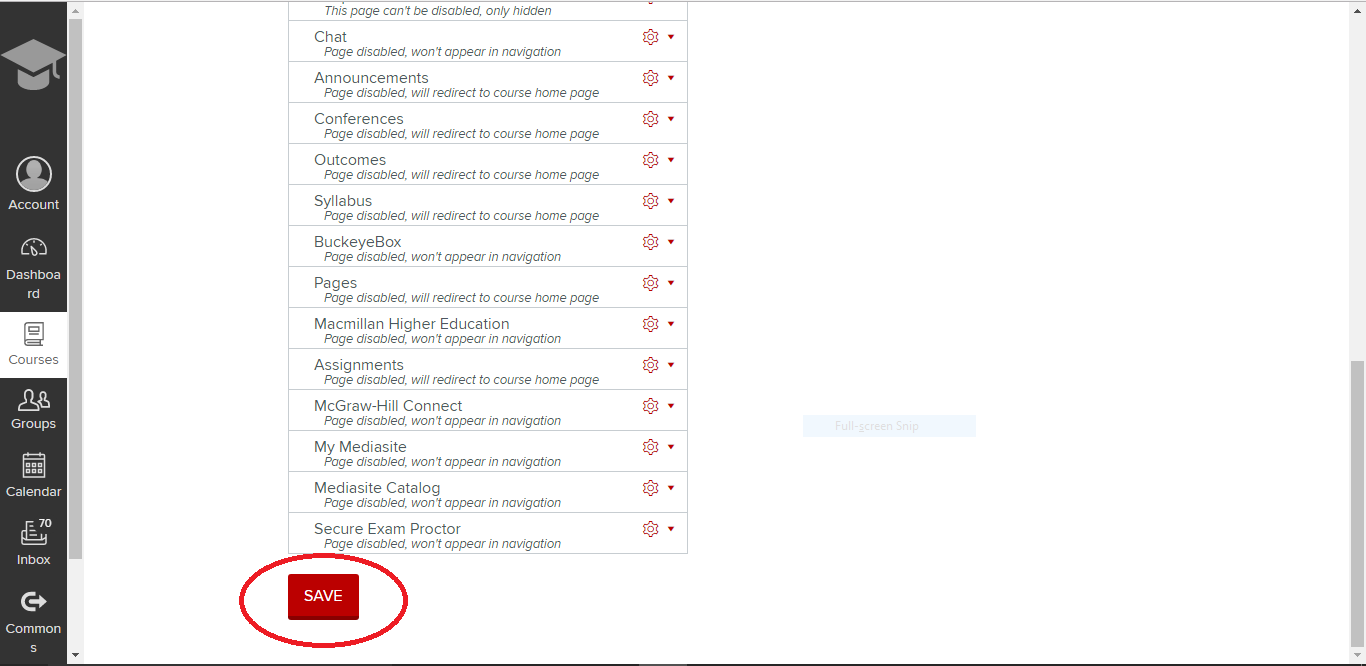
Scroll to the bottom of the page and click “SAVE.”


The Nearpod navigation link is now hidden and will no longer show up on the left navigation menu.

You can hide any of the unused or distracting navigation links in your Carmen course using the method described above. If you have questions or need assistance with your navigation links in Carmen, contact the CON IT team.

Creating Flashcards on H5P

The previous blog entry showed how to make a basic accordion style review tool on H5P. This entry will teach you how to use H5P to create online flashcards. The online flashcard tool is a great way to present a large amount of study material, as long as the material requires only a brief explanation or rationale. The process is a bit more complex than the accordion style list, but the outcome is much more customizable. Below is an example flashcard set to study commonly used medical abbreviations. Most of these cards are simply text on both sides. Cards 3 and 4 give examples of how to use audio and image clues on a flashcard set.

To create a flashcard set, start at the H5P content screen (you will need to create a free account) and select “dialog cards” from the drop down menu.

These first dialogue boxes will set the title for your project, the title that appears at the top of the card pile, and the general instructions for the card pile.

The first dialogue box for your card will determine what shows on the front of the card. The second dialogue box shows what will appear on the back of your card. Initially, you will only have one blank card. To add more cards, you must click the blue “add dialog” button on the left menu.

Card 3 is unique in that I added an audio clue to the card. To do this, scroll down until you see the section for “audio files” then click on the grey rectangle to upload your audio file. You can upload audio files with a URL or from uploading a saved MP3 from your computer. It’s also possible to record your own audio files to upload. It’s important to be aware of any copyrights your file may have, and to cite them properly. Citations will appear in the “Rights of Use” button on your flashcard set.

Card 4 is unique because it has a visual clue that appears on the card (images will appear on the front and back of the card). Images are uploaded just like audio files, except you will upload images under the “image” section. Just like audio files, be aware of the copyrights your image may have and cite them properly.

At the bottom of the page you will have the option to further edit actions and behaviors of the card deck. For this tutorial I left those options as default, but I encourage you to play with them and contact CON IT for any additional assistance you may need. You will also have the option of editing what buttons will appear on the final flash card deck. Once you are satisfied with your flashcard deck, click the pink “save” button. If you followed the directions posted here, you should end up with a deck identical to the one at the top of this blog post. For help configuring your deck, or assistance in implementing flashcards in your classes or study groups, please contact CON IT for additional assistance.


An Introduction to Using H5P

In this post, I will show you how to create an accordion list, one of the many tools on H5P. Below is an example I created of an accordion to review physiology. In this example, the student is presented with a question  to consider, and then the student can double check their answer by clicking on the accordion to reveal more information. One of the benefits of an accordion list is that it can organize and present broad answers with a lot of information. Accordion lists can be embedded into Carmen to condense large chunks of information and can be given to students as an assignment to complete or as a study guide. Accordion lists are especially useful in organizing long blocks of text into digestible pieces of information, as in complicated assignment instructions or longer discussion postings. Please try out the interactive accordion below:

The creation of an accordion list is quite simple. Follow this link  to get to H5P’s content creation page (you will also need to create a free account). Once there, click on the bar in the center of the page labeled “select content type,” and “accordion” will be the first choice. After selecting “accordion” and clicking the blue “use” button, you will be presented with a blank template. In the image below I have given the list the title “Physiology Review.” The current template has one blank form. To create a second blank form, you will need to hit the blue “add panel” button (circled in red).

The following images shows how I filled out the forms to create the interactive example at the top of the page (click on the image for a larger view):

Following these steps will create an accordion list identical to the one you see at the top of this blog post. All that’s left is to finalize the list at the bottom of the page:


If you want to add more content, you can continue to add more panels by clicking the blue “add panel” button. If you want to edit the display buttons on your accordion list, you can do so with the check boxes. If you are finished and want to see the completed list, click the pink “save” button.

Saving will take you to a finalized version of your accordion list. If you want to make edits to your list, you can do so by clicking the “edit” button. If you want to download a copy of your list or get the embed code, you can do so by clicking the respective buttons. If you don’t want the option to have download or embed buttons, you can remove them by deselecting the check boxes on the previous screen. For assistance using the H5P accordion list in your classroom, please contact the CON IT Department for support.

Multiple Choice vs. Multiple Answer

The “Quizzes” tool in Canvas is a easy way to allow students to take a quiz or survey online. Not only is this feature easy to use, it also comes with a large number of  features to customize a quiz to fit your exact needs. You can make it a quiz or a survey, a graded or a practice quiz, and even add a variety of question types such as matching and true/false.

With 12 different question types to choose from, there may be some confusion as to which question type does what. Two very similar sounding types are “Multiple Choice” and “Multiple Answer.” Although they sound the same, they produce very different types of questions. Below is a tutorial on how each of these question types work.

Multiple Choice vs. Multiple Answer tutorial

Go to the quizzes tab in Canvas and select “+ QUIZ.”


Select the “Questions” tab.


Select “+ NEW QUESTION.”


Here you can select which type of question you want. In this tutorial, we will select “Multiple Choice.”


Type your quiz question into the text box.


Type your possible answers into the texts boxes.


Select “UPDATE QUESTION.”


Select “+ NEW QUESTION” again. This time instead of selecting “Multiple Choice,” we are going to select “Multiple Answers.”


Note the warning above the text box. “This question will have a checkbox next to each answer and the student must select ALL the answers you mark as correct.”  Do not select this question type if you only have one correct answer in your question. For questions with only one correct answer, use “Multiple Choice.” For questions where you want the student to select more than one correct answer, use “Multiple Answer.”


Type your quiz question into the text box.


To turn a “Possible Answer” into a “Correct Answer,” click the arrow next to the answer. Notice if you were in a “Multiple Choice” question, the “Correct Answer” would simply move to that question row. You cannot have more than one correct answer in “Multiple Choice.”


Type in your possible answers into the text boxes. Notice since a net and volleyball are both needed for a volleyball game, both answers are marked as correct.


Select “UPDATE QUESTION.”


This is what the quiz questions will look like from the student perspective. Notice “Multiple Choice” questions have circles (also called radio buttons) next to the answers while “Multiple Answer” questions have squares (also called checkboxes).

If a student sees a question with squares (checkboxes) by the answers, they will assume more than one answer choice is possibly correct and can choose more than one answer. This circle and square convention holds true across quizzes and survey created in many different applications, including Qualtrics, SurveyMonkey, and the NCLEX.  This is why it is important to only use “Multiple Answer” questions on your quizzes if you want the student to believe that more than one answer may be correct.


Notice “Multiple Choice” questions will only allow the student to select one answer while “Multiple Answer” questions will allow the student to select several answers.

Citing media from digital resources

This post will provide a walk-through for citing digital media using the American Psychological Association (APA) format. This is the most common citation style for scientific papers. Proper citation is important in that it gives credit to the original authors and owners of referenced works, and it gives readers of your paper a way to research and verify the sources that you used.

  • Citing a Video Link:

Example:

Citation:

In-Text Citations:

The video should be referenced in the text, like this:

“The OSU marching band put on an amazing halftime show (the Lantern, 2012).”

or

“The Lantern (2012) highlights the skill of the OSU marching band.”

  • Citing an Image/Graph/Chart:

The image should have a caption that includes:

  1. The word Figure (with a capital letter and in italics)
  2. A number (starting with 1, increasing in numerical order with each new figure)
  3. A title for the figure or brief description of the work
  4. The owner and publication date in parenthesis

Example:

Figure 1. Ohio State Buckeyes Logo (Buckeyes1186, 2013)

undefined

Citation:

In text citation:

The figure should be referenced in the text, like this:

“As Figure 1 shows, OSU has the best school logo.”

  • Citing a Table

The table should have the following information:

Above the table:

Include the word Table with its number next to it (starting at 1) and a title which describes the contents of the table. Title should be in italics and capitalized in sentence case.

Below the table:

A table should be able to be understood on its own, even outside of the context of the rest of the paper. A note under the table can be used to provide extra information and context.

Example:

Citation:

In-text citation:

The table should be referenced in the text, like this:

“As shown in Table 1, I assume you will have a perfect understanding of APA formatting after reading this post.”

  • Additional Tips:

Some web resources may choose to include their reference list without the usual APA-style hanging indent because hanging indents will not display correctly on certain blogs and web platforms (See an example).  The reference entries you see above are image files intended to demonstrate how hanging indent should display in APA style.

It is important to be aware of the ownership rights of media you choose to replicate. Some sources of free use images are:

Flash Friday – Microsoft Sway

Microsoft Sway is a program for creation of online presentations using a combination of text, images, audio, and video. Sway is similar to PowerPoint, but the presentations are easy to create and present on the web. OSU students and faculty have free access to Sway through Office 365, so it is an excellent choice for students to share their course work in an online format. John Pryba covered the basic information you need to get started with Sway. View the recording here.

When in Doubt, Don’t Click! Avoid Email Phishing Attempts

You have probably been told in the past not to click links in emails from unknown sources, and you probably follow that rule to the letter.  Phishing attempts become more legitimate-looking every day.

When thinking about whether to click on a link, please remember these basic rules (explained in more detail in this Wired.com article):

  1. Always think twice before clicking a link in an email
  2. Consider the source (first, look at who sent the email, then hover over the link– but don’t click!– and see if the link leads to a website you recognize and trust)
  3. Report phishing attempts, or suspected attempts, to report-phish@osu.edu

Some recent items we have noticed in phishing attempts include the following:

  • Email addresses that look like OSU emails, but if you search the names at osu.edu/findpeople, no results will come up
  • Use of OSU logos, legitimate-looking email layouts, and legitimate email addresses/websites listed under the signature or in the header
  • Simple-looking emails that ask you to click a link to “validate” or “secure” your email, storage, or other information
  • Emails that look like they are written by a friend/colleague but with unknown email addresses or referring to a conversation you never had

Below are some recent examples that faculty and staff at the College of Nursing have reported.  Click on the image to view it full-size.

Examples of Recent Phishing Emails

This email has been flagged by the administrator as a possible phishing attempt (red flag #1), and if you hover over the link without clicking, you’ll see it does not go to a osu.edu webpage. Also please note the convincing-looking signature line, and the very suspicious line above this assuring you that it is legitimate.

See that the link above does not lead to my.osu.edu, and note the grammatical errors in the email.

The above email contains a link that does not lead to a osu.edu page.  It also contains questionable grammar such as “All staffs and students” and “portal to access the below”.

The link in the above email does not seem legitimate, and the “From” line of the email seems odd too, as it does not have an email address but only a name. I looked up the sender below for more information.

It turns out, the “sender” is a real OSU employee, but if you notice in the original email, the “From” box has a comma between last name and first and in the center of the email the comma is missing. If you do not know the sender or you are not expecting an email from them, assume this is a phishing attempt.

Sometimes it helps to do a Google Search or a “Find People” search on the sender of an email. Above is what I found out about “Wilhem Veen,” a name which appeared numerous times above.


Thanks for reading! Please remember to always consider the source and hover over links before clicking them. When in doubt, don’t click! Forward any suspicious emails to report-phish@osu.edu


Save

Save

Save

Save

Save

Save

Save

Save

Save

HSL Liaison Librarian News

Read the latest from the College of Nursing’s Health Sciences Library liaison, Kerry Dhakal, in her September 2017 newsletter. Find out how you can participate in Research Month (October) at HSL, use a systematic review tool called Covidence, and access InCites to analyze bibliometric data beyond the simple impact factor.

Read the latest newsletter from our HSL liaison.

Taking Notes in Nearpod

Nearpod is a interactive classroom presentation tool that can help students become more engaged in the classroom. Not only is this tool great for professors who want their students to experience more active learning through presentations containing polls and quizzes, but it also contains features to make the classroom setting less stressful for students.

One of these features is the note-taking component. With this component, students will be able to save all of the slides in a lecture, along with extra notes they can add to each slide, to either their email or Google Docs. This will enable students to pay more attention to what their professor is saying in lecture instead of scrambling to re-type each slide in their notes. This way, the student will have all the necessary information from the lecture slides, and have the time to type out extra notes that the professor may express verbally.

How to Capture Your Notes in Nearpod

When in a Nearpod presentation, click the arrow in the upper right hand corner.


Click the option that says “Notes.”


You will now be able to type extra notes in the grayed-out bar at the bottom of the screen.

This is an example of notes being typed out under the slide.


When the lecture is over, make sure to click the “Share” tab in the lower right hand corner in order to save your notes.

Now, you can either send the notes to your email or to your Google Drive.


If you send the notes to your email, it will download as a Word document. This is how your saved notes will look. They will contain all the slides, and any additional notes you added to a slide will appear under the slide.

Do you have questions about how to take notes in Nearpod? Email CON-S-help@osu.edu.

Embedding VoiceThread Videos into a Page/Post

This post will walk you through the steps to embed a video on a webpage.  The images here show how to embed a VoiceThread video into a u.osu.edu webpage, but the same basic instructions can be used to embed videos into your Carmen classroom pages as well.

After you have created a video in VoiceThread, click on the “menu” button to the top left and click “Share”

In the “Share” menu, click on “Embed”

Click to copy the embed code, and be sure to check the boxes if you want others to be able to view and/or comment on your video:

Now, after logging into u.osu.edu and going to the site you want to embed your video into, click on the title of the page or post where you want the video to go (or, create a new page or post)

In the “edit” screen, click “Add Media”

When the menu opens, click on “Insert Embed Code”

Now press “ctrl + v” or right click and click “paste” to paste the embed code into the box, and click “Insert Into Post”:

Now your video is embedded in the page. Be sure to “Update” or “Publish” your page to save your changes!


If you want to embed a video in a Carmen page, click on the “HTML editor” button and then paste the embed code into the page: