Using the BCC Field to Avoid a Mass-Email Faux Pas

Use of the BCC field to avoid a mass-email faux pas.

Did you know you can use the BCC field to avoid the awkwardness of mass replies to your emails?

In Outlook for Mac:

Outlook for Windows:

Outlook Web App (in a web browser):

You will first need to click the BCC button in the right upper corner.

A commonly asked question is, “If I put the recipient’s email address in the BCC field, what do I put in the ‘To’ field?” You do not need to put any address in the “To” field as long as you have an address in the BCC field. You can also address the email to yourself for archiving purposes.

If you are not seeing the BCC field, it may be hidden from your view in Options. Support documentation for Microsoft Office describes how you can show the BCC field.

Friendly reminder about remote access to CON drives:

You can access CON drives when you are not in Newton Hall by using our remote desktop server:

http://remote.con.ohio-state.edu/

“Your Password is ______.

Brace yourself for the latest in email scams: “Your password is ____”
Scammers are getting exceptionally clever lately and have started sending out very scary and convincing emails. These emails usually put a user’s actual password in the subject line to make it more credible, claim that they’ve hacked the recipient’s computer, and threaten to release very personal information to friends and family via social media if the scammer isn’t paid a large amount of money. While this is a very convincing trick, it’s still only a trick.

Here’s how they do it:

When websites get hacked, attackers often make off with a database of usernames, email addresses, and “hashed” (encrypted) passwords. While the passwords aren’t immediately useful, the hashes are usually posted to the internet where they can be reverse engineered and decrypted. If you were one of the affected users, anyone in the world can get a copy of your email and the password you used for that site.

Here’s a couple tips you can use to protect yourself:

  • Check https://haveibeenpwned.com. Enter your email address(es) into the field to see if any of your addresses have ever been affected by a breach. If so, you should assume that the password you used for that site is compromised and you should change it on any and all sites that share that password.
  • Use unique passwords for each website. If you use a password manager likechttps://www.lastpass.com/ or https://1password.com/, you can generate unique, secure passwords for every service you use and never have to remember them. If a site you use ever gets breached, attackers will only have your password for that site, instead of every site you use.
  • Change your passwords often, especially if you are informed that a service you use has been breached.

Microsoft Exchange Online is Coming to the College of Nursing

By the end of this fiscal year, Ohio State Office of the Chief Information Officer (OCIO) will migrate our email accounts from local servers to Exchange Online from Microsoft (MS).  This will increase email storage, simplify integration with other MS Office services and improve stewardship of university resources by leveraging the high-quality cloud services that are now available.

Your email, calendar items, contacts, tasks and notes will be migrated to the cloud after university business hours on July 16, 2018. Please close your Outlook and Skype for Business/Lync clients at the end of your work day on July 16, 2018.  After migration, OCIO will send a follow-up email to confirm your account was migrated to Exchange Online successfully. Because email accounts will be migrated in nightly batches, if you access other calendars and email accounts (in addition to your primary lastname.# account), you may notice a temporary disruption in permissions.  Any interruption will be temporary and will only occur if some accounts that you access have been migrated online, and others have yet to be migrated. To help you prepare, an Exchange migration checklist and additional Skype tips are available online. Your Outlook client or device should automatically reconfigure after your migration. If it did not reconfigure, be sure that you are using a supported client and/or mobile application.

You can check Microsoft’s online system requirements for Office. These requirements also apply to Exchange Online. If you have additional questions, please contact the IT Service Desk via online Self Service, or by phone at 614-688-4357 (HELP).  If you run into any issues after the date of your migration, please also feel free to contact the CON IT team at con-it@osu.edu.


When in Doubt, Don’t Click! Avoid Email Phishing Attempts

You have probably been told in the past not to click links in emails from unknown sources, and you probably follow that rule to the letter.  Phishing attempts become more legitimate-looking every day.

When thinking about whether to click on a link, please remember these basic rules (explained in more detail in this Wired.com article):

  1. Always think twice before clicking a link in an email
  2. Consider the source (first, look at who sent the email, then hover over the link– but don’t click!– and see if the link leads to a website you recognize and trust)
  3. Report phishing attempts, or suspected attempts, to report-phish@osu.edu

Some recent items we have noticed in phishing attempts include the following:

  • Email addresses that look like OSU emails, but if you search the names at osu.edu/findpeople, no results will come up
  • Use of OSU logos, legitimate-looking email layouts, and legitimate email addresses/websites listed under the signature or in the header
  • Simple-looking emails that ask you to click a link to “validate” or “secure” your email, storage, or other information
  • Emails that look like they are written by a friend/colleague but with unknown email addresses or referring to a conversation you never had

Below are some recent examples that faculty and staff at the College of Nursing have reported.  Click on the image to view it full-size.

Examples of Recent Phishing Emails

This email has been flagged by the administrator as a possible phishing attempt (red flag #1), and if you hover over the link without clicking, you’ll see it does not go to a osu.edu webpage. Also please note the convincing-looking signature line, and the very suspicious line above this assuring you that it is legitimate.

See that the link above does not lead to my.osu.edu, and note the grammatical errors in the email.

The above email contains a link that does not lead to a osu.edu page.  It also contains questionable grammar such as “All staffs and students” and “portal to access the below”.

The link in the above email does not seem legitimate, and the “From” line of the email seems odd too, as it does not have an email address but only a name. I looked up the sender below for more information.

It turns out, the “sender” is a real OSU employee, but if you notice in the original email, the “From” box has a comma between last name and first and in the center of the email the comma is missing. If you do not know the sender or you are not expecting an email from them, assume this is a phishing attempt.

Sometimes it helps to do a Google Search or a “Find People” search on the sender of an email. Above is what I found out about “Wilhem Veen,” a name which appeared numerous times above.


Thanks for reading! Please remember to always consider the source and hover over links before clicking them. When in doubt, don’t click! Forward any suspicious emails to report-phish@osu.edu


Save

Save

Save

Save

Save

Save

Save

Save

Save

Cybersecurity Part 1: Internal Threats

Erik Yarberry is the College of Nursing’s Network Administrator.  He recently took some time to talk to us about cybersecurity at the College of Nursing, including what are termed “internal” and “external” threats to the network.  This post will explore internal threats, and another post will follow discussing external threats.

Internal threats are those that come from employees or others who have access to the network.  These can be both intended and accidental. Here are some examples:

  1. Employees clicking on or forwarding phishing messages sent by email
  2. People leaving employment who leave security holes or delete files they shouldn’t (either accidentally or intentionally)
  3. People getting viruses through unsafe websites, unsecured flash drives, or other means

You might be wondering, what’s the point in phishing or hacking the College of Nursing? What’s there to gain? Here are some things hackers and phishers look for:

  1. Intellectual property including copyrighted works, dissertations, etc.
  2. Personally identifying information
    • Social Security numbers, credit card numbers, anything that would help an identity thief
  3. Access to legitimate email addresses to send more attacks out

Internal security threats make up a large portion of the cybersecurity threats that the College of Nursing faces. That’s why it’s important to know a threat when you see it, and if necessary alert the proper channels.  Here are some tips to remember to protect yourself and the College of Nursing from these kinds of threats:

  • Don’t click on unfamiliar links or attachments in emails! If you are sent an email that looks suspicious, forward it to report-phish@osu.edu
  • Change your passwords frequently, and use a new and unique password each time.  If your email or other information was ever breached, those old passwords could be in the wrong hands.
  • Know how to browse the web safely. Here are some good tips.
  • Have anti-virus software, and update your computer and software regularly. Cybersecurity is basically an arms race, and the best way to be equipped is to keep all of your systems as up-to-date as possible.
  • If you suspect you have a virus or clicked on something you shouldn’t have, alert IT right away at CON-informationtechnology@osu.edu


In our next Cybersecurity post, we will delve into external threats and what the College of Nursing is doing to mitigate them.


Canvas Notifications: How are Students Receiving Your Communications?

Several instructors have contacted the CON IT department with questions of how Canvas sends out emails and announcements.  Canvas does this differently from D2L in that each individual has control over which notifications they receive and how.  Because of this, if some of your students are receiving emails when you post an announcement and others are not, this is in the control of the students– not the instructors.  Below is a quick overview that you can use yourself and send out to your students so that they know where their notifications are going:

First, know that your default email is your name.#

If you would like to add an additional email for notifications, you can do this on the profile page by logging into Canvas, clicking “Account” –> “Profile” and clicking “+ Email Address” on the right side of the screen:

2016-09-21-5

Now, to view and change your notification preferences, go to “Account” on the left hand side and then click “Notifications”. 2016-09-21-1

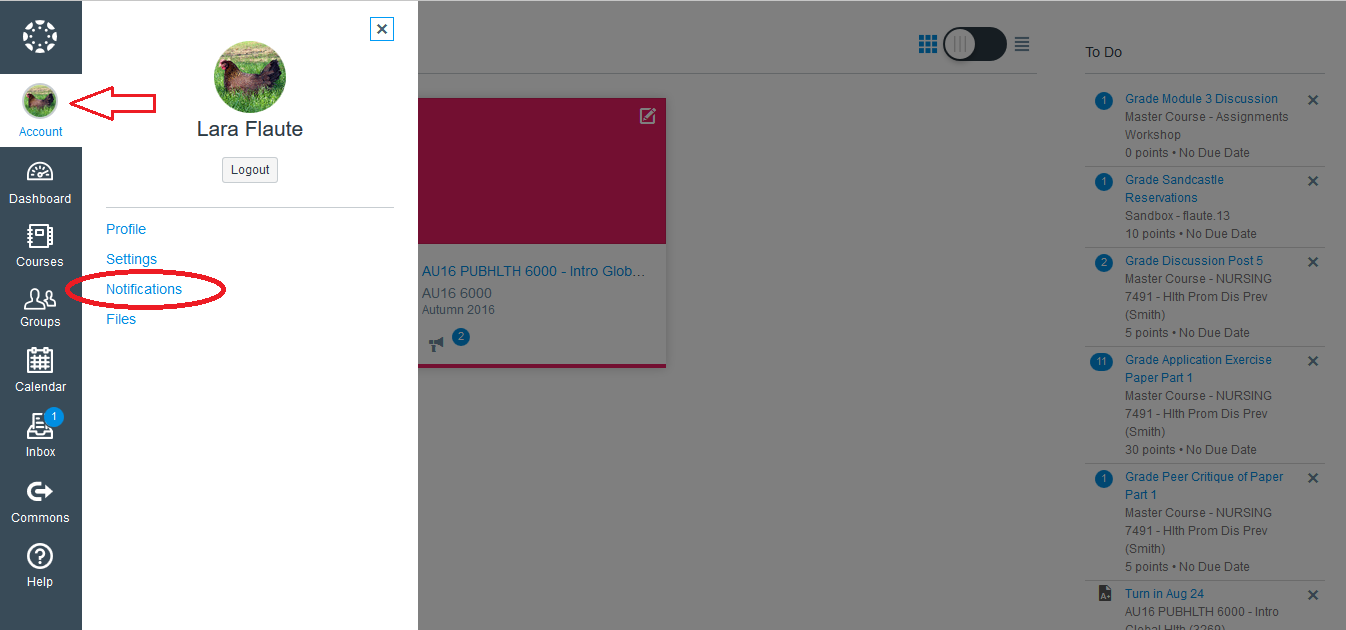
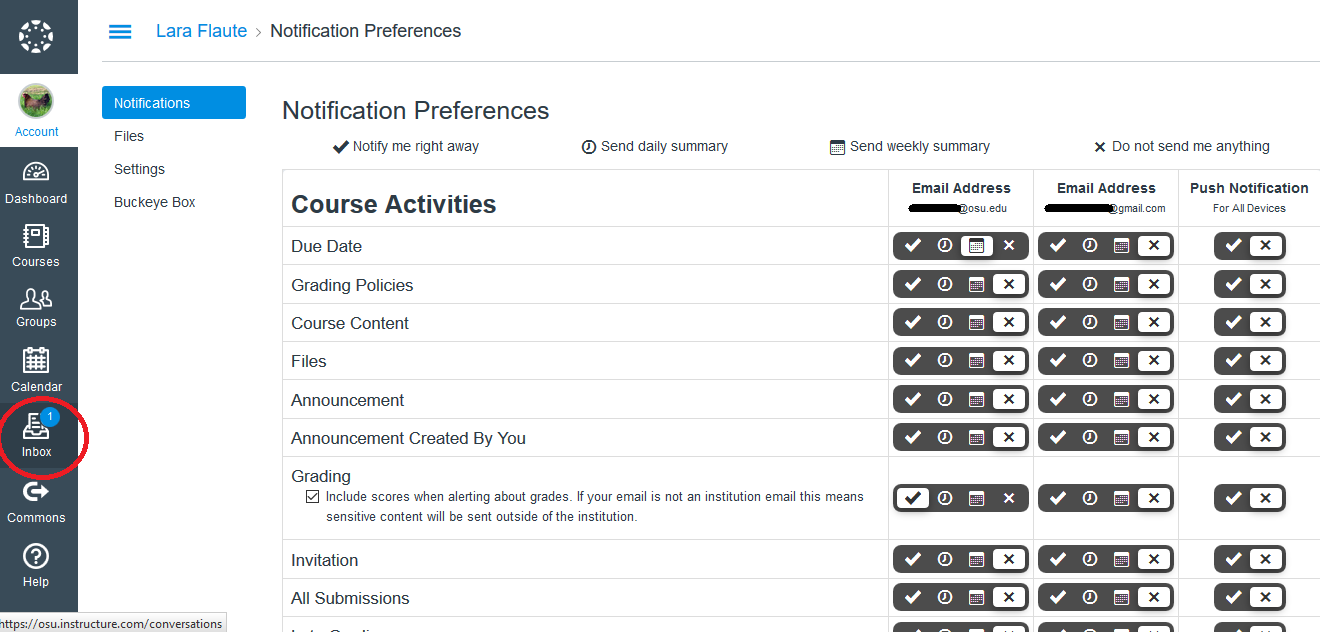
The Notification Preferences menu will open up.  Along the top of the menu you will see an explanation of what each of the 4 symbols mean.  There will be a column for each email address you have entered. If you have installed the Canvas app on your phone or tablet, there will also be a “Push Notification” preference column.  By clicking on the corresponding symbols, you can choose whether to be notified by email for each item, and how frequently you want to receive such emails.  If students are not receiving emails when you send announcements, their preferences will look like the below image.

2016-09-21-2

Whether or not students receive email notifications, they can always find these notifications when they log into your classroom on Canvas.

It’s a good idea to inform your students that if they want to email their instructor from Canvas, they can do so through the “Inbox” tab on the Canvas menu (see below).  The benefit of this route is that the instructor will receive the email both to their email inbox and to the Canvas inbox, and the message will inform them which course it came from.

2016-09-21-3

More information can be found on the Instructure Canvas guide here.

What other burning Canvas questions do you have?  Leave a comment or contact us by email to let us know!


“Your mailbox is almost full.”

Have you received a [legitimate] notice from OSU that your mailbox is full?  Here’s a tip that will help correct the problem and prevent it from happening in the future.


Each faculty and staff member is allocated 1GB (1024MB) of email storage, and unlimited archive storage. The reason the two are split comes down to how the email is stored and a few other technical reasons. We recommend setting up an archiving policy to manage the amount of storage you use. To accomplish this you can follow this guide:

1.       Login to OWA (Outlook Web Application), at https://email.osu.edu/. Choosing the private computer option will get you a longer session before it logs you out. This will be using your name.# university credentials.

image003

2.       Right-Click your Inbox folder and there will be an Archive Policy selection area

image004

3.       Select either the 3 Month, 6 Month, or 1 Year option to ensure enough free space. You can also clear your Deleted Items as well, which counts towards your total space.

4.       Repeat the procedure for any other folders you wish to have auto-archived.  Recommended folders to archive, at least:

  • Deleted items
  • Sent items
  • The top folder of nested folders, if applicable. (If you have a folder called “Saved” or something similar, with a bunch of other folders inside of that one, you just need to set the archive policy on the top folder and it will apply to all subfolders.)
5.       Your Archive folder will appear below in a section called Personal Archive:
image005
6.       Your folder structure under your inbox will be replicated and saved. Once emails reach the age of your chosen archiving policy, they will automatically migrate to this section of your account.
Making sure you have an archiving policy will save you much grief in the end help mitigate running out of space.


Slack

Rachael Kearney, director of the fully online BS in Dental Hygiene program at OSU, was looking for a better communication tool for her students.  They requested an app to communicate among themselves and with faculty, and email or the Carmen discussion board were not what they had in mind.  They wanted something that works on their mobile devices where they could follow conversations of interest to them and ignore the others.  They wanted instant notifications (unlike the Carmen discussion board) and the ability to respond quickly and simply as they do in a text message (unlike email).

Rachel found Slack and implemented it program-wide with channels for individual courses and a channel for the whole program.  Students can also chat with each other directly in private conversations.  Slack allows sharing of files like PDFs and images and integrates with other applications like Google Drive and Dropbox.

Do you think Slack might work for your team or student group? Email Joni Tornwall (.2) for access to a recording of Rachael’s presentation and her slides.  If you decide to use Slack with your College of Nursing group, please let me know!  We have tech-savvy assistance to support you, if you are interested.

Properly Adding an Email Signature to your iOS Device

There is a little trick to adding an email signature and preserving your email formatting on an iOS device!

The first step is to email yourself from your computer so that you have the proper formatting for your signature like so.

Screen-Shot-2015-03-04-at-1.25.39-PM-1ru4xqt

Then once you have done that, open up said email on your iOS device. Once there, copy and paste the signature by holding down your finger and hitting Select.

image1-1e1znzx-576x1024

Once you have done that, your screen should look like this.

image2-ugjee9-576x1024

Now drag the left pin to highlight the entire signature so that it looks like this.

image3-y15ee5-576x1024

Then hit copy!

Now go to Mail, Contacts, Calendars –> Signatures and either select All Accounts or Per Account depending on how you want the signature applied.

Be sure and erase the old signature, then press and hold your finger to the screen until these options come up. Now press Paste.

image1-1-17m01mn-576x1024

Finally, physically shake your iPhone until this screen comes up

image2-1-1le068g-576x1024

and click Undo. Once you click that, your signature will contain the proper formatting.