Overview of Canvas Peer Review for Group Work Evaluation

We have discussed peer review in Carmen/Canvas before both on this blog and in previous Flash Friday presentations.  If you would like to catch up on the most recent Flash Friday on Peer Review, click here.  This post will go over some details and instructions for using the Canvas Peer Review tool to allow your students to evaluate one another’s performance in group work.

Peer Review in Canvas was designed to allow students to review work submitted by peers, such as research papers and websites.  If you are interested in using Canvas for this type of peer review, check out this post on creating peer reviews and this post on viewing peer review comments.  Also note that there are other ways of getting peer review feedback, including Qualtrics surveys and having students use email.  Whatever method you decide on, the College of Nursing IT team can help you design and implement a peer review assignment.

Peer Reviews for Group Work

For a step-by-step guide to creating your own group work peer evaluation assignment, download this presentation: Using Canvas Peer Review for Group Peer Evaluations-1qlkjnb.

Hints and Tips

  • Peer reviews do not receive a grade—if you want to give a grade for how well a student peer reviewed another student, you have to create a separate (no submission) assignment in Canvas to allot grades.
    • Alternatively, the instructor can give a grade on the assignment being reviewed and call that the peer review grade—this does get confusing and will not work if you have two rubrics involved.
    • Grading completion of peer review vs. grading students’ work vs. grading students’ feedback can be confusing.  Feel free to consult IT about this!
  • Who can see the comments in a peer review?  Instructors and the student being reviewed can see all comments on their submission or performance. Peer reviewers can only see their own comments–the comments they made and the comments addressed directly to them.  Students cannot see comments made by students to other students. The “test student” in Canvas cannot complete peer reviews.
  • Saved by the Bell – Clicking the “bell” symbol next to a student’s name who has not yet completed a peer review sends an email to the student to complete the review along with a link to the review they need to complete. This is handy when students state they cannot find their peer review assignment. Peer reviews go directly to the person getting the review—instructors cannot read over or approve them beforehand
  • When “Saved by the Bell” doesn’t work—instructors can delete the assigned peer review and re-assign it. This will erase all record of the first peer review attempt.
  • When assigning peer reviews for evaluation of group members, there is no shortcut to have the group members evaluate each other— the instructor must manually add each student (this can be tedious).
  • Dates get wonky in peer reviews for performance rather than a submission (“due date” is really “start date”)— you will need to explain this to students so they understand that this will look like an overdue assignment. Also, changing the due dates or available dates after publishing the assignment may result in student difficulty in viewing and completing peer reviews.
  • There is no “self-review” option.  If you want your students reviewing their own work, you’ll have to do this separately or on a different platform.
    • Workaround: you could have students leave a comment on their own peer review submission page.
  • Students may be able to go back in and change rubric scores after the review period, but they cannot edit or delete comments.

If you would like help setting up a peer-to-peer evaluation of group work, please contact us at CON-IT@osu.edu

When in Doubt, Don’t Click! Avoid Email Phishing Attempts

You have probably been told in the past not to click links in emails from unknown sources, and you probably follow that rule to the letter.  Phishing attempts become more legitimate-looking every day.

When thinking about whether to click on a link, please remember these basic rules (explained in more detail in this Wired.com article):

  1. Always think twice before clicking a link in an email
  2. Consider the source (first, look at who sent the email, then hover over the link– but don’t click!– and see if the link leads to a website you recognize and trust)
  3. Report phishing attempts, or suspected attempts, to report-phish@osu.edu

Some recent items we have noticed in phishing attempts include the following:

  • Email addresses that look like OSU emails, but if you search the names at osu.edu/findpeople, no results will come up
  • Use of OSU logos, legitimate-looking email layouts, and legitimate email addresses/websites listed under the signature or in the header
  • Simple-looking emails that ask you to click a link to “validate” or “secure” your email, storage, or other information
  • Emails that look like they are written by a friend/colleague but with unknown email addresses or referring to a conversation you never had

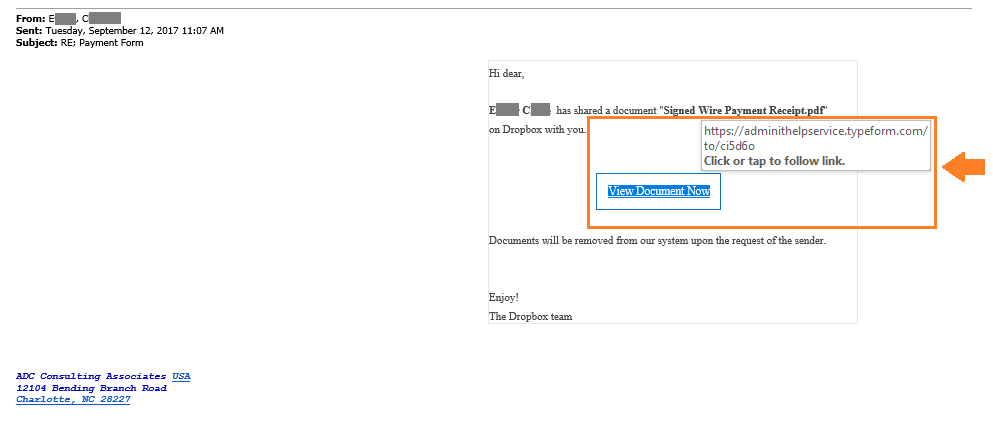
Below are some recent examples that faculty and staff at the College of Nursing have reported.  Click on the image to view it full-size.

Examples of Recent Phishing Emails

This email has been flagged by the administrator as a possible phishing attempt (red flag #1), and if you hover over the link without clicking, you’ll see it does not go to a osu.edu webpage. Also please note the convincing-looking signature line, and the very suspicious line above this assuring you that it is legitimate.

See that the link above does not lead to my.osu.edu, and note the grammatical errors in the email.

The above email contains a link that does not lead to a osu.edu page.  It also contains questionable grammar such as “All staffs and students” and “portal to access the below”.

The link in the above email does not seem legitimate, and the “From” line of the email seems odd too, as it does not have an email address but only a name. I looked up the sender below for more information.

It turns out, the “sender” is a real OSU employee, but if you notice in the original email, the “From” box has a comma between last name and first and in the center of the email the comma is missing. If you do not know the sender or you are not expecting an email from them, assume this is a phishing attempt.

Sometimes it helps to do a Google Search or a “Find People” search on the sender of an email. Above is what I found out about “Wilhem Veen,” a name which appeared numerous times above.


Thanks for reading! Please remember to always consider the source and hover over links before clicking them. When in doubt, don’t click! Forward any suspicious emails to report-phish@osu.edu


Save

Save

Save

Save

Save

Save

Save

Save

Save

Embedding VoiceThread Videos into a Page/Post

This post will walk you through the steps to embed a video on a webpage.  The images here show how to embed a VoiceThread video into a u.osu.edu webpage, but the same basic instructions can be used to embed videos into your Carmen classroom pages as well.

After you have created a video in VoiceThread, click on the “menu” button to the top left and click “Share”

In the “Share” menu, click on “Embed”

Click to copy the embed code, and be sure to check the boxes if you want others to be able to view and/or comment on your video:

Now, after logging into u.osu.edu and going to the site you want to embed your video into, click on the title of the page or post where you want the video to go (or, create a new page or post)

In the “edit” screen, click “Add Media”

When the menu opens, click on “Insert Embed Code”

Now press “ctrl + v” or right click and click “paste” to paste the embed code into the box, and click “Insert Into Post”:

Now your video is embedded in the page. Be sure to “Update” or “Publish” your page to save your changes!


If you want to embed a video in a Carmen page, click on the “HTML editor” button and then paste the embed code into the page:

Cybersecurity Part 3: Educate Yourself About Web Addresses

In our first two posts about Cybersecurity, we defined different threats and discussed what the College of Nursing IT department does, as well as what you can do, to protect our data at the College of Nursing.  This post will go over some additional information about reading website addresses that will help you to be safer when browsing the web.

Below in black/blue/red/green you can see the full web address of the RN to BSN program introduction on the CON website.  You will notice four distinct parts of the address. Below, we will go over those parts of the web address.

Http(s): The letters “http” ahead of a website signify the Hypertext Transfer Protocol, and the “S” added here indicates that the connection is encrypted (or, coded to keep unauthorized viewers from seeing the information being transferred).

Domain: The domain name is the name of the website that you are accessing. In the case above, nursing.osu.edu is the domain name of the College of Nursing.  All of the subsequent pages that you can reach from the College of Nursing’s website are “nested” into this domain.  In this particular case, nursing.osu.edu is connected to the overall osu.edu domain which you can reach by clicking the link at the very top of the page.  In much the same way that books have chapters with sub sections, the larger “osu.edu” domain connects to the smaller “nursing.osu.edu” domain which has many pages attached to it.

Extension: The extension tells us what kind of website we are accessing.  In this case, the “.edu” extension indicates that this is a higher educational institution.  Other common domain names are listed on this Wikipedia page.  It’s good to be familiar with the most used extensions, because in recent years, fake websites have popped up that may lead you to think they are legitimate. For example, the real website for the ABC News television station is abcnews.go.com.  Recently, a fake site popped up with the web address abcnews.go.co* (notice this site ends with “.co” instead of the usual “.com”) that mimicked the real website quite convincingly.

Path: The series of words with forward slashes that follow the website extension tell your computer where to look in the domain of the website– this is basically a nested series of pages. So, in the example above, the RN to BSN program introduction connects to the undergraduate program overview page which can be found on the academic program page.

Now that you know the basic elements of a web address, try paying attention to the addresses that common links take you to.  Whenever you see a domain name that seems off (like “gooogle.com” for instance), an extension you don’t recognize such as “.co”, or you don’t trust the provider of the link, DON’T CLICK!  You can find some helpful hints from these pages as well:

How to Spot a Fake Website

Reading Web Addresses


*For those of you who are now terrified of clicking on a bad link, we’re glad you’re paying attention! The link above to the fake ABC website will just take you to a Wikipedia page describing the site, so feel free to check it out this time.


Quick Guide: Leaving Classrooms After Class

For the purposes of saving energy and money, we ask that all instructors turn off classroom projectors when you are finished using them.  Of course, if you know the next instructor is outside waiting, feel free to keep the projector on. If you know the next class won’t be using the projector for 20-30 minutes or later, please turn off the projector. 


Below are instructions for turning off the classroom systems. Please note that pushing the “mute display” button on the control screen will cause the projector to project a black image and will still use up some of the bulb’s life. (For most of our projectors, the bulbs run around $300 each. In the case of room 172, the bulb is around $800.)  Thus, when you leave the classroom for more than a few minutes, it’s much better for the system to turn the projector all the way off rather than muting it.


1) Wave your hand by the touch screen on the lectern. The little dot my finger is pointing at the motion sensor that will turn on the touch screen for you.

2) Press the System Off button.


3) When asked if you are sure you want to turn the system off, press on the Power Down button.


Here and there the Power Down button may not work exactly as intended and the projector will stay on. If that’s the case, please let us know at con-it@osu.edu and we can take a look.


If you are coming into a classroom and wanting to turn the projector on, first make sure that the computer is on by looking under the monitor and checking for the lime green light:

If the computer is not on, you can turn it on by pressing the green button once. The machine may take a few minutes to start up.  Again, wave your hand in front of the sensor and the touch screen should turn on. You can use the touch screen to turn on the projector as well as changing the input (from the classroom computer to a laptop, for example).

Please let us know if you have any questions about using the classroom computers, turning on/off the projectors, etc.  Also, please remember to lock the classroom doors when you leave.

Adding Extra Credit in Canvas

Several instructors have reached out to learn about how to add extra credit points in Canvas classrooms.  If you are a learn-at-your-own-pace type, most of the information of this post comes from this article on the Canvas Instructor Guide.

The method for adding extra points to a class depends on whether your Gradebook uses Assignment Groups or not.  Assignment groups allow you to put your assignments/quizzes/tests, etc. in groups and then give a certain amount of weight to each group. You can read more about them at the link provided.

Adding Extra Credit on an Assignment/Quiz

To add extra credit to an assignment, you can manually “bump” grades up in the grade book.  For example, in my sandbox I have decided to curve the grades on my Ocean Life Quiz by adding 2 points for each student who took the quiz:

To do this, I can simply click into each student’s grade cell and re-enter a score that is 2 points higher:

Note: Once you have manually input a new grade, this grade will stay, so be sure this is what you want to do. If you want to add an entire extra credit assignment, see the section below: “Adding Extra Credit to an Entire Course”.

Quizzes offer another feature called “fudge points” in SpeedGrader.  To add fudge points, go to the bottom of the quiz result in SpeedGrader and enter positive or negative points to adjust the grade. This adjusts an individual’s grade.

Adding Extra Credit to an Entire Course

If your course uses weighted grades, then you can add an assignment category that’s worth the extra percentage you want (for example, 1%). Make sure that when you add the non-extra-credit assignment group weights, they add up to 100%.  Inside your extra credit group, you can put an actual graded assignment (worth 10 points, for example). The final grade for the course will be out of 101%. If someone doesn’t do the extra credit assignment, their grade won’t be harmed since their grade is still out of 100%.

If your course is using points-based grades, then you can create a grade item worth 0 points. After figuring out how many bonus points to give (such as 10 points), you can then give students this as the grade for this grade item (for example, 10/0). Again, if someone doesn’t do this assignment, it won’t hurt their overall grade.

If you have specific questions about extra credit that were not answered in this post, feel free to contact us and let us know how we can help you!

Student Printing When Lab is Reserved

At certain times of the year, the computer lab in room 220 Newton Hall is reserved for proctored exams or other purposes.  When the lab is reserved, students may still use printing services according to the below instructions.

When an instructor or staff member schedules the lab, they will be asked to also schedule a Newton Hall classroom to use as an alternate lab. The room number of the alternate lab space will be posted on the door of the 220 computer lab.  If the alternate computer lab is not listed, you can find out where it is by asking one of the IT staff members in rooms 260 or 208.  In the alternate space, students can then check out a laptop from the laptop cart and use it as they would in the lab, and send the print jobs to the new printer on top of the laptop cart.

Students, faculty and staff can see the lab schedule by following this link, or looking at the “Computer Lab Closures” list at the bottom of the Student Web homepage:

To Students: If you need technical support or have any concerns about IT services at the College of Nursing, feel free to let us know at con-s-help@osu.edu

Media and Your Classroom: Know Your Resources

Many instructors in the College of Nursing like to make multimedia resources available to students, whether it is through openly available online resources or password-restricted resources on the CON Nucleus server.  Some instructors may have noticed, however, that students have difficulty accessing certain resources, especially as more and more students choose to access the internet through tablets and phones.  We reached out to the Health Services Library (HSL) and the Office of Distance Education and eLearning (ODEE) to learn about what other resources may be available for instructors to use in their classes.
Nursing Education sure has changed through the years!

  • Procedures Consult: The HSL has access to procedure videos with associated text and images through ClinicalKey. You can browse the available Procedures Consult videos at the link above.
  • Films on Demand is run by the HSL and has a selection of over 3,000 videos on medicine and health topics.
  •  Adding New Purchases to HSL: When the Health Services library buys resources, physical copies will be available for checkout from the library and streaming video would be licensed for all of OSU.  If you have suggestions for resources that could be purchased and made available, you can contact Joe Payne or Kerry Dhakal.
  • ODEE Secured Media Library:  ODEE also offers a Secured Media Library where students can access and watch videos online.  To find out how to add a new title to the Secured Media Library, see the article on adding to the Secured Media Library here. To give students access to view an existing title in the Secured Media Library, an instructor must create a playlist and assign a specific video to a class for the students to have access to view it.  It’s a quick and easy procedure, but students will not have access to view videos on the Secured Media Library unless an instructor in their course (1) creates a playlist,  (2) adds a video to it, and (3) assigns a course and all of its sections to view the video.
  •  Issues with Nucleus:  If you or your students have problems watching videos on the Nucleus server, inquiries can be sent to CON-InformationTechnology@osu.edu.

Images found at the following web pages:


Cybersecurity Part 2: External Threats

In our previous cybersecurity post, we discussed internal threats and what you can do to avoid them.  This post will focus on external threats, and how the College of Nursing IT department is working to keep our network safe.

An external threat is an attack or attempted attack by an outsider trying to gain access to a network.  There are several levels of external threats, including:

  • Basic: These usually take the form of scripts that automatically search the internet for vulnerabilities. They are not usually aimed at specific people or networks.
  • Advanced: These are attackers actively trying to access a network from the outside.
  • Advanced Persistent: These are often hackers who are state-sponsored or may even come from inside foreign governments.  They have the time, money, resources, and motivation to get into a network and they will continue trying new attacks.  Attacks of this nature are often the ones you hear about on the evening news.

We asked Erik Yarberry, network administrator for the College of Nursing, what we are doing to mitigate threats from both external and internal attacks.  Here are a few things our network is equipped with:

  • A Firewall, or a system that uses certain rules to control traffic into and out of the network.  The CON has two firewalls– one that protects all networks inside the CON (including Nursing_WiFi) from the outside, and then another one that keeps Nursing_WiFi separate from the wired network.
  • A Virtual Private Network (VPN) which encrypts internet connections to network resources that are not available to the public
  • Splunk, a program which exports all of the network’s system logs and allows network administrators to search those logs using sophisticated techniques
  • Data Loss Prevention (DLP) Software which protects all of the network’s data from exposure or being compromised.
  • Various alerts about possible “ransomware” attacks, compromised accounts, too many login attempts, etc

With all of these programs and defense mechanisms in place, our network runs every day while fending off potential attacks from the outside.  In our next and final entry for this series, we will discuss more ways that you can protect your information and keep the CON network secure.


View Example Courses in Carmen Canvas

Did you know that Canvas has sample courses for you to view and download as templates?

ODEE has developed two courses you can peruse and download as templates if you wish.  One course is for resource-heavy supplements to face-to-face courses, and the other is a fully online course. Take a look here.

The Canvas community (operated by Instructure) also has sample course templates that you can look through and download if you are interested. Find those here.

It’s great to see what others are doing.  Comment below or email us at CON-InformationTechnology@osu.edu if you have questions or want to share your experience with course templates.