Southern Ohio Update

Southern Ohio VegNet Blog Update

May brought southern Ohio produce growers challenges but as we wrap up May field planting and crop conditions are looking good.

*Asparagus harvest has been great this month though some early harvests showed some spear damage due to cold and freeze events the first week of May. Overall asparagus crop quality, yield, prices and demand have been excellent with yields decreasing as some growers enter their 8th week of harvest.

Asparagus freeze damage

*As some growers enter week 7 of strawberry harvest this year’s plasticulture strawberry harvest is one of, if not the best for southern Ohio growers being reported since this production system was introduced into Ohio in the mid/late 1990’s, despite some late season frost damage the week of May 10.  Some growers reported last week nearing 1.5 to 1.75 quart per plant yields with high demands and prices at both the retail and wholesale markets.  At the OSU South Centers greenhouse strawberry trials  Rhizoctonia, or black root rot,  was diagnosed and is suspected that one of the soilless media being used may have introduced the pathogen.

Strawberry Harvest Aid (Jones Strawberry Farm)

Rhizoctonia, or black root rot on greenhouse Strawberry

Soft rot is being reported

Plasticulture strawberry harvest began the last 10 days of April throughout southern Ohio

* The annual Strawberry Field Night was held at the OSU South Centers at Piketon on Thursday May 25th. Despite rain storms rolling through all day the sky cleared for the wagon tour of the field trials which were beyond peak harvest due to the earlier than normal harvest season although it was a good opportunity to view the Day Neutral variety production systems and the double crop potential these plant types have for Ohio.

Despite a rainy evening growers from all over Ohio participated in the OSU South Centers at Piketon Strawberry Field Night

*The hops crop is looking good throughout Ohio although some growers north of I-70 reported some freeze damage the week of May 10.  More and more acreage continues to be planted to hops this spring to capture the high market demand by Ohio’s 350+ brewers.

Stringing OSU Piketon Hop yard

*Interested in learning more about hops production? Plan to attend our hops field day on Thursday, June 15, 2017 at the location of the OSU South Centers in Piketon, Ohio.  The field day will begin at 10 a.m. The field day will include viewing and discussion in the hop yard, a viewing of the new hops harvester and new galvanized trellis system, and many educational topics for the beginner or advanced grower.  Registration is required.  You can register with Charissa Gardner at gardner.1148@osu.edu or at 740.289.2071  ext. 132.  Deadline to register is June 13th. Cost to register is $25.00 per person, or $40.00 per family (up to three people).  We will be having a working lunch with one-on-one conversations between the growers and the educators/researchers.

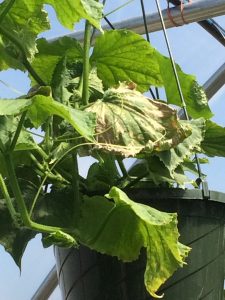
* High tunnel tomatoes and cucumber crops are looking good with some growers experiencing nutritional deficiencies during the low light levels earlier in May. Cucumber harvest in high tunnels is ramping up with good quality and demand being reported. A light high tunnel tomato harvest has begun with good fruit quality being reported.

High tunnel cucumber nutritional deficiency

*Field vegetables are looking good though some areas have experienced some minor flooded areas with the recent heavy rains. Plastic planted sweet corn is beginning to show tassel in the whorl. Some sweet corn planted bare ground the last week of April/early May had to be replanted due to heavy rains and soil crusting soon after planting. No real problems with disease or insect outbreaks however crop damage from herbicide drift, especially growth regulator type of herbicide damage from grain farms, ditch maintenance and  homeowner lawn applications continues to cost produce farmers lost profits and incomes due to severe crop damage.  Snap pea and lettuce harvest is in full swing with good quality and demand being reported.

Leaf lettuce harvest began in April and continues

Lettuce harvest continues with good quality and demand reported

Early sweet corn crops look good this

That’s a Great Idea! Can I/We Test It?

Every season is an experiment of sorts for growers as they test the idea that the farm can come out on top despite natural, market, human (e.g., labor), and other challenges. Dealing with or reflecting on those challenges leads to questions before, during, and after the season. Questions often relate to inputs, practices, or other components of production and how they influence efficiency, profit, and/or the long-term health of the farm. Conducting an experiment is one way to address a question. Like farming, successful research relies on the best methods.

Now is when many on-farm studies are started and it’s never too soon to double-check objectives and methods. Many experienced investigators, including growers, consultants/advisors, and input suppliers are comfortable with their approach. However, very useful (and, often, free) resources are available to others with questions about on-farm research. As you consider approaches and resources you may use, keep in mind that all research involves comparisons but not all comparisons are done scientifically. Only accepted research methods provide the benefits of scientific comparisons. Non-scientific comparisons can be useful but in different, perhaps more limited ways.

Guides available at the links below explain key principles, and research practices proven to be successful. Many more resources, especially experienced farmer-investigators, are available. Examples in the guides below may not fit your operation perfectly, but messages in them are likely to fit.

Currently, we partner with vegetable growers in Ohio and seven other states in documenting effects of microbe-containing crop biostimulants on crops and farms. We are also part of a national network of investigators that work with growers and others to describe the performance of grafted plants under a wide range of conditions. And, we work with growers and university colleagues to develop a better, more common understanding of the Base Cation Saturation Ratio approach to soil management and its effects on crops, weeds, and farms. Contact me or check webpages (http://u.osu.edu/vegprolab/research-areas/vegebiostimsferts/, http://www.vegetablegrafting.org/, and http://organicfarmingresearchnetwork.org.ohio-state.edu/network_activities/soil_balancing/) for updates on those efforts. In each of them, from planning through sharing lessons learned, we try to follow procedures outlined in the guides below and other resources.

http://www.sare.org/Learning-Center/Bulletins/How-to-Conduct-Research-on-Your-Farm-or-Ranch

http://ofrf.org/sites/ofrf.org/files/docs/pdf/on-farm_research_guide_rvsd.pdf

http://cropwatch.unl.edu/2016/10-steps-farm-research-success

Spotted Wing Drosophila…coming soon to a field near you?


Jim Jasinski (jasinski.4@osu.edu), IPM Program; Celeste Welty (welty.1@osu.edu), Dept. of Entomology

Spotted wing Drosophila (SWD) is a serious pest of raspberries, blackberries, blueberries, strawberries, grapes, and peaches. For the past five years, we have established a statewide monitoring network in 15-20 Ohio counties to look for this pest on grower’s farms in an effort to help them manage it better. With few exceptions, in every county where we have placed traps, we have found SWD. This network is typically established in the first week of June and runs through September, and consists of weekly trap checks and reporting.

Over the years we have gained some knowledge about the overwintering habits of this pest, which appear to be near wooded areas. This year we set out baited Scentry traps early at a few small fruit fields around the state to see if SWD are present in those locations. In Franklin Country, one trap was in place in a small raspberry patch for the entire winter, and four additional traps were placed near the boundary between a wooded fencerow and the raspberries on May 11th. Likewise, traps were placed in the boundary between the woods and berry fields in Greene and Clinton Counties on May 10th. In Wayne County, traps were also placed near a strawberry field in mid-May. We have detected SWD adults at all four of these locations within the past week. In Franklin County, the traps in the berry patch had no SWD, but one trap in the distant treeline did have one male SWD on May 25th. Traps at Greene, Clinton, and Wayne locations found SWD adults on May 23rd. These catches are 3-4 weeks earlier than we have detected them in past seasons. The earlier finds are interesting but not surprising, because we were looking for these pests earlier in the season at a location where they are likely to overwinter, in combination with a mild winter in which high survival was likely.

SWD adult imaged through stereo scope. This is a male, note spots on wings.

SWD Scentry trap with Scentry lure (inside) and 25% apple cider vinegar drowning solution set in a raspberry field.

What does finding SWD this early in the season mean for growers? We are still learning about this pest and how to interpret the nuances of early season detection and its effect on early season management. Strictly speaking, the threshold for this pest is one adult fly detected in the fruit planting, so if there is any ripe or ripening fruit on a farm, we recommend starting an insecticide treatment on a seven-day schedule through harvest. If growers cannot treat due to picking or harvesting considerations, we strongly recommend they conduct salt water tests on berries collected from several locations around their susceptible fields to verify no SWD larvae are found in the berries. If larvae are found, treatment should begin immediately through harvest.

All growers of these susceptible crops are encouraged to use a trap to detect the adult flies, and test ripening fruit for presence of larvae using a simple salt water test.


A factsheet on how to conduct a saltwater test can be found here: http://u.osu.edu/pestmanagement/files/2017/04/SWD-salttesthandout-updated-pnd335.pdf.

Insecticide options available to growers along with pre -harvest intervals, are shown on page 2 of a factsheet: https://u.osu.edu/pestmanagement/files/2017/04/SWD_Ohio_handoutV15-1fd4zp6.pdf

Did You Calibrate Your Sprayer? Here is An Easy Way to Do it

By

Dr. Erdal Ozkan

Pesticide Application Technology Specialist

Extension Agricultural Engineer

The Ohio State University

ozkan.2@osu.edu

Have you calibrated your sprayer this year before the spraying season started? If yes, great! If not, there is still time to do that. You may ask: Why do I need to calibrate my sprayer? The answer is simple: If you don’t calibrate your sprayer, it’s as if you were driving your car with a speedometer that doesn’t work. You assume you know what speed you are traveling at from habit, but you are not really sure. The problem with a sprayer is that nozzles may be plugged or worn out, and application rates change with different field conditions which affect traveling speeds. Many growers don’t take these factors into account.

Applying pesticides at the proper rate is essential to achieving satisfactory weed, disease, and insect control. The directions on the container label tell what application rates give the best results. However, proper application rates will be attained only if sprayers work well and are calibrated correctly.

Calibrating a boom sprayer is not as difficult as it sounds. It usually doesn’t take more than 30 minutes, and only three things are needed: a watch (or smart phone) showing seconds, a measuring tape and a jar those measures in ounces. The ultimate goal is to calculate the actual rate of application in gallons per acre to check for accuracy, or make adjustments as needed

Here is an easy method to calibrate a boom sprayer:

There are several ways to determine the actual application rate, but the one outlined below is perhaps the easiest, and do not require difficult calculations:

  1. Fill the sprayer tank with water.
  2. Run the sprayer, inspect it for leaks, and make sure all vital parts function properly.
  3. Measure the distance in inches between the nozzles. Then measure an appropriate distance in the field based on this nozzle spacing. A table available at http://ohioline.osu.edu/factsheet/fabe-520 shows various nozzle and row spacings and the distance you must travel. For example, the travel distance for a 15-inch nozzle or row spacing is 272 feet, for 20-inch nozzle or row spacing is 204 feet; for a 30-inch nozzle or row spacing, the distance is 136 feet.
  4. Drive through the measured distance in the field at your normal spraying speed, and record the travel time in seconds. Repeat this procedure and average the two measurements.
  5. With the sprayer parked, run the sprayer at the same pressure level and catch the output from each nozzle in a measuring jar for the travel time required in step 4.
  6. Calculate the average nozzle output by adding the individual outputs and then dividing by the number of nozzles tested. If an individual sample collected is more than 10 percent lower than the flow rate of the same nozzle when new (check the nozzle catalogs or web site) check for clogs and clean the tip. If this does not help, then you should replace the nozzle. If an individual sample collected is more than 10 percent higher than the flow rate of the same nozzle when new, this indicates the nozzle orifice is worn out. In this case, replacement of the nozzle is needed.
  7. Repeat steps 5 and 6 until the variation in discharge rate for all nozzles is within 10 percent of the nozzles when they were new.
  8. The final average output in ounces you get is equal to the application rate in gallons per acre.
  9. Make adjustments if necessary. Compare the actual application rate determined above resulting from the calibration process with the intended application rate.  If the difference between the calculated actual rate and the intended rate is more than 5% of the desired rate, you need to make adjustments to bring the error below 5%. You can start by changing the pressure. Lowering the spray pressure will reduce the spray delivered; higher pressure means more spray delivered.  Do not exceed the pressure rate recommended for the nozzles when adjusting the pressure rate. Remember that changes in pressure will result in changes in droplet size. So, don’t go to extreme pressure settings just to reach the desired output from nozzles. You can also correct the application error by changing the travel speed.  Slower speeds mean more spray delivered, faster speeds mean less spray delivered.  If changes in either pressure or travel speed, or both do not bring the application rate to the desired rate, then you may have to select a new set of nozzles with smaller or larger orifices. Learn how to make these adjustments and additional information about calibration at http://ohioline.osu.edu/factsheet/fabe-520
  10. Recalibrate the sprayer often. Calibrating a sprayer once a year is not enough.  It should be calibrated several times throughout the season to compensate for wear in pumps, nozzles, and metering system; and when spraying in a different farm than the one where the previous calibration was made. Changes in the soil surface characteristics and topography cause changes in travel speed which will directly affect the application rate.

In summary, properly maintained spraying equipment is critical to pest control and user safety.  A properly calibrated sprayer saves you thousands of dollars in chemical cost; improves yield; reduces the chance of damage to your crop as a result of over application and potential risk of contamination of the environment with pesticides. Safety is extremely important.  Use water instead of chemical mixtures when calibrating your sprayer, and wear gloves and protective clothing.


Early Season Cucurbit Pests

Growers are ramping up to plant pumpkin, squash, melon and cucumbers through May and into June. Here are some key pests to keep in mind with seedlings and small plants this time of year.

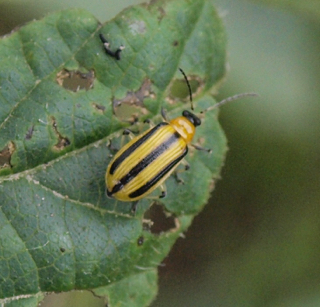
Striped cucumber beetle – This small black and yellow striped beetle is a major pest of all cucurbits early season. In addition to the heavy feeding damage that can be inflicted upon seedlings, this feeding injury can also transmit bacterial wilt to the plant which will stunt or kill the plant. Growers can control this pest in several ways such as buying FarMore FI400 treated seed, which contains several fungicides paired with thiamethoxam insecticide that provides seedling protection for 2-3 weeks after emergence. Using an in-furrow treatment of a systemic insecticide at planting will provide a longer window of control, between 4-6 weeks. Another management option is to scout for beetles on emerged seedlings, and based on seedling stage, use a foliar spray when the threshold is exceeded according to the guide below:

0.5 beetles per plant for cotyledon through 1st leaf

1 beetle per plant for 2nd and 3rd leaf

2 beetles per plant for anything after the 4th leaf stage

Striped cucumber beetle adult.

Regardless of method of treatment, be sure to scout for these beetles and their damage on the underside of the cotyledons and early leaves every few days as severe damage can occur rapidly in a short period of time. Pollinators can also be affected by systemic insecticides present in pollen and nectar, so seed treatments to some degree and in-furrow products should be considered before use. Foliar applications of insecticides should be made in the evening to minimize pollinator impact.

Squash Vine Borer – The damaging stage of this pest is actually a caterpillar from moth that mimics a wasp which becomes active in early June. The best management practice for this pest is to put up a pheromone trap next to the field and monitor the number of moths caught. A week after adult moths are caught in the trap, usually around mid to late June, apply an insecticide targeted at the base of the plants where the eggs are laid 7-10 days apart for up to four weeks. If the caterpillar bores into the stem of the plant, treatment will not be effective. Systemic products such as imidacloprid, used either as a seed treatment or in-furrow application at planting, will not control this pest.

Squash vine borer moth.


Squash vine borer larva.

Squash Bugs – These true bugs overwinter as adults in nearby fields and can attack seedling and smaller plants with sucking mouth parts that can collapse leaves and stems. These pests can also vector yellow vine decline, a bacterial pathogen that can cause stunting and death in seedling plants. Plants infected with YVD will turn yellow about a month after being infected, and there is no remedy. YVD can look very similar to injury caused by tunneling squash vine borer larvae, so if a plant is suspected of YVD, check the base for evidence of SVB larva, usually spotted by frass surrounding entry hole. If more than one egg mass per plant is found, treatment is warranted once the nymphs hatch. If nymphs mature to adults, they are harder to control.


Squash bug eggs

Squash bug adult.

Yellow vine decline infected plant.


A list of recommended insecticides for all these pests can be found in the 2017 Midwest Vegetable Production Guide (https://btny.purdue.edu/Pubs/ID/ID-56/).

Graft, Roll, Crimp, Crush, and Strip: A Few of the Steps included in an Ongoing Study

Every production technology or technique has pros and cons. Occasionally, using two techniques or technologies simultaneously may offset their individual disadvantages and make it easier to use both. This is one idea behind our evaluating the combined use of reduced tillage and grafted vegetable plants. While both have clear benefits, their counterparts (conventional tillage featuring highly worked, often pulverized soil and standard single-variety transplants) are standard. Cost, timing, familiarity, and other obstacles have limited the use of reduced tillage and grafted plants.

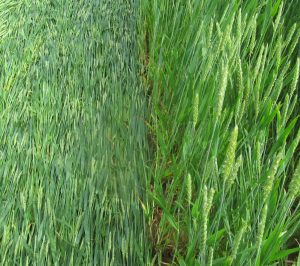
In 2016, we completed an experiment in Wooster comparing the performance of grafted and standard tomato transplants in no-till and strip-till plots established in wheat seeded in Fall-2015. We reported three results in VegNet, at the OPGMA Growers Congress, and in a report to the OVSFRDP: 1) yields were higher in strip-till plots than in no-till ones, 2) grafted plants out-yielded ungrafted ones in both tillage systems, and 3) yield was greatest in strip-till plots containing grafted plants. We are repeating the experiment in 2017 to see if those trends hold under other conditions. Plants representing three rootstock-scion combinations were grafted three weeks ago and the ‘Hopewell’ wheat was rolled/crimped/crushed on May 17. Weather-permitting, on May 22, a PTO-driven rototiller will be used to create ten-inch wide strips of soil tilled to six inches deep in some areas and herbicide will be applied in a two-foot wide band centered on each strip. They and the no-till plots will be transplanted on May 23.

Rye, rye/vetch mixes, and other crops are better than wheat for no-till/reduced-till (including strip) vegetable production. We are using wheat partly because it may be one crop that growers can experiment with easily since it is abundant. We have used a PTO-driven rototiller (with outer tines removed) for a similar reason. True strip-till units are currently above our budget. Therefore, like growers, we experiment with equipment on hand. The goal has been to describe what happens when ‘alternative’ approaches are used and to improve our use of them. Input from growers continues to be very helpful in the process. Overall, given the documented benefits and challenges associated with using grafted plants and reduced-till approaches, using them together may be particularly useful. Look for updates on the study, stop by to visit, or contact Matt Kleinhenz (kleinhenz.1@osu.edu) or Zheng Wang (wang.2735@osu.edu) for more information. The pictures below show the roller/crimper at work and the condition of the wheat at and after the process. Paper clips on wheat stems show locations of damage due to rolling/crimping.


Managing Phytophthora Blight in Peppers

Phytophthora blight has become a very serious problem in peppers and cucurbits, particularly in areas with concentrated vegetable production.  The pathogen is a water mold that thrives under conditions of high moisture and high temperature. It produces motile spores (zoospores) that are attracted to plants, then form a structure that allows them to infect, and aggressively attack any type of plant tissue. Zoospores can be splashed onto leaves, stems and fruits during rain events and overhead irrigation. Phytophthora blight is often seen first in low spots or other poorly drained areas of production fields, but the disease also occurs on well-drained, even sandy soils if the environmental conditions are right.  An increase in intensive rainfall events that result in soil saturation and standing water in fields in the last decade or so is certainly a contributing factor to the uptick in problems with Phytophthora blight.

Effective management of Phytophthora blight in peppers requires an integrated approach:

Crop rotation.  Phytophthora produces structures called oospores that can survive for a number of years in the soil.  Plan to rotate out of peppers, cucurbits or green beans for 4-5 years if Phytophthora blight has been a problem.

Resistant varieties.  A few pepper varieties are resistant to the root rot phase of the disease.  In general, these varieties are susceptible to the crown rot phase, which affects foliage and fruits. Varieties with moderate to good resistance to Phytophthora blight are: Paladin, Aristotle, Declaration, Intruder, Vanguard (bell); Hechicero (jalapeño); and Sequioa (ancho).

Well-drained soil. Avoiding standing water is critical to limiting the movement of Phytophthora from plant to plant.

Avoid surface water for irrigation. We have found Phytophthora in irrigation ditches and ponds as early as late June in vegetable production-intensive areas in Ohio.  Using surface water for irrigation is risky, especially if Phytophthora is present in fields near surface water sources.

Plant on raised beds. Prepared properly, raised beds will help prevent standing water near pepper plants.  If possible beds should be domed, and there should be no depressions in the soil surrounding the plants.

Sanitation.  Phytophthora can be moved from an infested field to a clean one on soil clinging to boots, equipment, etc.  Power washing to remove soil is a good first step, followed by rinsing with a sanitizer.

Fungicides.  There are a number of fungicides labeled for use on peppers to manage Phytophthora blight  (see table below).  The newest product, Orondis, has very good efficacy against this disease.  It is available in the Midwest this year as a co-pack with either Revus (Orondis Ultra), Ridomil (Orondis Gold) or Bravo (Orondis Opti).  Pre-mixes will be available in 2018. There are many restrictions on the use of Orondis – including the number of applications (no more than 1/3 of total applications for Phytophthora blight) and when it can be applied (to the soil or to the foliage but not both).  Orondis Ultra and Orondis Gold can be applied in transplant water or through the drip, although Orondis does not move much in soil and emitters need to be right next to the plant.  If the pepper variety is susceptible to Phytophthora blight, it may be a good idea to apply Orondis Gold or Orondis Ultra at planting, and follow up later with a program containing at least two of the fungicides with activity against Phytophthora (see table).  Research conducted at the University of Illinois has shown that adding a copper-based fungicide to these foliar applications can improve their efficacy.  If the pepper variety is resistant to Phytophthora, any of the three Orondis products can be used in a foliar fungicide program that includes other effective fungicides.  The Bravo component of Orondis Opti will not help with Phytophthora blight, but will control anthracnose.  Orondis Gold is considerably more expensive than Orondis Ultra and Orondis Opti, and resistance in Phytophthora to the Ridomil component of Orondis Gold has been found in numerous locations.

Larger, Better, and More Stress-tolerant Crops with Microbial Biostimulants?

An increasing number of growers use an ever-larger number of microbe-containing biostimulants to jump-start crops and/or to increase their yield or quality. Also, some claim that using these products makes all that possible with lower inputs, including fertilizer. We (https://u.osu.edu/vegprolab/) are coordinating a  USDA NIFA-, SARE-, and industry-sponsored effort to help vegetable growers select, use, and evaluate the effectiveness of these biostimulants more reliably. One experiment underway at the OARDC in Wooster includes multiple commercial inoculants applied to leafy vegetables and carrot grown in high tunnels. A second set of experiments this summer will include inoculants applied to field-grown fresh market tomato and butternut squash. A third set of experiments will be completed on farms in Ohio and five other states. Use https://u.osu.edu/vegprolab/research-areas/vegebiostimsferts/ and later issues of VegNet to learn more about this work. Images below are from the carrot study seeded in late March in which root and shoot characteristics are being monitored. Plots will be harvested soon. For more information, please contact Matt Kleinhenz.1@osu.edu and Zheng Wang.2735@osu.edu.