By: Meghan Thoreau, OSU Extension Educator, Community Development & STEM, Pickaway County
This month, STEM Club had the pleasure of hosting guest OSU Extension Educator, Jessica Lowe, who led an engaging and hands-on exploration of jam making. Students discovered the fascinating science behind creating this sweet treat, delving into the roles of pectin, acid, and sugar in achieving the perfect gel-like texture.
The Science Behind Jam Making
During the session, students learned about the importance of:
Pectin: a natural occurring substance found in the cell walls of fruits that acts as a gelling and thickening agent.
Acid: helps to balance the sweetness and enhances the gel formation while creating an environment less favorable for microbial growth.
Sugar: plays a crucial role in preserving the jam and contributing to its texture.
Butter: reduces foam formation through fat molecules that disrupt foam bubbles and phospholipids molecules that act like surfactants that reduce surface tension.
Through experimentation and hands-on activities, students gained a deeper understanding of the chemical reactions and processes involved in jam making. This unit was designed to encourage curiosity and exploration in the kitchen, showcasing the intersection of science, technology, engineering, and math (STEM) in everyday life.
Key Takeaways
The importance of measuring ingredients accurately in jam making
How pH levels affect the gel formation process
The role of sugar in preserving the jam and its impact on texture
By: Meghan Thoreau, OSU Extension Educator, Community Development & STEM, Pickaway County
This month, we’re diving into the fascinating world of DNA and genetics! We’re exploring the structure and function of DNA, how genetic traits are passed down, and the incredible ways DNA science is used in our daily lives. From solving crimes to developing new medicines, understanding DNA has revolutionized many fields. We’re learning how DNA is extracted, analyzed, and applied in various areas, including medicine, agriculture, and forensics.
In our DNA Strawberry Extraction lab, we’ll get hands-on experience extracting DNA from strawberries using simple household items. This fun and interactive activity will help us understand the basics of DNA extraction and its significance in the scientific world.
DNA, or deoxyribonucleic acid, is the molecule that contains the genetic instructions for all living organisms. It’s often referred to as the “blueprint of life.” DNA is found in the cells of every living thing, from humans to strawberries. But have you ever wondered what DNA looks like or how it’s extracted from cells? In this activity, we’ll explore the fascinating world of DNA by extracting it from strawberries using simple household items. Get ready to uncover the genetic secrets of one of nature’s sweetest treats!
Strawberries are unique because they are octoploid, meaning they have eight copies of each chromosome. This abundance of DNA makes strawberries a great model for DNA extraction labs, as it’s easier to visualize the DNA strands. For comparison, human cells are diploid, with only two copies of each chromosome.
This activity combines hands-on experimentation with critical thinking and problem-solving, providing a comprehensive learning experience for students.
The science behind the DNA Strawberry Extraction Lab:
Breaking Down Cell Walls and Membranes:
Blending strawberries: The blender breaks down the cell walls of the strawberry tissue, releasing the cellular contents. This mechanical disruption helps to release the DNA from the cells.
Dish soap (detergent): The soap breaks down the cell membranes (lipid bilayer) and nuclear membranes, releasing the DNA and other cellular contents. The detergent helps to solubilize the lipids and disrupt the membrane structure.
Releasing DNA from Proteins:
Salt: The salt helps to release the DNA from proteins that are bound to it. The positively charged sodium ions (Na+) from the salt help to neutralize the negative charge on the DNA phosphate backbone, allowing the DNA to precipitate out of solution more easily.
Precipitating DNA:
Rubbing alcohol (ethanol): When the ethanol is added to the mixture, it creates a layer on top of the strawberry mixture. DNA is insoluble in ethanol, so it precipitates out of solution and forms a visible, stringy substance at the interface between the alcohol and the strawberry mixture. This is because the ethanol disrupts the hydrogen bonds between the DNA and water, causing the DNA to come out of solution.
Why Strawberries?
Octoploidy: Strawberries are octoploid, meaning they have eight sets of chromosomes (one set from each parent, duplicated). This means they have a large amount of DNA, making it easier to extract and visualize.
Easy to break down: Strawberries are soft and easy to blend, making it simple to break down the cell walls and release the DNA.
DNA Structure and Properties:
Double-stranded helix: DNA is a double-stranded molecule with sugar and phosphate molecules making up the backbone, and nitrogenous bases projecting inward from the backbone and pairing with each other in a complementary manner.
Chargaff’s rules: The base pairing rules (A-T and G-C) help to explain the structure and properties of DNA.
Negative charge: DNA has a negative charge due to the phosphate groups in the backbone, which is important for its interactions with other molecules.
This lab takes advantage of the properties of DNA and the cellular structure of strawberries to make DNA extraction and visualization possible. By understanding the science behind the lab, students can gain a deeper appreciation for the molecular biology of DNA.
Learning about DNA extraction has numerous real-world applications across various fields
Forensic Science:
Crime scene investigation: DNA extraction is crucial in forensic science for analyzing DNA evidence, identifying suspects, and solving crimes.
DNA profiling: DNA extraction is used to create DNA profiles, which can be used to identify individuals, resolve paternity disputes, and identify human remains.
Genetic Engineering and Biotechnology:
Genetically modified organisms (GMOs): DNA extraction is used to introduce desirable traits into organisms, such as pest resistance or improved nutritional content.
Gene therapy: DNA extraction is used to develop gene therapies that can treat genetic disorders by modifying or replacing faulty genes.
Medical Research and Diagnostics:
Genetic testing: DNA extraction is used to diagnose genetic disorders, identify genetic mutations, and predict disease susceptibility.
Cancer research: DNA extraction is used to study cancer genetics, identify biomarkers, and develop targeted therapies.
Agriculture and Food Science:
Crop improvement: DNA extraction is used to develop crops with desirable traits, such as drought resistance or improved yield.
Food safety testing: DNA extraction is used to detect and identify pathogens in food, ensuring food safety and quality.
Conservation Biology:
Species identification: DNA extraction is used to identify species, study population genetics, and monitor biodiversity.
Endangered species conservation: DNA extraction is used to study the genetics of endangered species and develop conservation strategies.
Personalized Medicine:
Genomic medicine: DNA extraction is used to develop personalized treatment plans based on an individual’s genetic profile.
Pharmacogenomics: DNA extraction is used to predict an individual’s response to certain medications based on their genetic profile.
DNA Fingerprinting:
Food authentication: DNA extraction is used to verify the authenticity of food products and detect adulteration.
Product tracing: DNA extraction is used to track the origin and movement of products, ensuring supply chain integrity.
These are just a few examples of the many real-world applications of DNA extraction. The knowledge and skills gained from learning about DNA extraction can be applied to various fields and industries, leading to innovative solutions and discoveries.
By: Meghan Thoreau, OSU Extension Educator, Community Development & STEM, Pickaway County
Candy DNA Model
Our STEM Club recently embarked on a sweet adventure into the fascinating world of DNA structure and genetics! In the “Make A Candy DNA Model” activity, 4th and 5th-graders got hands-on with science, using colorful candies to represent the four nitrogen bases – Adenine, Thymine, Cytosine, and Guanine paired together in a twisting latter we call a double helix. Nitrogenous bases, also known as nucleobases, are the building blocks of DNA. They are a type of organic molecule that contains nitrogen and plays a crucial role in storing and transmitting genetic information.
The information in the nitrogen bases are then transcribed into RNA (Ribonucleic Acid), which is another type of molecule that readies our genetic code to be packaged into a set of instructions called proteins. Proteins are the workhorses of the cell, and their functions are essential for maintaining life. The genetic code in DNA and RNA provides the blueprint for making these important proteins, which in turn determine the traits, characteristics, and functions of an organism in working order or in our case keep our human body healthy and happy.
Proteins are the instructions to building and running our human body. Think of it like the instruction book that comes with a Lego build kit. The diagram above shows a general breakdown of critical roles proteins play in providing instructions to our body. Many complex systems make up the human body and proteins ensure each systems runs and responses as they were designed.
Immune system: Proteins like antibodies, cytokines, and complement proteins help recognize and respond to pathogens.
Muscular system: Proteins like actin, myosin, and troponin work together to enable muscle contraction and relaxation.
Structural proteins (bone system): Proteins like collagen, osteocalcin, and osteonectin provide structure and strength to bones, skin, and connective tissue.
Neural signaling: Proteins like neurotransmitters, receptors, and ion channels help transmit and regulate signals in the nervous system.
Blood: Proteins like hemoglobin, clotting factors, and lipoproteins play critical roles in oxygen transport, blood clotting, and lipid metabolism.
Enzymes: Proteins that catalyze chemical reactions, such as digestive enzymes, metabolic enzymes, and DNA repair enzymes.
Cell membrane: Proteins like receptors, transport proteins, and structural proteins help regulate what enters and leaves the cell, and maintain cell shape and function.
The licorice serving as the backbone, the sides of the ladder, that are made up of sugar and phosphate molecules. The rungs of the ladder are composed of the paired nitrogenous bases (A-T and G-C). The students carefully attached their candy bases to the licorice using toothpicks, following the crucial base pairing rules: Adenine pairs with Thymine, and Cytosine pairs with Guanine. This tasty project allowed students to visually construct and understand the iconic double helix structure of DNA. Through this fun and interactive model, students gained insight into the key components of DNA. The room was buzzing with excitement as students discovered the building blocks of life in a deliciously engaging way!
Afterwards they will engage in Trait Inventory and Genetics Practice Problems and Investigating Alien Genetics activities.
Trait Inventory/Genetics Practice Problems:
Students answered a traits survey, that helped them identify their physical characteristics (eye color, hair color, height, etc.) and other traits (tongue rolling, earlobe attachment, etc.). This activity helped students identify and record various physical characteristics about themselves and their classmates. The physical characteristics of an organism are known as its phenotype. This refers to the observable traits and features, such as: eye color, hair color, height, skin color, and other physical characteristics. Then expanded into the complexity of genetics by understanding dominant and recessive traits we call alleles. Alleles are different forms of the same gene, and they determine the phenotype, physical characteristics of an organism.
Dominant Allele: Represented by an uppercase letter (e.g., “B” for brown eyes)
Recessive Allele: Represented by a lowercase letter (e.g., “b” for blue eyes)
The combination of alleles an organism has for a particular gene determines its genotype. For example:
Genotype: BB, Bb, or bb (think of the genetic makeup, the letter codes of each each parent possesses, but may not physically show)
Phenotype: “Brown eyes” (BB or Bb) or “blue eyes” (bb) (think of the physical characteristics that results from the genotype
Understanding the relationship between genotype and phenotype is crucial in genetics, as it helps predict how traits will be inherited and expressed. Eye color is an easy way to start understanding how dominant/recessive traits work. There are three combinations of eye color punnet squares below:
Dominant Traits:
A dominant trait is expressed if an individual has one or two copies of the dominant allele (version of the gene).
Dominant traits are often represented by an uppercase letter (e.g., “B” for brown eyes).
Examples: brown eyes, dark hair, curly hair
Recessive Traits:
A recessive trait is only expressed if an individual has two copies of the recessive allele (one from each parent).
Recessive traits are often represented by a lowercase letter (e.g., “b” for blue eyes).
Examples: blue eyes, blonde hair, straight hair
Key Points:
An individual can be homozygous dominant (BB), homozygous recessive (bb), or heterozygous (Bb) for a particular trait.
Heterozygous individuals (Bb) will express the dominant trait, but can pass the recessive allele to their offspring.
Understanding dominant and recessive traits helps predict the likelihood of certain traits being passed down from parents to offspring.
Students discuss the implications of their findings, exploring how traits are distributed within the group and how they might be influenced by genetics.
Investigating Alien Genetics Activity:
Students applied the genetic principles they learned to a fictional scenario, thinking creatively about how traits might be inherited by alien parents. Even through each student had the same parent Genotypes, they soon discovered the difference Phenotype their offspring can acquire through the random combinations of how dominate and recessive genes pair up. Students discuss their results, exploring the implications of genetic inheritance in this alien species and how it might differ from or resemble genetics on Earth.
These activities can help students develop a deeper understanding of genetics and traits, while also promoting critical thinking, problem-solving, and creativity. By exploring these concepts in a variety of contexts, students can gain a more nuanced appreciation for the complex relationships between genes, traits, and environment.
By: Meghan Thoreau, OSU Extension Educator, Community Development & STEM, Pickaway County
The Science of Concrete
Concrete is a composite material made from a mixture of cement, water, aggregates (such as sand or gravel), and admixtures (chemical additives). When cement comes into contact with water, it undergoes a chemical reaction called hydration, which forms a hardened paste that binds the aggregates together.
The Concrete Mixing Process
The process of mixing concrete involves combining the ingredients in the correct proportions and mixing them until a uniform consistency is achieved. The mixing process can be done manually or using a machine.
Making Concrete Stepping Stones
To make concrete stepping stones, you will need:
Concrete mix
Water
A mold to shape the stepping stone
A release agent to prevent the concrete from sticking to the mold
Optional: decorative aggregates, such as small rocks or shells, to add texture and visual interest
Basic process for making concrete stepping stones:
Prepare the mold: Before pouring in the concrete mixture, make sure the mold is clean and dry. Apply a release agent to prevent the concrete from sticking to the mold.
Mix the concrete: Follow the instructions on the concrete mix package to combine the correct proportions of mix and water. Mix until a uniform consistency is achieved.
Add decorative aggregates (optional): If desired, add small rocks, shells, or other decorative aggregates to the concrete mixture for added texture and visual interest.
Pour the concrete mixture into the mold: Pour the mixed concrete into the prepared mold, making sure to fill it to the top.
Vibrate the mold (optional): If you have a vibrating tool, such as a vibrating plate or a tamping tool, use it to vibrate the mold and eliminate any air bubbles in the concrete. If not, tap side of mold with firm finger tips for two to three minutes.
Allow the concrete to set: Let the concrete set and harden in the mold. This can take anywhere from a few hours to overnight, depending on the temperature and humidity.
Remove the stepping stone from the mold: Once the concrete has hardened, remove the stepping stone from the mold. If necessary, use a release agent to help release the stone from the mold.
Seal the stepping stone (optional): To protect the stepping stone from the elements and extend its lifespan, apply a concrete sealer according to the manufacturer’s instructions.
Seal the stepping stone (optional): To protect the stepping stone from the elements and extend its lifespan, apply a concrete sealer according to the manufacturer’s instructions.
Enjoy the program highlight video above. This past November students engaged in several hands-on activities that allowed them to learn more about chemistry by adding a little colorto it.
Chemistry of Milk and Soap Molecules
First students experimented in a rainbow milk activity where they learned first hand about how cow’s milk and soap molecules interact with each other by add food coloring to the mix to visual the reaction.
Cow’s milk contains water, fat globules, proteins, minerals, and vitamins that are spread throughout the liquid. Of this composition, fats and proteins are very sensitive to changes in the milk solution they comprise. Whereas detergent, such as dish soap is made up of anionic, non-ionic, and amphoteric surfactants.
Sufactants help with wetting, degreasing, and foaming in the washing processes, where as non-ionic surfactants improve the functional properties of liquids, so they act as surfactant auxiliaries.
What happens chemically with the soap molecules and the fats in the milk?
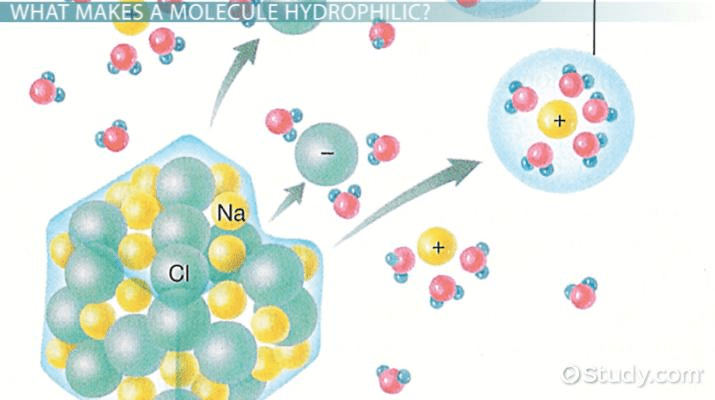
The soap’s polar, or hydrophilic (water-loving), end dissolves in water, and its hydrophobic (water-fearing) end attaches to a fat globule in the milk. The molecules of fat bend, roll, twist, and contort in all directions as the soap molecules race around to join up with the fat molecules.
Student adding soap molecules to milk sample.
What does the term hydrophilic mean?
Well let’s break it down. The prefix “hydro” means water and the suffix “philic” means loving. Thus hydrophilic means water-loving. A hydrophilic molecule is a molecule that can mix and interact with water.
To observed this chemical interaction, we added food coloring drops into the milk, dipped a tooth pick or q-tip into dish soap and poked it into the milk and chemistry was witnessed before their very eyes.
The opposite of hydrophilic is hydrophobic, substances that repel water, “hydros” for water and “phobos” for fear.
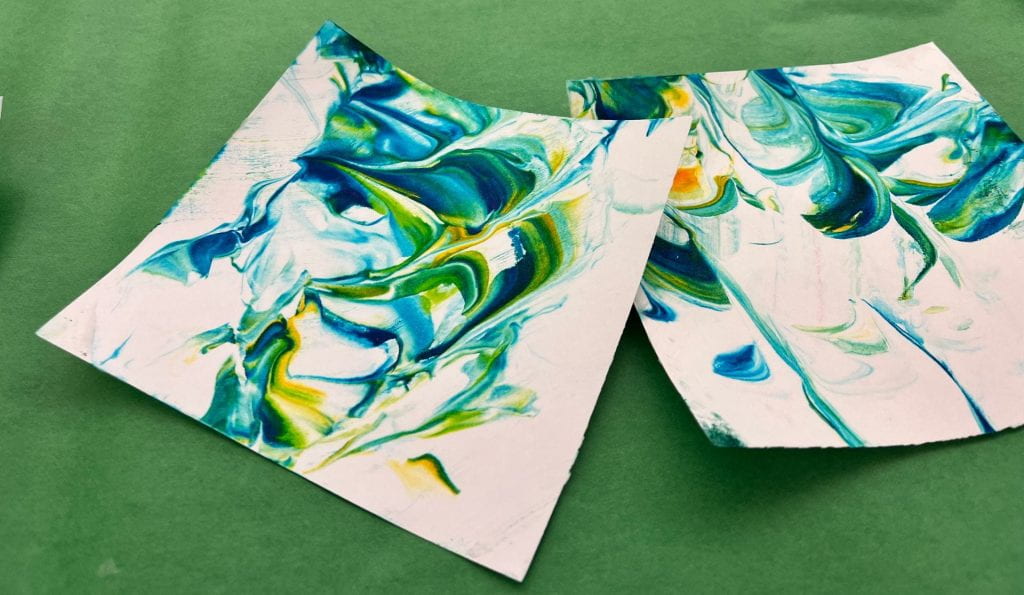
More Hydrophobic and Hydrophilic Interactions: Creating Abstract Art by Applying Chemistry
Student created abstract art by applied chemistry.
To continue reinforcing this concept of molecular play, students were lead through another chemistry experiment were they made abstract art with shaving cream, food coloring, and paper.
Soap is an interesting molecule because it has both hydrophilic and hydrophobic components, or what we call amphipathic, depicted in the image above. A soap molecule looks a bit like a snake, in which the head is polar and hydrophilic and the tail is non-polar and hydrophobic.
Shaving is a foam that is comprised of soap and air. Food color is a dye that was dissolved in water, and is therefore hydrophilic. Students added a few drops of food coloring into a tray of shaving cream. The food coloring can only interact with the hydrophilichead of the soap molecules and thus has limited mobility.
The students take advantage of this limited mobility characteristic of the shaving cream’s chemistry and take a tooth pick and swirl the drops of food coloring for a few seconds. They then take a sheet of paper and place it on top of their shaving cream and add a little pressure.
Paper is composed of cellulose with is comprised of polar hydroxyl (or oxygen and hydrogen) that make paper very hydrophilic. The food coloring which is also very hydrophilic, can spread very easily across the paper to stamp a distinct pattern from the shaving cream to the paper; similar to a printing press, but her used for abstract art printing.
Chromatography C.S.I. Lab
The students started the last experiment, by learning how science terms can be broken down and be very informative by just understanding how terminology is used. For example, the club activity used Chromatography, chromat/o means “color” and –graphy means “the process of recording,” therefore chromatography is “the process of recording color.” The break down of science terms can be very specific and informative to learning.Just like photography is “the process of recording a light” which was the original science process behind how traditional photographs were developed.
Or take Instagram, the social media company, used a terminology naming approach to describe their social media site. Insta- means “instant” or quickly produced. Gram means “to record,” so Instagram means “to record instantly.”
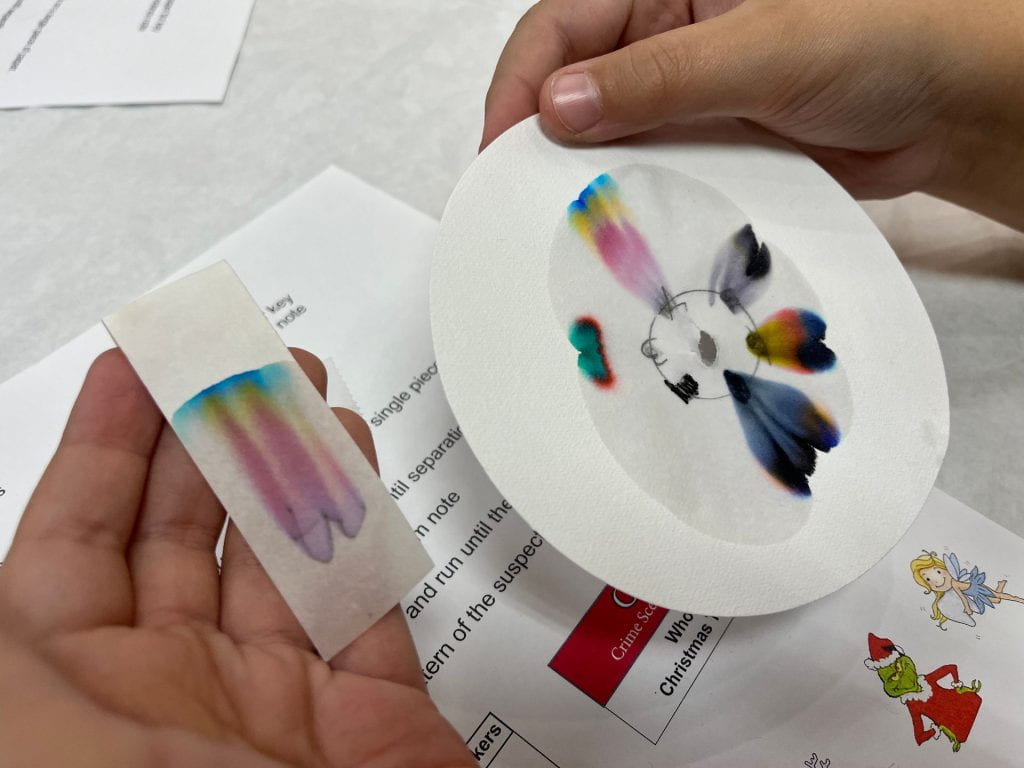
Students preparing to start the C.S.I. Chromatography lab experiment.
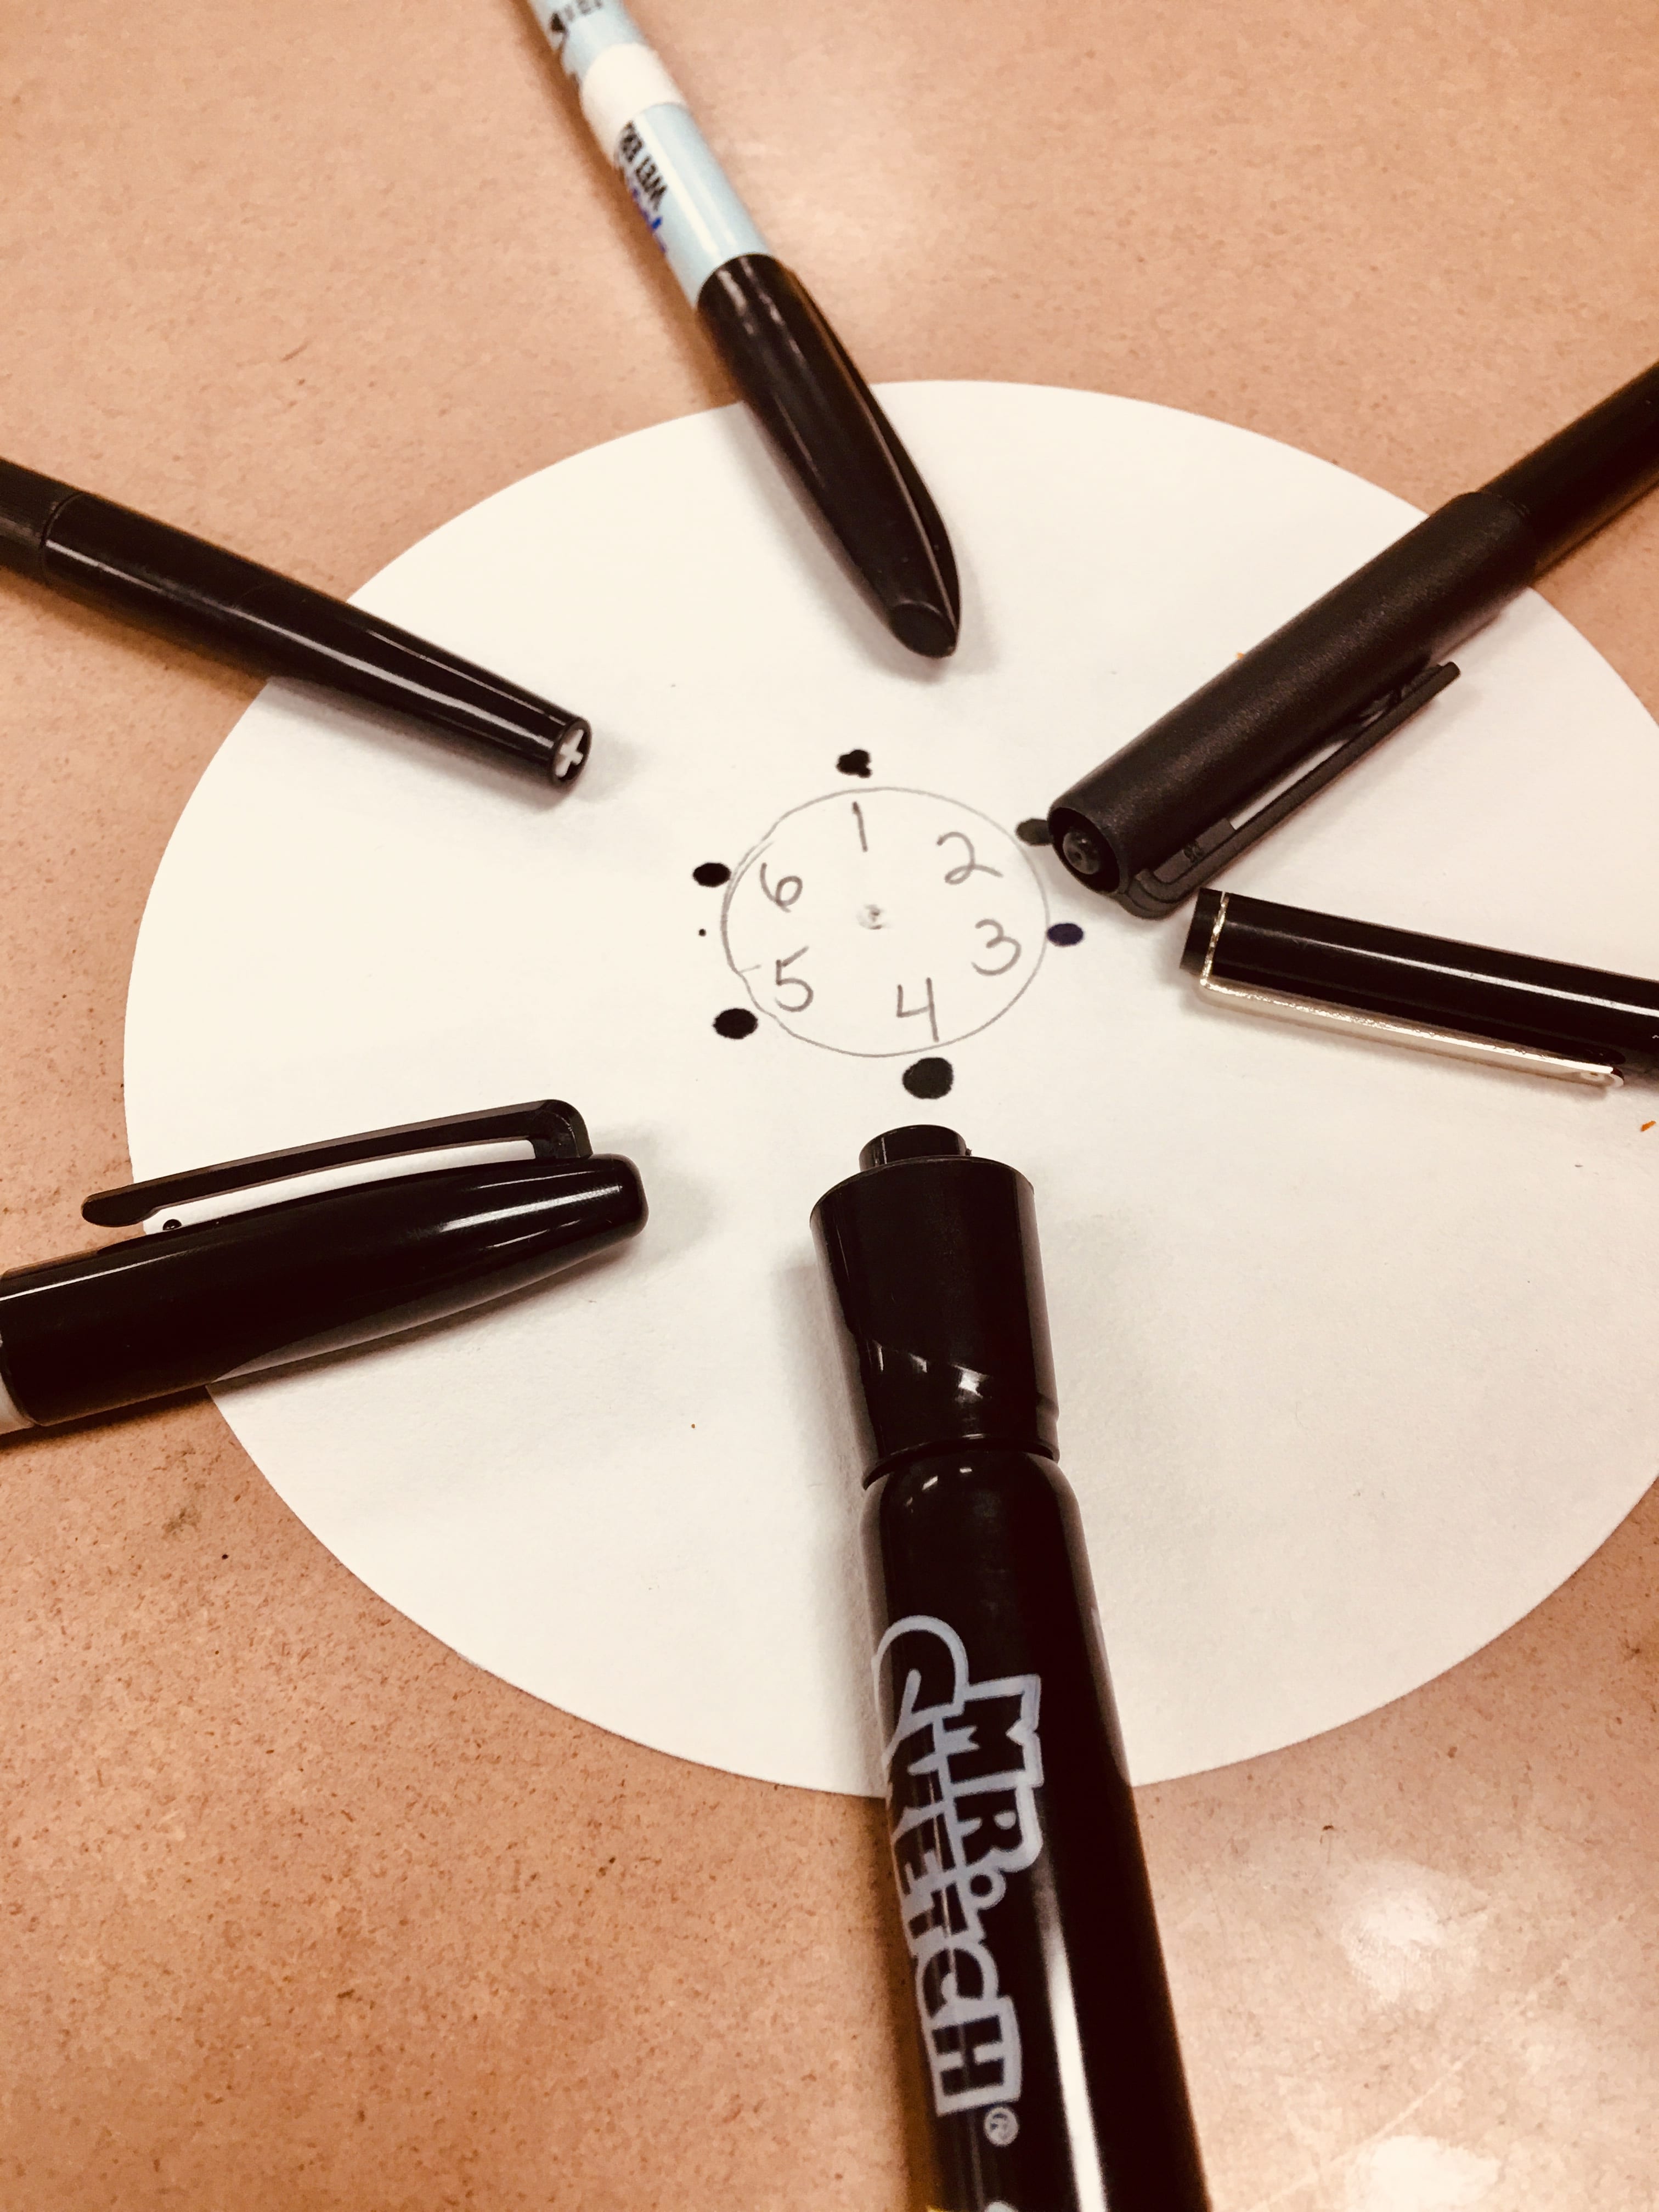
Now back to the student run C.S.I. Lab experiment, students began lab technicians that analyzed evidence in theft case of, Who done it? The were given six different pens found in possession of six suspects and a ransom letter left by person who stole a Christmas tree.Students analyzed the evidence by studying the black ink in six different pens vs. the black ink sample found on the ransom letter. The students already were clued into what Chromatography was because they learned to how to breakdown the term. They were involved in “the process of recording color,” more specifically by separating components of the black ink samples, into two phases, stationary to mobile phases, and then compare the results against the black ink sample of the ransom letter.
Students adding black ink samples of six pens to the chromatography paper.
Chromatography paper is a powerful analytical tool. Students added the six ink samples to the paper. They allowed the paper to slowly absorb water, which in turn took the station ink sample and the ink sample and allowed it to move through the fibers of the paper into its mobile phase. This process separated the ink substance which is a low-molecular-mass and move it between its stationary phase and mobile phase.
Student C.S.I. lab sample comparison of ransom letter and six black ink samples collected.
The results were very conclusive and turned over to the Pickaway County’s Sheriffs Department to further inform their investigation of who stole the Christmas tree case.
This month students used electromagnetism to force Jack to jump and applied the principle of buoyancy to force a cartesian diver to sink.
PHYSICS
Magnets exert a force, an invisible field, that can attract or repel magnetic metals. Students applied and controlled this magnetic force by building an electromagnetic.
Electromagnetism is found in everyday life, such as in our kitchen appliances, radio transmitters, portable electrics, computers, and much more. Electromagnetism is the physical interaction among electric charges, magnetic moments, and the electronomagenitc field. An electromagnet is not permanently magnetized. An electromagnet is only a magnet when an electric current (I) runs through its coiled copper wire. The ability to turn the magnetic field on or off makes the electromagnet very useful.
You may not realize it, but all electric cords in your home become a very weak magnet when current runs through them. When you plug in your laptop, the power chord becomes a weak magnet. The students learned that in order to strengthen the magnetic field, they would have to wrap the cord around several times, which is exactly what the students did in their Jumping Jack STEM project. Each student built their own electromagnet.
Steps. Each student:
Wrapped copper wire tightly around a plastic straw piece, and called it “Jack.”
Left the last 5-inches of each end of the copper wire wrapped around the straw uncoiled and accessible.
Glued a small permanent magnet onto a piece of cardboard.
Stuck a metallic screw vertically up onto the top of the permanent magnet to hold Jack.
Tapped a AA battery onto the cardboard.
Touched the two free 5-inch copper wires from Jack to the battery ends to test which direction of the current flowing through the electromagnet (Jack) to ensure Jack is repelled upward and not attracted downward.
Once the right current direction was established, one copper wire end was taped to the battery end, while the other was left open to be hand-touched to the other end of the battery to make Jack jump/repel off the permanent magnet.
CHEMISTRY
The Cartesian Diver was a simple science experiment that demonstrated the principles of buoyancy and pressure. It is named after French scientist and philosopher René Descartes. A Cartesian Diver is an example of Boyle’s Law, which says that the volume and pressure of a gas (like air) have an inverse relationship. This means that when you increase one, the other decreases.
Students learned that density describes substances based on how much mass they have in a certain volume. When the students increased the pressure it caused a gas to decrease in volume while its mass stays the same. Objects that are more dense than water sink, while objects that are less dense than water float.
STEM student observing Boyle’s Law in action.
PROGRAM PARTNER
We thank and recognize the OSUs Department of Electrical and Computer Engineering for their amazing outreach programs. More specifically Dr. Betty Lise Anderson for her unwavering dedication to K-12 youth through Columbus and south into Pickaway County Schools! Thank you for all you do.
Watch our club highlight video to get the best visual overview of this month’s challenges.
This March our young STEMist broke down the parts of an atom, learned about chemical elements and compounds, and how we organize elements on the period table. They also built and took home a homemade battery powered by electrolytes (lemon juice) that carried an electric charge to turn on an LED light. This expanded on what the students learned in the previous club during their hands-on chemical changes lab. During that lab, students experimented with chemical changes and molecular compounds and turned a liquid from an acid to a base and vice versa. Electrolytes are compounds that the students used to conduct electricity and power up their photon flower and turned on a LED light.
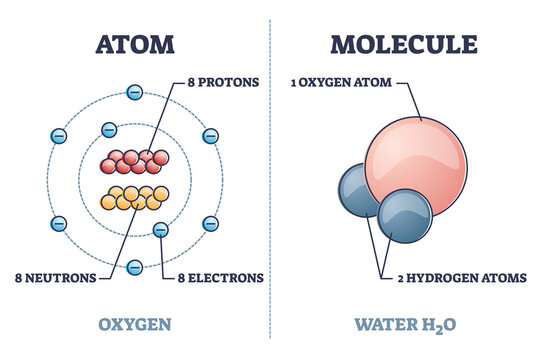
Our club focused on the basic building block of matter, an atom. Atoms combine to form pure elements, compounds, and complex forms like computers and phones. Atoms are the smallest particle of matter that cannot be further subdivided using chemical means. In order to understand how atoms interact with each other, the students put together the parts of a carbon atom.
Atoms consist of three basic particles: protons, electrons, and neutrons. The nucleus (center) of the atom contains the protons (positively charged) and the neutrons (no charge). The outermost regions of the atom are called electron shells and contain electrons (negatively charged).
We introduced different elements to the students, who discovered them, and what the element is used in. In order for students to claim their prize they had to read back the full element name and confirm how many protons each element had.
Chemistry is a part of everyday life. This month we focused on improving our students’ understanding of the importance of chemical reactions in our lives in producing many of the things we take for granted. We also worked on improving their recognition and comprehension of what is involved in a chemical change through hands-on chemistry labs. Check out our two-minute program highlight video for a recap below:
Students learned the five signs of a chemical change firsthand:
Color Change
Production of an odor
Change of Temperature
Evolution of a gas (formation of bubbles)
Precipitate (formation of a solid)
Students learned that atoms are the smallest units of elements that still retain the element’s properties. And that, atoms contain electrons, neutrons, and protons. In addition, they learned that each element is defined by the number of protons in its nucleus. Students used a periodic table handout to find the different elements we used in our hands-on chemistry labs.
Then we expanded to explain how elements can combine and form molecules. In a chemical change, the molecules in the reactants interact to form new substances.
Another important aspect of the program was exploring the many careers in chemistry. Take a moment and click through the Careers in Chemistry Prezi presentation with your child or use it in your classroom. The data used comes from the Bureau of Labor Statistics.
The Bureau of Labor Statistics’ Occupational Outlook Handbook (OOH) is a valuable online resource to explore and is also available through the CareerInfo app. Both Web and the App, include 300+ occupational profiles that cover about 4 out of 5 jobs in the economy. You can browse job profiles by occupational group or top lists—or find a specific job type with a simple search and learn information that will impact education and career planning decisions such as median pay, entry-level education, on-the-job training, number of new jobs projected, growth rate, and career highlight videos, on the hundreds of occupations that provide most jobs in the United States. Click on a QR code to download the CareerInfo app to your mobile devices now!
We covered a lot of material last month. We thought we’d take advantage of the spooky mystery themes of Halloween and challenge our students to become science detectives, experimenting with hands-on activities involving chromatography, perception of vision, and phosphorescent slime chemistry. We also learned about atoms, electrons, batteries, LEDs, and simple circuits.
Two Minute Video Highlight of Program
DAY 1
Chromatography
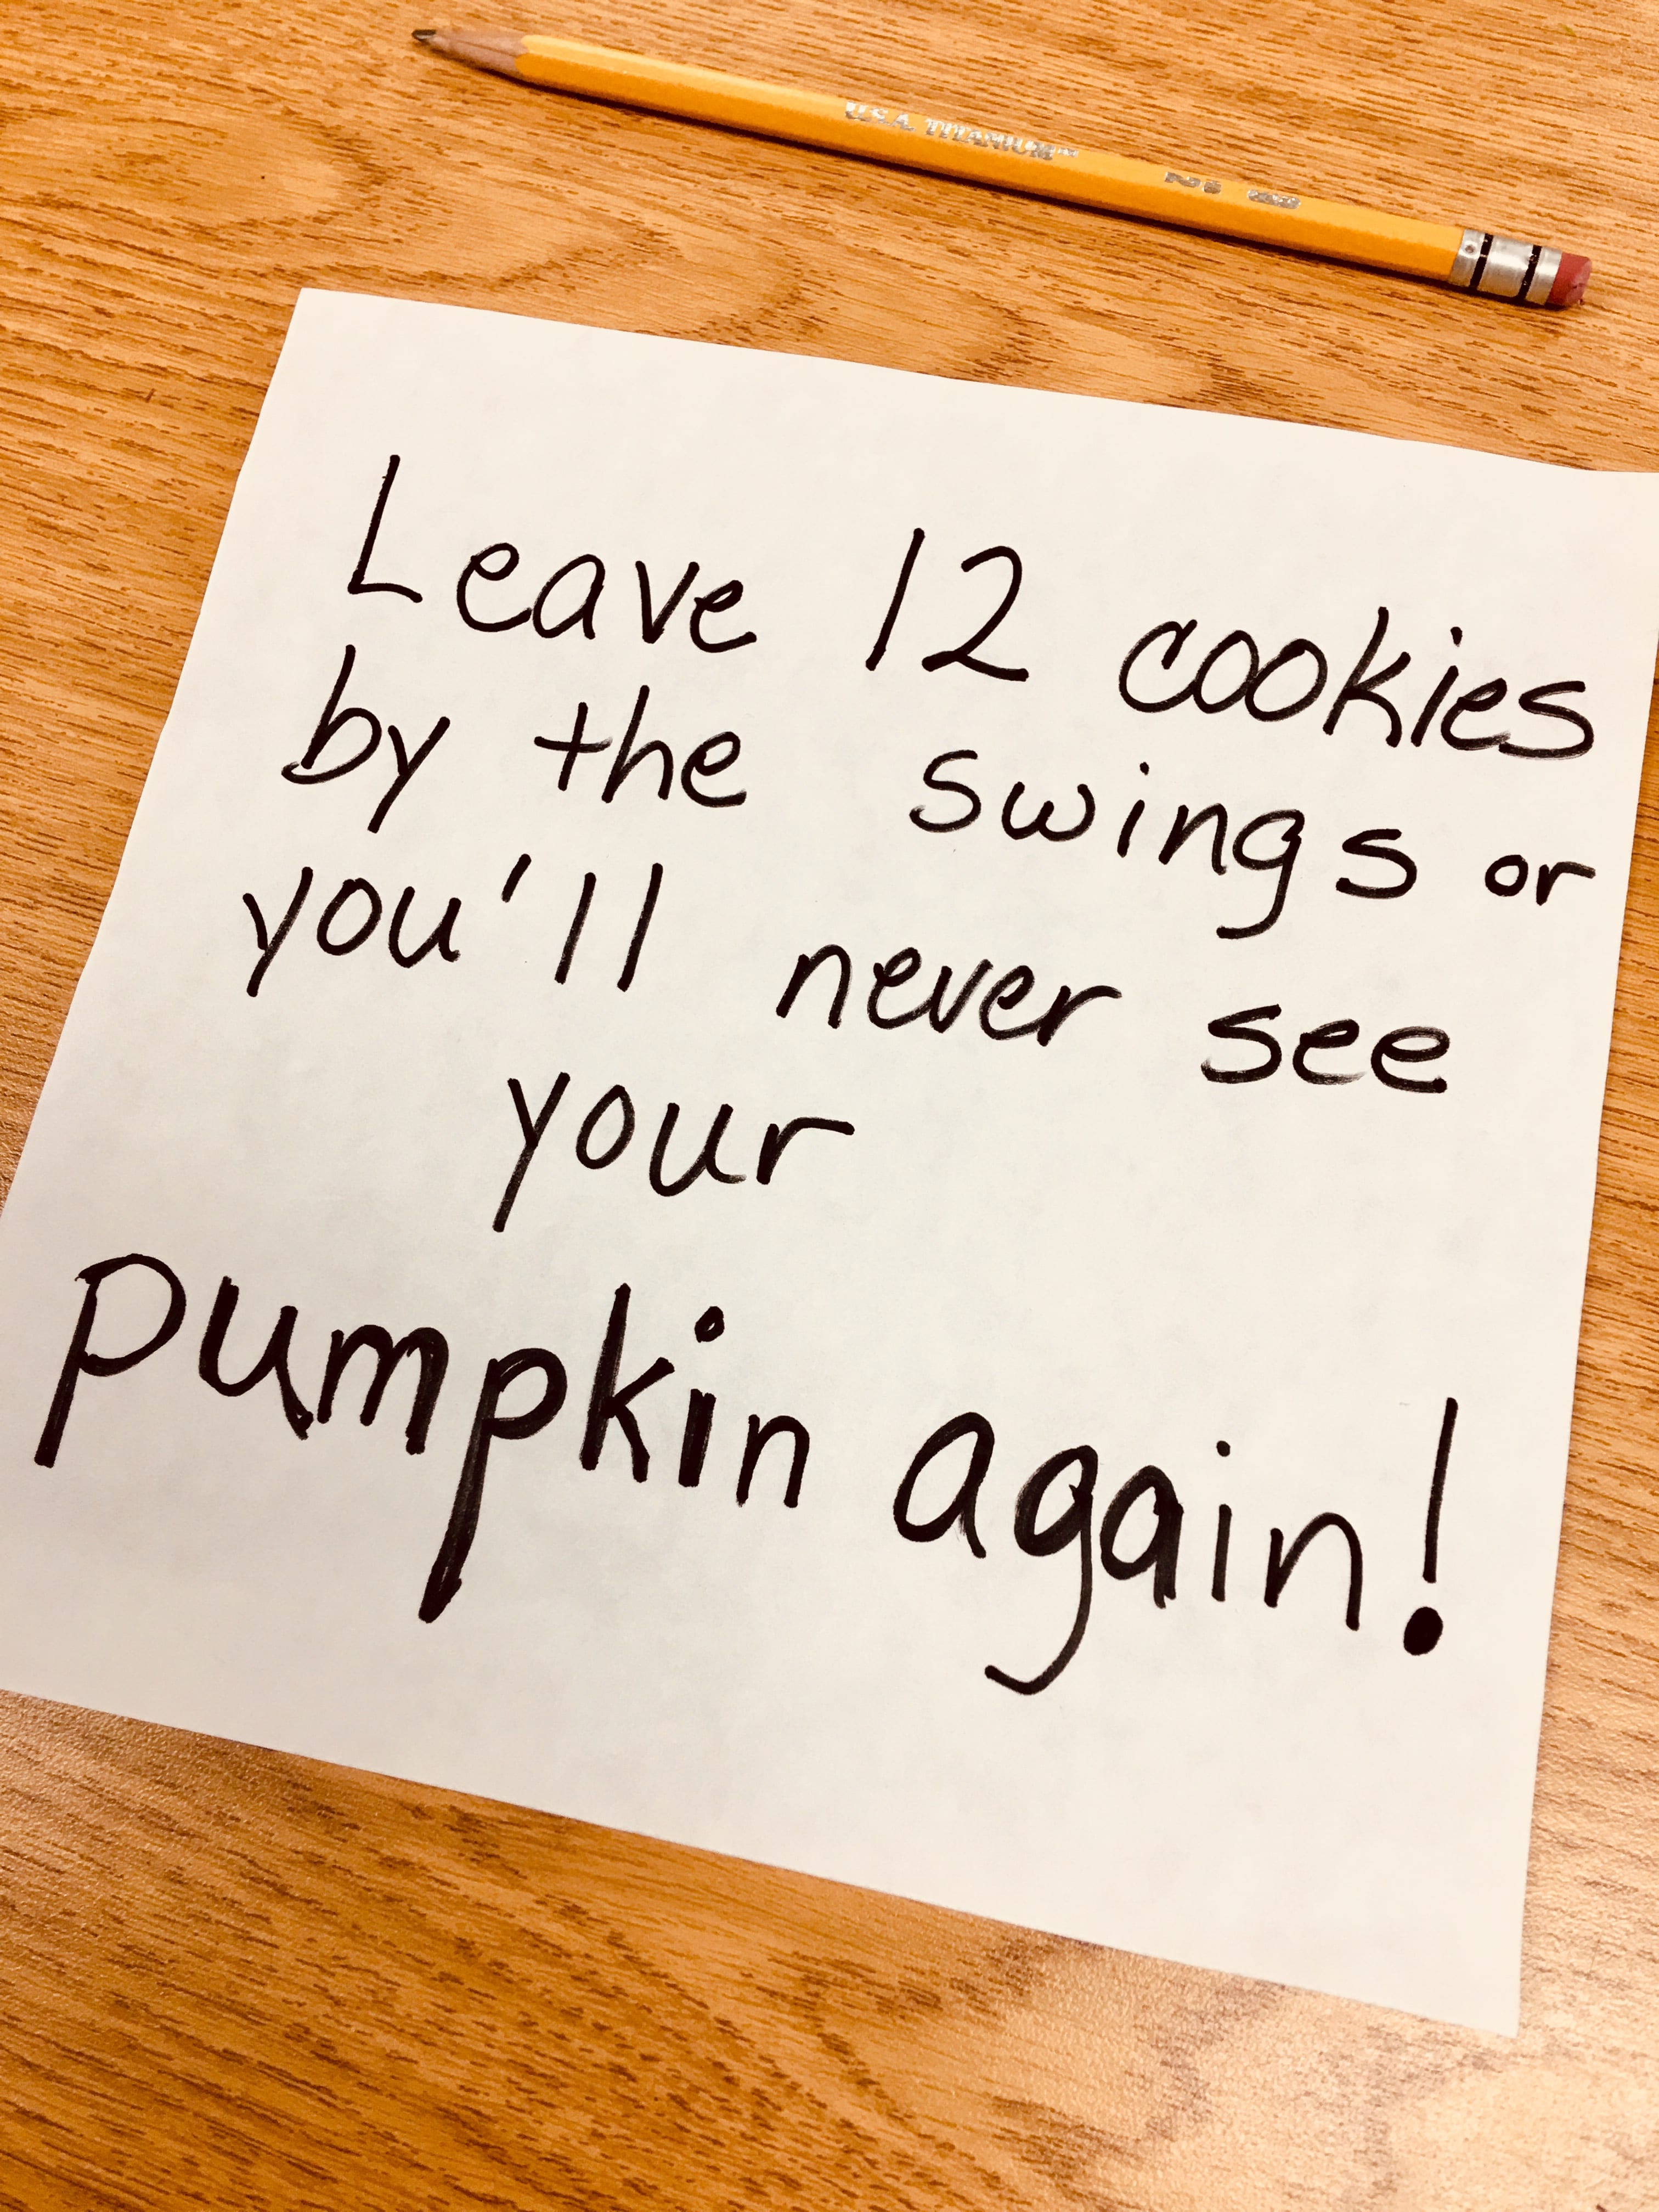
The students became CSI lab technicians, tasked with solving a who-done-it pumpkin theft. All that was left at the scene of the crime was a letter demanding cookies! No fingerprints were found, but six suspects were brought in for questioning and all six had different black markers on their person. The marker evidence was tagged and brought to the CSI lab along with the random letter for further analysis. Marker samples were taken and a chromatography test was performed by our young lab technicians.
Chromatography is a laboratory technique for the separation of a mixture (more specifically separation of molecules) and in our case black marker ink molecules. The ink was dissolved in a water solution process of mobile to stationary phase, revealing distinct ink-finger prints for comparative analysis against an ink sample taken from the random note. The students discovered different ink molecules travel at different speeds, causing them to separate and reveal distinct color patterns that could help identify the pumpkin thief from the six suspects.
People don’t often pick up a marker or pen and think of molecules, but ink and paints are made up of atoms and the molecules, like everything, follow rules. Ink and paints follow the standard CPK rule, which is a popular color convention for distinguishing atoms of different chemical elements in molecular modeling (named after the chemists Robert Corey, Linus Pauling, and Walter Koltun). Basically, certain elements are associated with different colors. For example,
Hydrogen = White
Oxygen = Red
Chlorine = Green
Nitrogen = Blue
Carbon = Grey
Sulphur = Yellow
Phosphorus = Orange
Other = Varies – mostly Dark Red/Pink/Maroon
Teays Valley High school mentor, Drew Dean, assists elementary students with our chromatography lab.
PERSISTENCE OF VISION
Persistence of vision refers to the optical illusion that occurs when visual perception of an object does not cease for some time after the rays of light proceeding from it have ceased to enter the eye. The discovery was first discussed in 1824 when an English-Swiss physicist named Peter Mark Roget presented a paper, “Explanation of an Optical Deception in the Appearance of the Spokes of a Wheel when seen through Vertical Apertures” to the Royal Society in London. Shortly after, in 1832, a Belgian physicist Joseph Plateau built a toy that took advantage of the optical illusion trick. (Photo below source: http://streamline.filmstruck.com/2012/01/07/the-persistence-of-persistence-of-vision/)
The toy made images move independently but overlapped them or when placed in a series made them look as if they were walking, running, juggling, dancing. This concept soon laid the foundation for early filmmaking. (Photo below source be: http://1125996089.rsc.cdn77.org/wp-content/uploads/2011/12/persistence-of-vision-transit.jpg)
The students learned how our eyes report basic imaginary back to the brain, or rather how our eyes perceive shapes, their motion, and their relative position from other objects. The students discovered that eyes are not simple windows to the world. Eyes do not see what is, but instead, see approximations.
PHOSPHORESCENT SLIME
The students learned how different objects glow in the dark. First, students learned that heat is a good emitter of light, such as a fire or an old-fashioned light bulb, but heat isn’t always required to make something appear to glow. For example, bedroom glow-in-the-dark stickers, glow sticks, or fireflies do not require heat. The stickers and even certain types of rocks, like the Bologna Stone, require several hours of light to charge them in order to later glow. But glow sticks and fireflies, do not require heat or light, but instead, deal with chemistry where two different elements are mixed together to make a ‘luminescent’ compound.
We talked about phosphorescence and the process in which energy absorbed by a substance is released slowly in the form of light. Unlike the relatively swift reactions in fluorescence, such as those seen in a common fluorescent tube, phosphorescent materials “store” absorbed energy for a longer time, as the processes required to re-emit energy occur less often.
Finally, we let the students become chemists and make their own phosphorescent slime for later glow in the dark fun after the compound was charged by light. The young chemists used measuring devices to concoct their spooky slime recipe.
Make another batch at home with your young chemist:
Add 20.0 mL of glue to cup
Add 15.0 mL of water to cup
STIR!
Drop of preferred food coloring
STIR!
Add a drop of glow in the dark phosphorescence paint
Add 12.0 mL of BORAX solution
STIR! It will be runny until you take it out of the cup and start to play with it.
We are going to have a little chemistry fun this Saturday, May 8th @ 10:00 a.m. with experiments focused on chemical reactions! We’ll be sending home STEM tots to create some goofy glow gels, fizz wizards, and experiment with jamming jelly reactions!
IMPORTANT: Join this virtual meeting from your kitchen if possible and try to have your parents near by for this program, because we are going to be mixing materials that could get a little messy. We are sending home chemicals, powders, and dyes to mix for our experiments. Also, make sure you have some play cloths and not your favorite top in case anything stains. We’ll provide a smock in your STEM tote, but better safe than sorry.