Posts

Perspective: Process


Research


I began researching different dimensions that I could use for my 200 sq. ft. studio space.

Room Size:

10×20 – 200 sq. ft

14×14 – 188 sq. ft.

16×13 – 208 sq. ft.

Mood Board

I selected images for inspiration and to organize my thoughts/ideas.

View inspiration links

>Exercises/Activities

Exercise 1: Line and Contour 

In this exercise I used different drawing techniques to enhance the object. After practicing contouring with several different objects, I used repetition to create a new composition.

Exercise 2: Triangulation Drawing

By observing my environment I used triangulation to recreate this space from my perspective.

View other quick sketches

Exercise 3: Grid Space

I took the steps from the linear perspective grid demo on tracing paper in order to create a one perspective room for the assignment.


Iterations


I experimented with different tools to create different perspectives of my room.

View procreate iterations

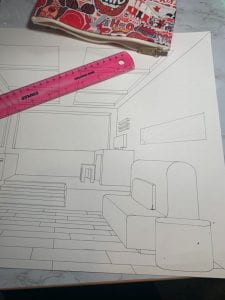
Finally I designed the basic structure of my room including the 4 requirements needed.


Production


Final construction

To get to my final project I transferred my digital layout onto tracing paper and then onto Bristol.

The last step I did was adding little details to the project.

Final Composition

While working on my space I tried to design it to reflect my personality. I like a clean space that is free of distractions with lots of natural lighting. I enjoyed working with the one point perspective but I found it a bit challenging when objects were closer to the vanishing point. The more I utilized the skills we learned throughout the exercises I discovered a few things based on the layout that I could have done better.


Portfolio Project


View portfolio project

Shape Grammar: Process


Research


To help with creating my design I researched synonyms for wedged and dug deeper into principles to narrow it down to one for my final project.

Wedged: jam, squeeze, pack, force

Balance: stability, structure, aesthetically pleasing, symmetrical?, equal in weight

Pattern: repetition, adds visual interest, focus on content, don’t want it too complicated

>Exercises/Activities

To begin the process of this exercise, I experimented with the different sizes of shapes and then traced over them to create new shapes.

View exercise iterations

After picking my shapes, I created compositions both digitally and physically for the final outcome that activated static and dynamic qualities. By creating the digital compositions first, it made it easier to transfer them physically while also getting the same effect.


Iterations


I began exploring the idea of pattern and/or balance while also trying to create a wedged concept through triangles and squares.

View all iterations


Production


Final Composition

This project gave me a lot of freedom to do what I wanted but found myself getting away from the main objective. I continually referred back the instructions in order to stay on track. One part I struggled with was being able to communicate the descriptive state while also using the principle. But once I simplified things I was able to accomplish a design I was happy with.

I found the construction process a bit more challenging than digital. I could make corrections easily in illustrator, but in the hand construction process my mistakes were more time consuming. With practice and trial and error, I found a method that was more efficient for me.


Portfolio Project


View portfolio project

About Me: Process


Research


For the beginning of this project, we dove into what makes something a “good” vs. a “bad” design.

›Exercises/Activities

The first activity we did to explore more into good vs. bad design was to find designed “things” that we thought fit into certain categories.


Iterations


Sketches

Sketching a layout for my page was the first step I did to begin the process. I began to think of different ways to organize my information to guide the audience through the page.

As I continued, I found it easier to write down all of my ideas and then organize that information on a separate page.

Next I took that information and played around with the website features to learn how it worked.

While beginning to finish my project and change little details, I played around with colors and contrast.


Production


While working on this project, it allowed me to reflect on my past achievements as well as areas with room for improvement. Collecting and organizing information is always a struggle for me, but once I created a plan and just started the process I feel I had a successful outcome. Once I sketched things out and understood the requirements, it was easier to get started. This website was something unfamiliar to me but playing around with the different features gave me a better understanding of the system.

I think the challenge was learning the program at the same time as reflecting on the content. Now that I understand the program, I feel that it will serve as a framework for future projects.


About Me Project


View about me project