Research:
When introduced to this project I immediately thought of how many styles and ways notebooks are made. But I also thought of reasons why I don’t like buying ones from the store…such as having the same lined paper throughout the whole book, the binding gets annoying once the book has been used, the covers get flimsy and bent in your book bag…the list could go on and on.
I’ve never really been the type of person to sketch or doodle and honestly never saw the purpose in doing it. Below are some sources I used to educate myself on sketching and my biggest takeaways from the material I learned.
- TedTalk: Doodlers Unite
- I learned that doodling is actually supposed to make yourself think and stops you from losing focus. Although the social norm of doodling is looked down upon, it impacts the way we can process information and how we can solve problems. There are four ways to make a decision, visual, auditory, reading/writing, and kinesthetic. As someone who is extremely indecisive, I learned through this project how to make decisions for my sketchbook primarily from doodling.
- https://www.ted.com/talks/sunni_brown_doodlers_unite?language=en
- Reading: Sketching as Design Thinking
- I learned that sketching is a tool for visual thinking, as it creates and envisions a physical example of what used to be a thought. There are even different types of sketches, these include…
- draft
- detailed
- proportionate to the end result
- monochromatic
- geometric abstractions of use of space and text
- doodles and scribbles
- I had no idea how many ways someone could “sketch”. The idea of sketching always scared me because I never knew what was appropriate or needed to be put down in order for it to be considered a ‘sketch’, in my mind sketching is all about drawing something and because I’m not good at drawing I always avoided the idea.
- https://osu.instructure.com/courses/117283/modules/items/7649737
- I learned that sketching is a tool for visual thinking, as it creates and envisions a physical example of what used to be a thought. There are even different types of sketches, these include…
Exercise:
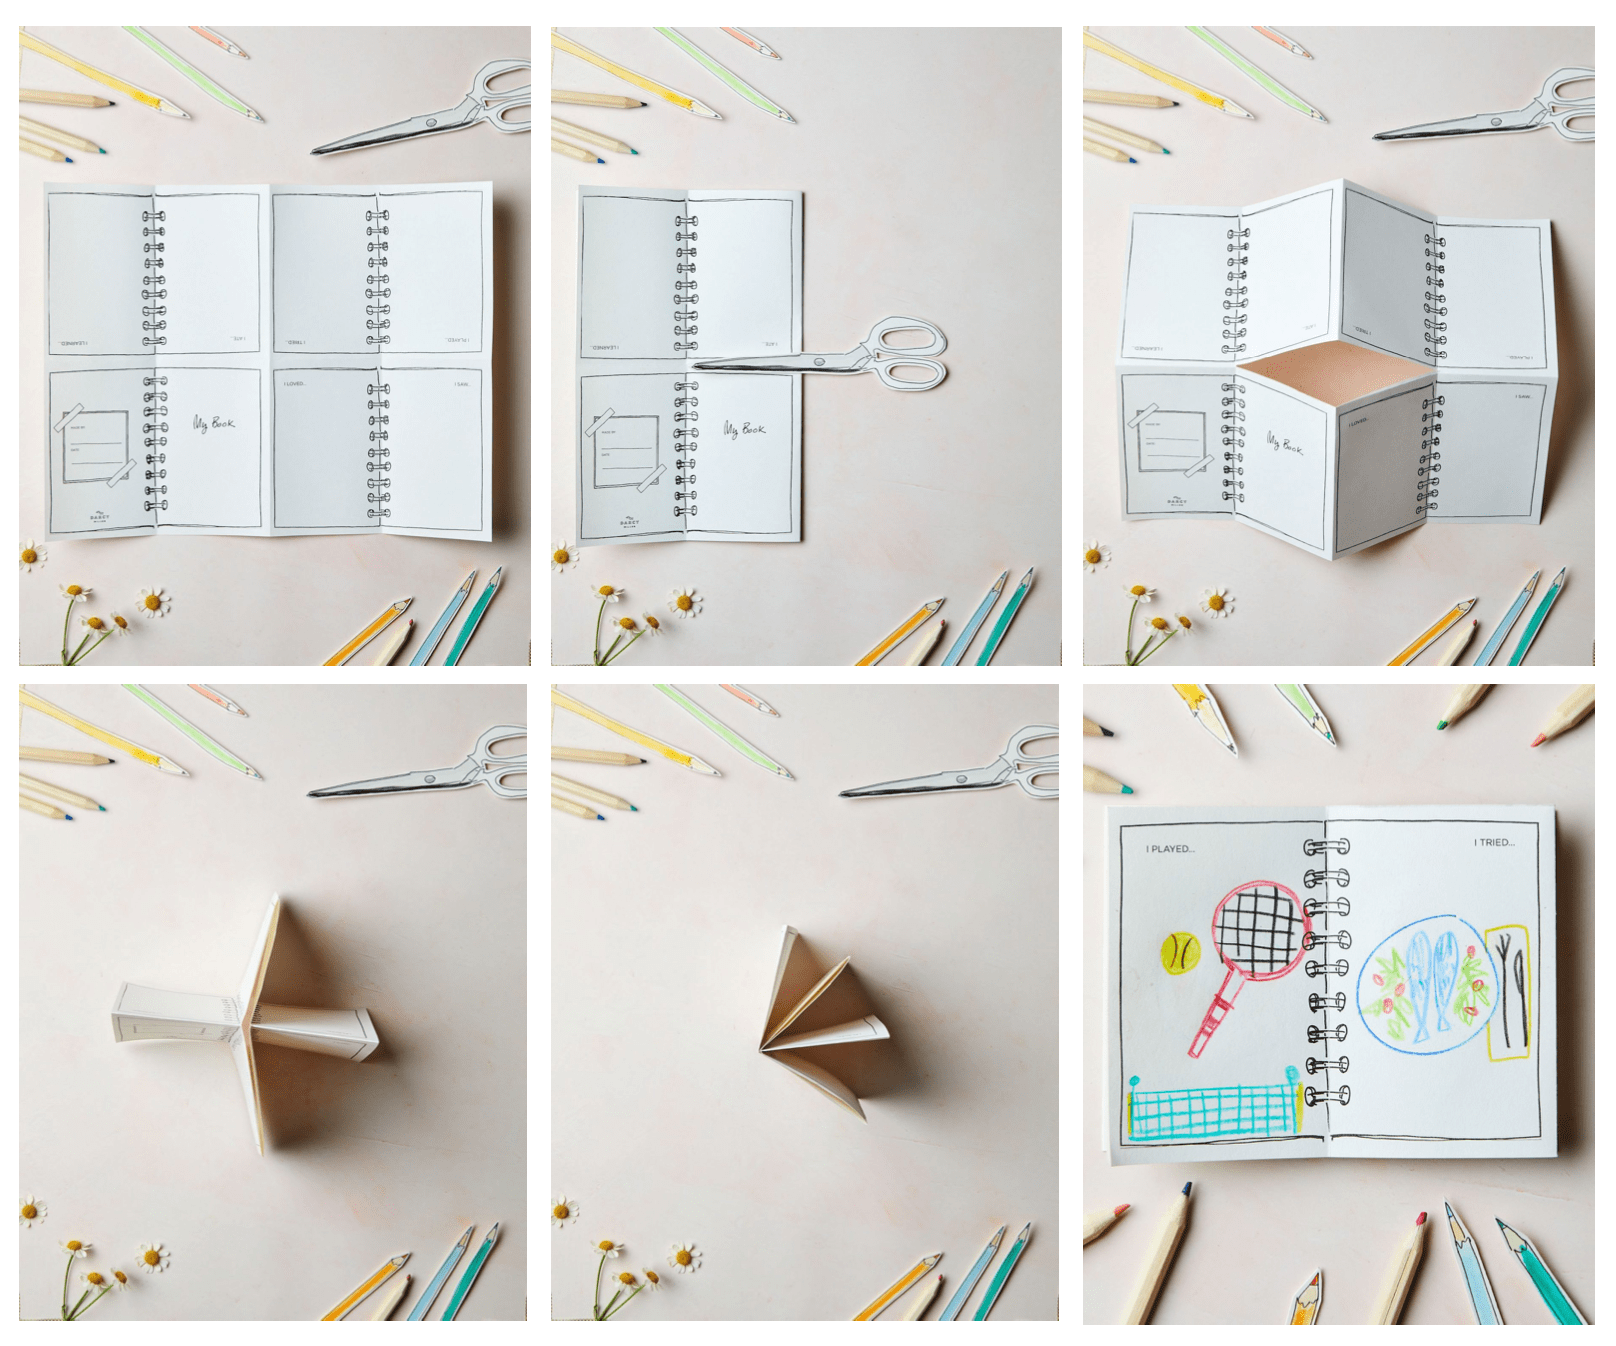
In this activity we created mini sketchbooks out of a single piece of paper. Below is the tutorial I used to create the mini sketchbook.


What I learned:
- After making the sketchbook I found that there were some elements I liked and disliked.
- I did not like how some of the pages were still connected to each other (folded on the outside edge which made the page super thick) while others were loose and single pages.
- I did like how I was able to use a single piece of paper to make the product, that opened my eyes in seeing how I could recycle and reuse products that I probably wouldn’t have expected to complete the job.
- Once we finished making the sketchbook, we practiced making quick sketches in our books using the prompts given to us to doodle about. This helped myself visually see how quick brainstorming is super beneficial. I ended up really liking how I could get all my thoughts down onto paper and physically see how things correlate with one another. I also experimented with explaining things without using words which is something I’m not very familiar with.


Iterations:
Brainstorming what I want in a sketchbook:
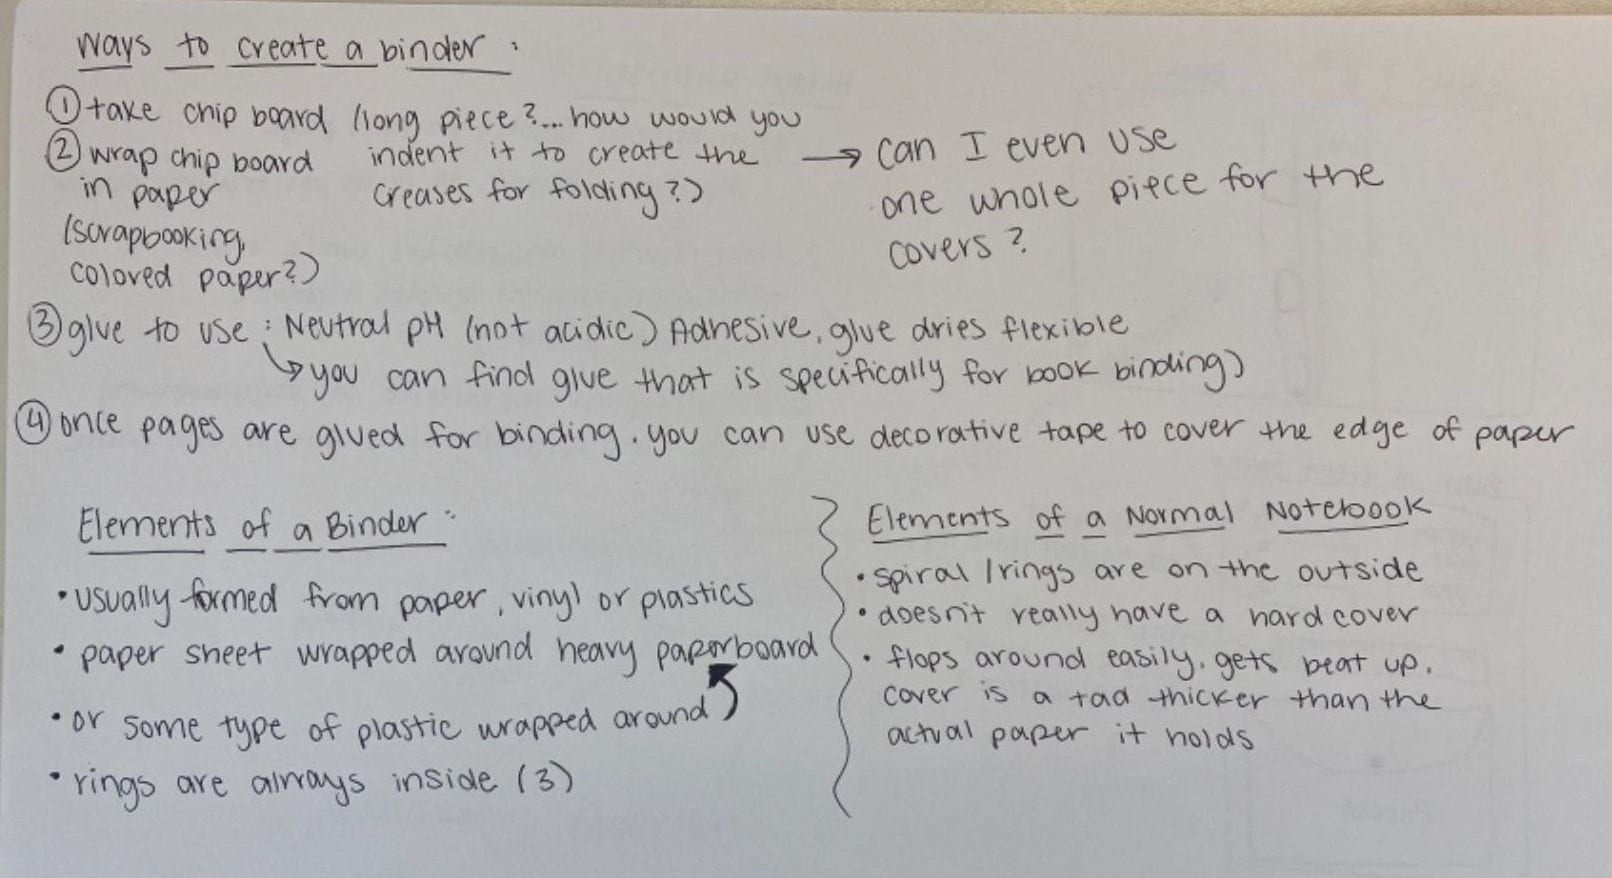
- I began my process by getting together almost an inspiration board of the elements and feeling I wanted my sketchbook to have. I wanted it to somewhat resemble my personality and who I am as a person. Below are some notes I used to begin my idea of what the sketchbook could include.


- Then I began mind mapping all the features that a sketchbook has. Basically getting all the main parts down on paper so I could begin to think about how I wanted to manipulate those features to where they are satisfying and useful for myself in my own sketchbook.
- I created a step by step brainstorm of what each feature of the sketchbook is and options for each feature underneath it. I found that this was one of the most beneficial things I did throughout this project, as I continuously came back to these notes during my iteration process. It was a great way for me to visualize my thoughts and make decisions quickly of what I wanted or didn’t want.

- I decided that having a sketchbook that worked like a binder was exactly what I wanted. I loved the aspect of being able to take a piece of paper out and move it or do whatever I wanted and then once I was finished with it I could put it back into the book without any issues. I also thought it was the cleanest way of making a book…unlike regular notebooks the binding either gets messed up and starts to undo itself or it sometimes just doesn’t even go back together. I wanted my book to be functional and durable.

- Below are the visualizations I wanted my book to have…I began brainstorming the requirements of the project and how I wanted to personalize the book.

- I moved to using a vector format so I could get a better idea of how the book was going to look but also understand measurements and how all of that could play out. I found a lot of my measurements by going through my own books at home and seeing which sizes I liked the most and felt nice in my hand. I used Adobe Illustrator to create these artboards.


- Binding:
- I tried a couple different techniques that I could use to bind my book together. I really wanted the rings to have a small detail on the outside of the book but not completely on the outside as I have found having the rings stick out makes it easier for damage. I played around with scrap pieces of paper and metal rings to create prototypes for binding.


- Once I found the binding method that I wanted to use, I began estimating measurements for where the holes for the rings would go. I used Adobe Illustrator to transfer those measurements and make sure everything aligned correctly.


- Connecting the book together:
- I decided to tear apart a binder I already had and use the chipboard that was inside the plastic lining. In design we have learned that finding reusable sources and being able to be environmentally friendly while paying attention to cost of materials is a big part of being a designer.
- I experimented with ways I could connect the binder together using my own materials. I found with the binder that I tore apart, that the chipboard pieces were connected together using melted plastic. I had to make sure the material I chose was going to bend like thin plastic would, I thought of using tape as it is flexible and somewhat sturdy.


Production:
Constructing the base:
- Using the laser cutter at Hopkins Hall and the Innovation Studio, I was able to cut out the front, back, and side covers for my book, using the recycled chipboard from a previous binder. I also cut out the holes for the rings at this time as well. I set all the measurements in Adobe Illustrator, then we connected to the laser to make sure everything cut where it needed to.

- Once everything was cut out, I applied modge podge on the chipboard and wrapped the board in thin wrapping paper. I did this using one whole sheet of the wrapping paper for the outside of the book. With the excess paper on the edges, I wrapped those inward to create the flush look. Then I flipped the book and did the same process on that side.


Adding the Necessities:
- I wanted to create my own pocket for inside the front cover. I used the measurements of my book and made some estimations based off of the placement on the book. Then I drew out somewhat of a blueprint of the pocket using the skills I learned in Design Foundations in Autumn 2021. Then using a cutting knife and self healing mat, I was able to cut out the drawing out of cardstock and used glue to fold the paper into a pocket.

Final Product:


Meaning behind this Sketchbook:
I really wanted this book to be a resemblance of who I am as a person. I’ve always been told I have an old soul, I wanted to implement that into this book with the natural looking cover and the vintage vibe the book gives off. I feel like the elements I included very much speak to my aesthetic. I always need to be organized so I added the post it notes and pocket knowing that I will definitely use them quite often. My hidden element is my family’s motivational quotes. I talk to them every day and they are a big reason why I work so hard. They have been my biggest cheerleader in this dream of mine and having their handwritten words in my sketchbook means a lot to me.
What I learned from this project:
- This was a huge learning curve for myself. I have never used a laser cutter before and had no idea what I could even use it for. I took a lot of chances in this project which isn’t normally how I like to do things. Every day it felt like I had no idea what I was doing but at the same time I did. I learned that having confidence in yourself during the design process is really important and will ultimately help yourself in making your designs.
- Due to not having much experience with the laser cutter, it was difficult to find a comfortable spot with it. Looking at my final product, I’m not completely disappointed because I know it was a learning process but I definitely think I should’ve spent more time testing with the laser as the final design on my book cover looks blurry and hard to see due to the affects of the laser…I now know what it looks like to fill the lettering!
- Another aspect of this project that was a learning curve was the time management and how to adjust when things don’t go as planned. We had a snow storm during production week which caused us to not be in class for a couple days. This forced me to make back up plans due to not being able to get to the laser but also to realize that panicking in the moment will not help but instead cause rushed work that doesn’t look as good as it could be.
Link to Portfolio Project: Sketchbook