In the Spring Heat!

Cool weather crops, like spinach and lettuce, tend to prefer cooler temps which is why they are planted in the spring and fall. However, sometimes our weather likes to throw some hot dates our way and these crops do not like it. While some crop varieties are tolerant of warmer temps, not all are.

For those cooler crops, make sure they don’t dry up and even utilize that frost blanket or a shade tunnel to help shade your cool weather crops from the sun and the heat.

learn more below!

Help Plants Keep Cool

“Let Them Eat Squash!”

If you have never planted squash before in your garden, I highly encourage you to consider it for this season. Personally, I have never met a squash I didn’t like, but even if traditional zucchini isn’t your thing, there are a vast variety of squash that are worth planting in your garden. Planting squash is said to make you a great neighbor because most have a bountiful crop all season long that must be disbursed.

squash varietiesIf you have never grown squash before, I recommend trying a green zucchini or yellow squash, both are easy to cook with and have a quite mild flavor. I recently fell in love with and will be planting Delicata Squash, a winter squash, which has a sweet orange meat (like sweet potato) that can be cooked with the rind on. I will also be trying my hand at growing Patty Pan Squash, a summer favorite usually found at the farmers market.

Now that I have your mouth watering, hopefully your green thumb is throbbing as well. Remember before planting your garden to have a location prepared that has good access to water and is in an area that will receive full sun. Raised beds or planting directly into the ground are both acceptable options, but you will need to consider that healthy squash plants take up a lot of space. Read your seed packets for accurate spacing, but you should plan on spacing your plants 12 inches apart in rows three to five feet apart, and at a seed depth of two to three inches deep.

While you can start your seeds indoors, squash can be highly susceptible to transplant shock, you will likely have more success by direct seeding in the garden after Mother’s Day here in Ohio, or after your areas last frost date. Squash plants and tomatoes need lots of calcium, so an easy trick at planting is to plant an antacid tablet an inch or so deeper than your seed which will help meet your plants calcium requirements.

Throughout the growing season, always water your squash plants at the ground level, directly at the base of your plants. Cucurbits are highly susceptible to Downy and Powdery Mildew and focused watering with lower leaf defoliation aka pruning (once your plants have reached maturity) will help prevent these diseases. Fertilizing your squash should be done with good bed preparation but can be side-dressed once plants have reached three to four inches tall.

To ensure fruiting, make sure you are planting pollinator-attracting flowers throughout your garden, as squash plants have imperfect flowers (some male and some female) and need help with pollination. You can also hand pollinate your plants using the male flower, a paintbrush or a cotton swab, this video is a nice example:

If you have done your job right, and depending on the variety, you should be harvesting in 60 days after planting and four to eight days after pollination. When harvesting, its best to harvest first thing in the morning with gloves. You can expect healthy plants to typically produce at least one squash every other day. If you don’t harvest regularly, the fruit will harden and the plant will set fewer fruits, but overgrown fruit can still be used for zucchini bread! So find a couple of recipes and enjoy summer, fall or winter of delicious and nutritious squash, and if you find yourself with a surplus, one of my favorite obscure holidays is “Sneak a Zucchini Day” on August 8th.

Hallie Williams
Extension Educator, Agriculture and Natural Resources
OSU Extension, Seneca County

Growing Strawberries for Beginners

Over the years I have tried to grow strawberries with little success. Five years ago, with 25 strawberry plants, a friend taught me some proper growing techniques and100 plants later, I am still having success! Here is what I have learned:

Varieties

Know what type of producer you want. There are three types: June bearing, everbearing, and day-neutral. June bearing strawberries produce during the month of June only the year after they are planted. Everbearing strawberries produce three times a year; once in spring, summer, and fall beginning the year they are planted. Day-neutral plants produce fruit throughout most of the growing season.

You should pick a variety that will fit your eating, freezing, canning, and flavor preferences. You will find there is a greater selection of June-bearing varieties then everbearing or day-neutral.

How many plants will you need? The average family will only need around 25 plants. However, that is what I started with as a family of 4 and it was not nearly enough for us!

Planting Preparation

Before you get your plants, prepare an area for planting. Strawberries like full sun, fertile soil with organic matter, and well-drained soil with a pH of 5.8 to 6.5. Raised beds are good for growing strawberries since the plants do not like having excessive moisture at their roots.

Planting

Early spring (April) is the best time to plant strawberries if the soil is not too wet. When planting, make sure to cover the roots and only half of the crown with soil. The crown is the short stem between the roots and leaves.

Crown of strawberry plant

Crown of strawberry plant

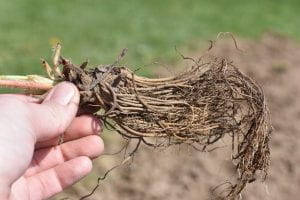
Roots need to be set into the ground vertically. Do not bend the roots horizontally. Bare root plants typically come with lengthy roots. It is okay to even the roots out to fit them into the ground vertically without having to dig a deep hole. I do this by cutting the roots to be even.

Roots of plant

Roots of the strawberry plant

strawberry

Plant Spacing Runners and Removing Blossoms

The long stem along the ground is a runner.

Rows need to be 36-40 inches apart for June bearing plants with 12-24 inches between each plant within the row. Day neutral rows need to be 30-36inches apart and 8-12 inches between each plant within the row.

Mulch the plants with 3-4 inches of straw or wood chips to conserve moisture. Remove runners and flowers throughout the first season. Your goal during year one is to focus on the “mother plant” (original plant).

Dr. Gary Gao with The Ohio State University Extension has a great fact sheet to help you with selection, disease problems and planting advise. Here is the link to the factsheet on Ohioline: https://ohioline.osu.edu/factsheet/hyg-1424

Be looking for a strawberry after harvest renovation article coming in June!


Sabrina Schirtzinger, ANR Educator Knox County, can be reached at 740-397-0401 or Schirtzinger.55@osu.edu. This column is provided by the Ohio Department of Agriculture Victory Garden Program


Raised Bed Vegetable Gardening


Raised beds are a great option for most vegetable gardeners, especially if you only have a small amount of space for a garden. A raised bed is nothing more than a box or container with soil placed on top of the ground. Raised beds typically are more productive than in-ground beds because the soil is less compacted, has better drainage, and warms and dries earlier in the spring, allowing you to start gardening earlier in the season.

Raised beds are also often easier to maintain, particularly for gardeners with limited mobility, and generally have lower perennial weed pressure.  The main disadvantages of raised beds are that they tend to require more frequent irrigation and have a high initial cost of construction. The advantages, however, typically outweigh these disadvantages over the long term.


Design & Construction
Gardeners can purchase raised bed kits that require assembly, or you can build beds out of many different types of materials. Large containers such as livestock water troughs are popular right now for their industrial-chic appearance and these containers make excellent raised beds.

Most gardeners elect to build beds out of non-treated rot-resistant lumber such as cedar, oak, or locust. Bricks, rocks, and cinder blocks can also be used.  Gardeners should avoid the use of used railroad ties and tires as these items have the potential for leaching toxic materials into the soil.

Proper design and sizing of a raised bed is critical so that the gardener can easily accomplish all garden tasks while outside the bed, so beds should be no more than 3 or 4 feet wide, and even more narrow if young children will be gardening in the bed. While the length of the bed is less critical, many raised beds are designed to be a maximum of 8 feet in length.

Soil in raised beds should be a minimum of 6 inches deep and 8 to 10 inches is desirable.  Raised beds can be placed directly over existing sod or soil, and a barrier does not need to be placed under the raised bed.

Raised beds can also be elevated several feet off the ground to allow individuals with limited mobility or those confined to a wheelchair to enjoy the therapeutic benefits of gardening. Such beds should be designed to be a maximum of 24 inches wide to allow easy access to the entire bed.

Soil
One of the greatest benefits of gardening in raised beds is the ability to grow in lighter, less compacted soil with more pore space for air and water, so filling raised beds with native soil dug from existing in-ground growing spaces is not recommended. Ideally, raised beds should be filled with a mixture of quality garden soil and compost. Many garden centers sell bagged soil blended specifically for use in raised beds.

Location
Like any vegetable garden, raised beds should be located in areas that receive a minimum of 6 to 8 hours of direct sunlight each day. Raised beds can be an option for utilizing sloped locations if the beds are terraced during construction.  Ideally, raised beds should be located close to a water source to facilitate frequent irrigation. If you build several raised beds be sure to allow for adequate space between beds to facilitate working in each bed as well as maintenance of the beds.

While a  raised bed won’t solve every problem a vegetable gardener might encounter during the growing season, it will provide an opportunity to produce more vegetables in a smaller space while reducing the labor involved with routine garden maintenance chores.

Mike Hogan, hogan.1@osu.edu
Extension Educator & Associate Professor,
Agriculture & Natural Resources
2019 Faculty Council Chair
OSU Extension, Franklin County
Past President, National Association of County Agricultural Agents


ODA And OSU Extension Kick Off 2021 Ohio Victory Gardens Program

It’s time to get your hands dirty and start growing! The Ohio Department of Agriculture (ODA) and OSU Extension Offices are kicking off the second year of the Victory Gardens Program. Due to high demand, the program is expanding to include 25 counties, up from 10 counties last year. Approximately 8,300 seed packets will be available free to the public to get people planting.

“We have seen a revived passion for planting through our Victory Gardens Program, which has expanded to 15 additional counties this year,” said Dorothy Pelanda, Director of the Ohio Department of Agriculture. “Our Ohio Victory Gardens are meant to be enjoyed by everyone, from urban apartment dwellers, to those living in the country, and everyone in between. We hope this will inspire a new generation of gardeners who will be able to enjoy the fruits of their labor for years to come.”

“We are excited to expand our partnership with ODA on the Victory Garden Program. Last year, we had an overwhelming positive response to the program, so this year, we will be expanding the seed distribution initiative to 25 Ohio State University Extension county offices,” said Dr. Cathann A. Kress, Vice President for Agricultural Administration and Dean, College of Food, Agricultural and Environmental Sciences. “No matter your level of gardening experience, our OSU Extension educators will provide expertise that will help your gardens thrive.”

Seeds will be available to pick up the first week of April at county OSU Extension Offices. Specific days and times for each office are available on the Ohio Victory Gardens website, as well as planting resources and information. The following counties are taking part in the program this year:

Athens Cuyahoga Hamilton Mahoning Stark
Butler Fairfield Jefferson Miami Summit
Clark Franklin Knox Montgomery Trumbull
Clinton Geauga Licking Seneca Union
Coshocton Greene Lucas Shelby Washington

Victory Gardens originated during World War I, an answer to a severe food shortage at the time. The idea was wildly successful, growing an army of amateur gardeners and serving to boost morale and patriotism. Although there’s no food shortage now, ODA and OSU Extension are reviving the effort and once again encouraging people to plant seeds, realize the fruits of their labor, and share with others if inspired.

The Victory Gardens Program offers a full website with details on seed distribution, advice, and resources on every aspect of planting and harvesting produce.

-30-

Media Contact:
Katie Boyer, 614.563.6974
katie.boyer@agri.ohio.gov

WEBINAR: Starting Seeds for your Victory Garden

Wednesday, April 7th, 2021 12:00 PM


The Seneca County Extension office is proud to offer a 1-hour webinar with Mackenzie Moyer to help you learn how to start your seeds before transplanting to your garden. This webinar will teach you all the beginner basics of starting seeds for a successful growing season.

Register here: https://go.osu.edu/startingseeds

CONTACT INFORMATION

Hallie Williams
Agricultural & Natural Resources Educator
williams.6386@osu.edu

Testing Old Seeds

Do you have old seeds? Unsure if they will germinate? Did you know you can test your seeds’ germination rate? Follow these steps:

Step 1: Gather Your Supplies

  • Water in a container (bowl)
  • Paper towels
  • Seeds
  • Ziploc bag or container with a clear lid.

Step 2: Moisten the Paper Towels

  • Dip the paper towel into the water.
  • Squeeze out the extra water.

Step 3: Seeds

  • Place seeds in the center of the paper towel.
  • Fold the paper towel over to cover the seeds.

Step 4: Seal

  • Write on the container the variety that you are testing.
  • Record the days of germination. This is found on the back of the seed packet.
  • Write the date that you started testing.

Step 5: Placing

  • Put the bag/container in indirect sunlight for the length of time the seeds require for germination.
  • You may be tempted to open your container up and look at the seeds. Don’t do it! You need to keep the seeds warm and moist.

Step 6: Calculating Germination Rate

  • Germination rate is a percentage based on the number of seeds that you tested.
    • If you tested 10 seeds and 6 germinated your seed germination rate is 60%.

Sabrina Schirtzinger, ANR Educator Knox County, can be reached at 740-397-0401 or Schirtzinger.55@osu.edu.

Seed Starting – The Very Basics – Let’s start with supplies

I have all my seeds on order and can’t wait to get some of them started indoors.

Starting seeds indoors requires light, water, a container and soil mix, and fertilizer.  In some cases, they need heat or warm soil to germinate – this depends on the seed variety.

Light is absolutely critical for success with seed starting.  Think about the plants that you are growing and their normal growing conditions.  Most of them thrive in full sun.

Now, think about the location in your house where you are going to start the seeds.  You may need to supply supplemental lighting in order to meet the needs of the seeds.  A bright west window is ok but still isn’t quite enough light for good growth.

Light needs to be available to the plant for at least 14-16 hours a day.  The light source needs to be close to the plants, no more than two inches above the top of the plant.  Light that is farther away leads to stretched plants.

You’ll see stretched plants if you are planting in a bright window without supplemental light.  The plant reaches for the light, therefore, stretches and become lanky.

Make sure the container has drainage holes

Containers are also critical for success.  No matter the container, make sure it has drainage holes to prevent accidental overwatering.

Gardeners use all types of containers, often recycling plastic take out and other containers.  Just be sure to poke holes in the bottom for good drainage.

The seed starting mix is also critical for success.  Garden soil is too heavy and usually leads to damping off or root rot because of poor drainage.

I purchase a soil mix that is labeled for seed starting.  It’s lightweight and well-drained.  I fill my flats and soak them with water to ensure that the soil is moist prior to seeding.

There are different methods to start the seeds.  I like to seed everything in one flat and then transplant them into their final container after they develop a few sets of true leaves.  Others like to directly sew them into their final container.

Watering is the most difficult task when it comes to plants.  Figure out the water requirements for the plants and the soil mix that you are using.  Pay close attention during the seedling stage to over- and underwatering.  Overwatering leads to almost certain death.  Err on the dry side, but don’t let the plants get to the wilting stage.

Fertilizer will be important a few weeks after seed starting and when the plants develop true leaves.  The first leaves that emerge are the cotyledon leaves and provide nutrients to the emerging plant.

Don’t forget to add labels to your seedlings

Once the true leaves develop, photosynthesis begins, and the plant needs additional nutrients.  Follow the directions on any liquid fertilizer for best success.

In terms of transplanting, as mentioned above, if you start the seeds with a seed starting mix, you may want to select a lightweight soilless mix for growing them on.  This mix will hold a little more moisture for the larger plant while providing good drainage to prevent overwatering.

Growing your plants indoors is fun and not all that expensive.  Give it a try!