Explain (or make reasonable assumptions about) the manufacturing processes used to create a pod-style coffee maker

- Three main elements: cup, filter, and aluminum foil top → maintain the pod contents’ quality and freshness by preventing oxygen, light, and moisture from degrading the coffee
- Lid: food-grade aluminum foil which is sealed to the cup portion of the pod during the production and filling process
- Filter: made with abaca fiber (same material typically used in tea bags); filter is welded to the cup portion of the pod during the production and filling process
- Cup: #7 plastic (multi-layer blend of materials and plastics); inside layers are polyethylene; plastics must be BPA free
- Coffee: roast the coffee → immediately after roasting, coffee is packaged into air tight pods → nitrogen-flush during packaging ensures there is little oxygen left in the pod
- Source: https://www.officebarista.co.uk/blogs/better-office-coffee/keurig-k-cup-whats-in-it
Barrie House Coffee Company roasting plant and packaging facility
- Source: https://www.businessinsider.com/how-k-cup-coffee-is-made-2017-10#we-arrived-at-barrie-house-coffee-company-in-elmsford-new-york-ready-to-learn-and-very-ready-to-drink-coffee-1

- Fair trade coffee arrives in large bags
- Coffee grounds must be smaller and more granular for the best, most even brew
- Each pod contains 13-18 grams of ground coffee

-
- These rolls are used to create the paper filters
- Claims that the plastic cup and foil lid can be recycled, and the filter is biodegradable

- Cups now have the filters applied and are filled with coffee → photo technology is used to inspect each of the K-Cups
- Inspection includes accuracy of assembly, accuracy of printed labels, and weight measurements
- Any K-Cup that does not meet the specifications is thrown away and the capsules are recycled

- K-Cups that pass the inspection test move on to a conveyor belt where they are packaged into boxes
- Machine will automatically remove the K-Cups from the conveyor belt and place them into boxes
- Boxes go into a process of being labeled, stacked, and then shipped


- Cups have ridges on the outside → help ensure that the filter does not stick to the sides of the capsule when hot water is added
- Also helps ensure that the coffee is dispersed evenly throughout the capsule in order for the coffee to not be burned when brewed
- Filter sits as low as possible in the capsule so there is a larger capacity for coffee (18-20% more space)
Pod Coffee Maker Components
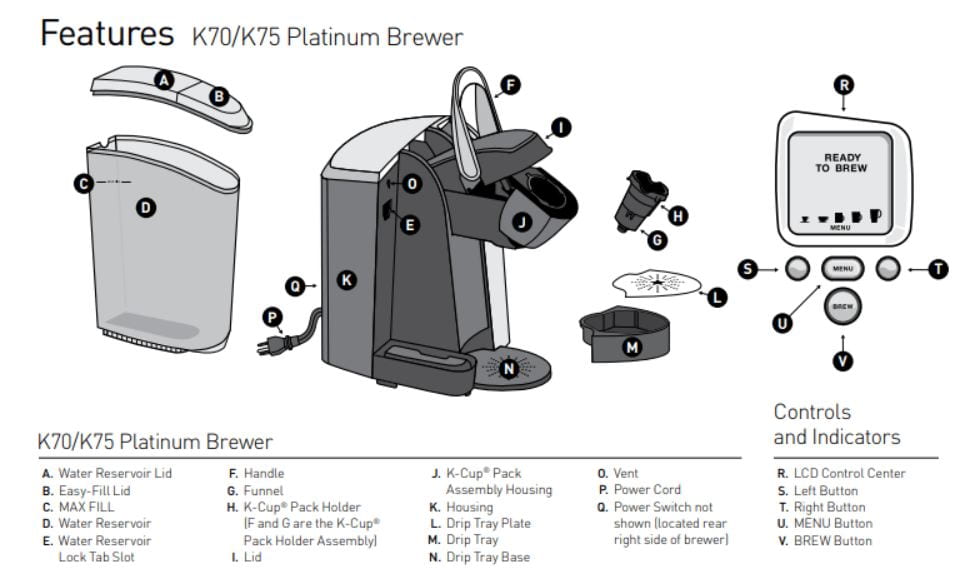
Source: https://beanpick.com/keurig-k75-platinum-brewing-system-review/keurig-k70-k75-parts-diagram/
Keurig Teardown: Model B130 Single Cup Brewing System
Source: https://www.fictiv.com/teardowns/keurig-b130-coffee-brewing-system-teardown

- Drip plate and tray are made from injection molded ABS plastic
- Drip tray has a gloss finish → highly polished/shiny surface
- Injection molding tool is polished by hand with diamond paste to create this shiny finish
- Drip plate has a matte finish → injection molding tool is etched with a laser, chemicals, or media blasting to create this matte finish
- Most screws were Phillips heads but there were Torox security screws as well; each screw had a nut and washer
- Torox security screws were used to secure the ground wire and make sure people couldn’t mess with this wire

- Printed circuit board assembly (PCBA) was screwed to the base plate and contained a thermocouple → thermal paste was applied to the thermocouple in order to help achieve a more accurate temperature reading of the base plate

- Metal stamping was used to create the bottom cover plate

- Bottom contained numerous wired connections; an internal plastic bracket made from polypropylene was used to organize and place the wires within the machine


- Front panels can be easily removed; were made from metallic painted ABS with pad printed graphics
- Panels snap fit into the frame; snap fit was achieved by using cantilever clips with 90 degree hook faces
- On the right side of the frame, there were two more connected PCBAs
- Upper right PCBA → has three LEDs and a push button switch
- Green: lit up the “Place Cup” light
- Red: lit up the “Heating” light
- Cyan: lit up the “Brew” button

- Brew button was a clear polycarbonate
- Painted center with a graphic; also had a spring for springback as well


- Left image: polycarbonate light guide
- Right image: rubber gasket; masked light, waterproofed the upper right PCBA
- Both were place between the upper PCBA and the cover panel on the right side
- Lower right PCBA:
- Had a green LED that lit up the “Power” button
- Same button mechanism → polycarbonate clear button, compression spring, rubber gasket, and then the PCBA
K-Cup Holder

- Handle opens and closes the lid and punctures the K-Cup portion pack
- Made from metallic painted ABS; secured with two screws and a clip on top


- Push the “Press to Open” button to reveal the K-Cup holder
- K-Cup is punctured with the metal needle on the top and bottom
- Right image = K-Cup holder assembly; can be removed and needs to be cleaned by the user; made from polypropylene (cheaper material that can be replaced easier)
Water Tank
-
-
- Water tank lid was removed; had another PCBA that would sense if the lid was open or not while the user was filling the tank with water
- The rubber rings above and below the water only plate help ensure that the water does not leave the tank while being heated


- Back housing was a large U-shaped piece of ABS with a matte finish on the outside and no finish on the inside
- Water tubs and electronics are loosely organized inside the housing with zip ties
Internal Hydraulics:

- This component holds the steel stamped “water only” plate and is made from polyoxymethylene (POM) → used to make strong, precise plastic parts
- Blue rubber water droplet symbol; loosely fit into the opening in the above component


- Internal hydraulic components can only be seen with outer housing removed

Electronics
- Air pumps rely on voltage signals in order to know when to pump air into the top of the water heater
- There is a system that controls how much water is being sent to the coffee cup by tracking some reference level
- There is a thermostat that keeps track of the temperature in the water tank
- There is a switch that detects if the lid is closed or not
Mechanical Structure

- The bottom of the machine is a single piece made from injection molded ABS

- The lid consisted of two pieces
- Left: top cover; holds the “Press to Open Button”; made from ABS
- Right: internal component; made from PC/GF = glass fiber + polycarbonate; has great mechanical properties and heat distortion temperature

- This is the assembly where the K-Cup is inserted; made from three separate components; all made from PC/GF
- Connected via a guide rail; can be disconnected at the right angle but the machine prevents this from happening
Summary

- Plastics included:
- ABS, PP, POM, and PC/GF
- ABS → low cost engineering plastic (most frequently used)
- PP → cheaper material used in less critical components (lifting handle, internal organization of the wires)
- POM and PC/GF → more expensive; only used for the mechanically essential components
- Electronics are simple in order to prevent more opportunities for failure; elastomer gaskets are used to waterproof the electronics
- Cheap retail price → company makes most of the money off of the K-Cups