Always show meeting control toolbar in Zoom

If you’ve ever started sharing your screen in Zoom and then lost track of the controls for Zoom, there is a setting to fix that.  It’s called Always show meeting control toolbar and here’s how you find it. You can also skip down this page for a video demo.

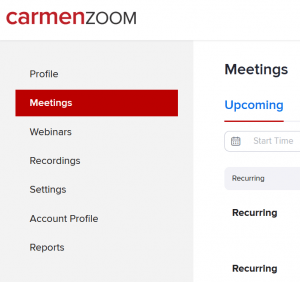
Navigate to CarmenZoom in your browser and login with your name.#. By default, you’ll be on the Meetings tab:

Default tab once logged in to CarmenZoom


Move to the Settings tab

Settings tab and details on CarmenZoom

There are many settings here, I’d suggest you search (Ctrl + F or Cmd + F) for the words Always show meeting control toolbar, or you can scroll down until you find the setting.  When the setting is turned on, the toggle bar will appear red with the white dot on the right side.


Always show Zoom Controls toggled on


Now when you share screen in Zoom, the control toolbar will appear at the top center of your screen so you can always find it. Note, only you will be able to see the toolbar, unless you also turn on the setting to show Zoom controls during meetings.  But that’s a different topic!

Video – Always show Zoom controls

PowerPoint as virtual background in Zoom

An advanced feature within Zoom is the ability to show your PowerPoint slides as your virtual background.  This feature allows you to advance your slides while keeping your video feed on top.

To show your PowerPoint slides as your background, click the green Share Screen button. By default, the Basic options appear:

Image of the first step in setting PowerPoint as virtual background

Switch to the Advanced tab, and select PowerPoint as Virtual Background and then click Share:

Image of the second step in setting PowerPoint as virtual background

Browse to find the file you want, and click Open:

Image of the third step in setting PowerPoint as virtual background

It’ll take a moment to prepare your slides. When the slides are ready, you’ll see arrows (< >) in the bottom center of the screen for advancing the slides:

Image of the last step in setting PowerPoint as virtual background

Peer review in CarmenCanvas

The peer review function in CarmenCanvas is one way to create interaction among students, and with advance planning in the setup, may serve to lessen the grading burden a bit for instructors.  While the instructor or TA would still have to assign grades for each assignment, you can assign a rubric to the peer review and let students have the “first pass” at grading each other’s submissions.  Note that this works best for online only submissions. Canvas provides peer review tips, and the videos and links below should help you get started as well.

If the assignment in question is a writing assignment, I would also suggest consulting the Center for the Study and Teaching of Writing.  They have great resources as part of their Writing Across the Curriculum program. I’ve found their resources to be amazingly helpful both in creating the instructions for an assignment, and in creating the rubrics.

Ohio State guides to peer review

Creating a peer review assignment


Grading the peer review itself

Canvas LMS guides for instructors:

Canvas LMS guides for students:

Creating a Virtual Office Using Google Slides

In an attempt to keep things fun for my students (and myself), I created a “Virtual Office” in Google Slides. This is embedded in my Carmen course, and allows students to interact with my virtual office space by clicking links, listening to audio recordings, and more. Below you can see my current virtual office that I update throughout the semester. Feel free to click on each item and test it out!

If you’re interested in creating your own, you’ll first need to make sure you have the necessary applications/accounts on your computer.

Create Your Bitmoji (this is the avatar of yourself)

  • Download the Bitmoji app to your phone from the App Store or Google Play. Follow the instructions in app to create the virtual you.

Download Google Chrome

Install the Bitmoji Chrome Extension

  • Go to Bitmoji.com
  • Scroll to the very bottom of the page and select “Bitmoji for Chrome”.
  • Add the Extension to Chrome as directed by this page.

Create a Google Account (GMAIL)


Once you’ve set all of this up, you can begin to create your virtual office space!

Open up Google Slides (https://docs.google.com/presentation/u/0/)

Create a Blank Slide:

Select a Background:

Select “Choose Image”, “Google Image Search”. then type in “wall and floor background”. Select one you like and insert it.


Decorate:

Go to “Insert”:


From there, select “Image”, then “search the web”. You can search any item with the words “transparent background”. For example, you might search “desk transparent background”. Double click the desk you like, size it how you want, and now your office has a desk.

Add your Bitmoji by using the bitmoji icon on the top of Google Chrome:


You can also use existing photos, screenshots, etc.

Share:

If you’re embedding this in Carmen, you’ll want to go to “File”, “Publish to the Web”, “Embed”.

This is the embed code that you can input in your Carmen page.

If you’d like to get even fancier, and want some help adding audio, video, or other ideas, feel free to reach out to me at felhaber.1@osu.edu

Samantha Felhaber, M.Ed.
Pre-Major Advisor
College of Medicine School of Health and Rehabilitation Sciences
206 Atwell Hall, 453 West 10th Avenue, Columbus, OH 43210
614-292-1706 Office
felhaber.1@osu.edu / hrs.osu.edu
Pronouns: she/her/hers
How-to: Import from CanvasCommons

A new course template for instructors in HRS has been published to CanvasCommons. Built on the ODEE Distance Course Core Template, the HRS Carmen Course Template includes everything ODEE created and adds images, links, and resources specific to HRS.  Here are the steps to import the course template from CanvasCommons.  Note, these steps can be used to import anything you find in CanvasCommons.

  1. On the right side of the course navigation, click Import from Commons.

Image highlighting the option to import from commons.

2. The page will redirect to CanvasCommons, a repository of templates created by others using Canvas. Here you can search for just about anything, and filter by grade level, institution, or resource.

Image of the default page in CanvasCommons.

3. Type HRS Carmen Course Template in the search bar to find the HRS template. Click on the course.

Image of the search results for HRS Carmen Course Template in CanvasCommons

4. On the right side of the next page, click the blue button to Import/Download

Image highlighting the import/download option.

5. Check the box next to the course you want to import the template into, and click Import into Course:

Image showing how to import into a course.

6. Look for the green bar at the top- give it a few minutes, and then head back to your course to see the result.

Image showing the success message when importing a resource.