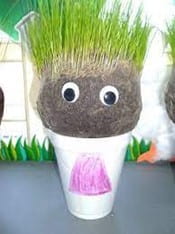
Growing Chia Pets

Growing plants is an activity that has success happening right before your eyes! Plants need five things to grow: light, water, air, nutrients, and the proper temperature. Light is absorbed by the plant causing it to produce food that is utilized by the plant for growth. We all need food and water so make sure you are providing adequate water to the plant. Air is vital to provide carbon dioxide for making that food and making sure our environment is an acceptable temperature for growth. Most plants are not excited about frosty mornings, so covering outside plants is a must for those with flowers, bushes, and vegetables until May 15. Nutrients are the last thing that is necessary for plant growth and is typically provided in the soil and absorbed into the plant through the roots.

What is a “chia pet”? As advertised on television, chia pets are round, clay objects that grow grass resembling hair. The best part is we can give them “a haircut”, and then watch it grow to be cut again. We still need to provide all the necessary ingredients to grow our “hair” but can find many of these items around the house or at the local store.

Supplies needed: small Styrofoam cup, knee high pantyhose, potting soil, grass seed, markers, googly eyes and glue.

  1. Place grass seed in the bottom of the pantyhose (make sure you are covering a good section to make its head full of hair).
  2. Now add 1 ½ cups of potting soil on top of the seed.
  3. Tie the pantyhose tight around the soil, making it round like a human head.
  4. Decorate your cup (which is your flowerpot) and then fill it ½ full of water.
  5. Turn your head upside down (so extra pantyhose is hanging down) and place the pantyhose full of soil and seed in the cup.
  6. You can add eyes, ears, nose, etc. to make your chia pet come alive!
  7. The pantyhose acts as the roots of the plant. In just a few short days, your chia pet will start growing hair.
  8. Make sure that you provide sunlight and add water as needed to help your “hair” grow!

Conducting Nature Fun Activities Virtually

Spring is in the air and children are excited to go outside and explore.  However, many clubs still need to conduct their meetings virtually because of current restrictions.  With a few modifications, you can still offer some great outdoor related activities in a virtual setting.  Read on to learn how you can modify some of the Nature Fun activities from The Big Book of 4-H Cloverbud Activities (2016, pgs. 85-89).

Preparing for a virtual lesson takes a little bit of communication and preparation by both the volunteers and the members.  Get your members excited and prepared for the meeting by sending a message a few days prior.  Let the members know the topic you plan to cover and the supplies you need them to have ready when they log onto the virtual meeting.

The Magic Can activity allows children to use their sense of hearing to listen for noises they may hear when an item from nature is being shaken in a can.  Since members will be unable to pass the can around and shake it individually, you can shake the can for them. The children will need reminded to use their ‘listening ears’ and quietly listen to the sound so everyone will have a chance to hear.  Ask the members to give you a thumbs up once they think they know what item from nature is in the can.  You can call on members to share their guess before showing the group what is in the can.

The Sounds of Nature Hike activity can be adapted using audio recordings of nature.  Check online for videos or audio recordings of nature.  You can share the audio from your electronic device during your meeting and allow the members to listen to sounds.  Ask your members to close their eyes, turn on their ‘listening ears’, and listen quietly to the sounds.  Once everyone has had a chance to listen for a little while, the members can share the sounds they heard.  You can replay the audio to point out specific sounds that were mentioned.  When searching for sounds of nature, be sure to find a variety of recordings to share such as birds, moving streams, waves of the ocean, etc.  This activity can enable you to share how sounds of nature may vary depending on where you live. 

The Leaf Rubbings activity can be done virtually as well.  Ask your members to gather 3-5 leaves prior to the meeting.  They should have the leaves and a piece of paper and some crayons when they join the meeting.  This activity may be easier to use a little later in spring when leaves are more readily available.  Members can each share the leaves they found and use them for the leaf rubbing drawing.  Members may be able to identify the tree species their leaf came from or find it exciting to see that other members have the same type of trees near their house.

The Nature Scavenger Hunt activity can be turned into a nature hike show and tell activity.  Ask your members to take a hike through nature prior to the meeting and bring 5 things to the meeting that they found in nature.  Remind them not to bring anything back that may be an animal’s habitat as they do not want to disturb it.  Allow each member to share the items they found on their hike and tell where they found it.  Some items may be very common while other items in nature are unique to certain environments (open, dry area vs. a dark, moist area).  Ask the members to each share two things they saw on their nature hike, but were unable to bring back with them (i.e. bird, bird’s nest, squirrel, insect, etc.).  If they are able, encourage youth to return the items they collected back to nature after your meeting is complete. The original Nature Scavenger Hunt activity can be shared with members to complete on their own prior to your meeting as an interest approach activity or after the meeting as a follow-up application activity.

The attention span of Cloverbud members during a virtual meeting may drop quicker than an in-person meeting.  Your virtual meeting may only last 30-40 minutes.  Depending on the number of members you have and how much you want to accomplish, you may feel like this is not enough time to complete your lesson.  It is okay to provide an activity for the member to do prior to the meeting as an interest approach to the lesson you are going to teach during the meeting.  Another option is to provide them with an activity to complete at home after their meeting, reinforcing what they learned.  Encourage members to share with you what they completed during their application activity.


Reference:  Glover, C., Longo, M., Mendenz, B., Millhouse, C., Williams, R., Woods, D.,  Zimmer, B. (2016).  The Big Book of 4-H Cloverbud Activities.  Columbus, OH, The Ohio State University.

It’s Slime Time!

We are all fascinated by slime!  There are so many different colors, textures, mixtures, and ingredients used to make slime. A classic favorite that has been around for quite some time is Oobleck. Oobleck was cool before slime was cool! Take some time with your Cloverbuds to make some Oobleck.

Make sure you have a space that can get messy, gather all the ingredients, and wash your hands before you begin.

Ingredients/Supplies:

  • Small bowl
  • 1 cup of water
  • 1.5 – 2 cups of cornstarch
  • Spoon – optional
  • A few drops of food coloring – optional

Instructions:

  1. Pour water into a small bowl.
  2. Begin adding cornstarch to the water. You can stir with a spoon at first, but you’ll need to use your hands as the mixture thickens.
  3. As you are mixing the cornstarch in you may add the optional food coloring.
  4. Once you’ve added 1.5 cups of cornstarch, add the remaining amount a little at a time. You may not need it at all.
  5. You are looking for a consistency that is liquid and solid at the same time.
  6. If you find you’ve added too much cornstarch, add a little water to thin it out.

Oobleck is a great tool to use when teaching hands-on science concepts. Once you have created your Oobleck, take some time to play with it.

Discuss the following science concepts:

  • Is it a solid? Or is it a liquid? – Answer: It acts as both!
  • What is a solid? – Answer: matter that retains it’s shape when not confined.
  • What is a liquid? – Answer: a substance that flows freely.
  • What other things can be both a solid and a liquid? – Answer: water/ice, rock/lava

Store your Oobleck in an air-tight container. Be sure to tell your Cloverbuds not to eat their Oobleck!

Ada Twist, Scientist – A Cloverbud Reading Adventures Activity

The Ohio 4-H Cloverbud Reading Adventures Series incorporates literature, crafts, games, and snacks into a fun-filled program for children in grades K-2.  In Ada Twist, Scientist, we meet a precocious second grader who looks at the world through a sense of discovery.  Her need to explore and understand everything around her began with her first word at the age of three – “WHY?”.  From that time forward we are drawn into the amazing journey of this young scientist as she pokes, smells, sees, tests, tries, puzzles, and quests to learn “how it ALL works”.

The book is beautifully illustrated with experiments and materials that Ada used in her research.  To determine the cause of a pungent odor, Ada Marie conducted several investigations.  Your Cloverbuds can do their own explorations by using the “How Smart is Your Nose?” activity from The Big Book of 4-H Cloverbud Activities.  Place different “identifiable aromas” in sandwich bags.  Blindfold the children and ask them to sniff the contents of the bags.  Have them ask questions to figure out the scents.

Ada also dropped tablets into 2-liter bottles which caused an explosion of colorful soda.  Although this may be a fun messy outside activity, another less messy inside experiment can also be conducted using clear carbonated water or soda, a clear plastic cup, and raisins.  Pour liquid into the cup.  Add a few raisins.  Wait for it – the raisins will begin to rise and fall as if doing a dance.  Why?  Carbon dioxide bubbles are released from the carbonated beverage.  They attach to the rough surface of the raisins and cause the raisins to float to the surface of the liquid.  Once the bubbles pop and the gas is released, they return to the bottom of the cup.  This up and down movement will continue until the soda is “flat”.  Try other foods such as pasta, corn, or candy.  How do they perform?

For an edible science snack, make fruit sorbet in a bag.  Pour one cup of fruit juice in a quart-size zip-close bag.  Seal the bag.  Place that bag into another bag the same size.  Seal the second bag.  In a gallon size zip-close bag, place 4 cups of ice and 3 tablespoons of coarse ice cream salt.  Put the small sealed bags in the larger bag and close tightly.  Have Cloverbuds shake the bags for about 5 minutes while wearing winter gloves.  Take the inner bag out and pour into cups.  Enjoy!  Why did the mixture freeze?  Salt added to ice lowers the freezing point.  The melting ice absorbs heat making the mixture cooler which causes it to freeze (Source: Science Fun with Kitchen Chemistry).

Have Cloverbuds make a picture journal of what they learned.  Encourage them to find out more about other children who sought solutions to challenges by raising questions and developing better ways to make things work in the book, Kids Who Are Changing the World.  May you never lose the wonder of “WHY”.

Explore STEM with Cloverbuds

Science, Technology, Engineering and Math (STEM) education at an early age fosters growth in the curiosity and creativity of young minds. These young minds are the basis for the next big discovery and the world depends on STEM innovations. STEM exploration includes interactive and hands-on activities, and let’s be honest, learning through play is more fun! It is never too early to start building the skills that youth will need for their careers and future success as adults. I encourage you to take the opportunity to allow Cloverbuds to “explore” through “doing” and spark the thought process that leads young minds to understand there is “more than one way to complete a task successfully”. To get you started here is an activity to use at your next meeting to explore STEM.

Rain Cloud in a Jar

A great way to demonstrate how rain arrives to us through clouds.

You will need a few supplies:

– food coloring

– water

– clear jar (pint or quart)

– shaving cream

– plastic pipettes or eye droppers

– small glass

  1. Mix a few drops of food coloring into water in the small glass and set aside.
  2. Fill the glass jar ¾ of way with cool water.
  3. Fill the glass jar the rest of the way with shaving cream creating your “cloud”.
  4. Now we are ready to make it rain!
  5. Kids can now use the pipettes to squirt the colored water into the top of the shaving cream.
  6. Once the cloud gets heavier with liquid, colored rain will make its way through the cloud and start falling onto the ground (bottom of the jar).

Clouds are formed from billions of water droplets. When those droplets get heavy enough, gravity pulls them down as rain.

Source: Activity retrieved August 29, 2019 from thestemlabratory.com

Cooking with Cloverbuds: Apples, Apples, and More Apples!

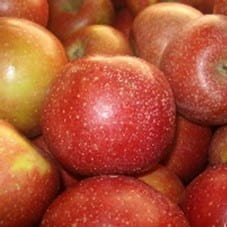
Everyone loves apples!  And fall is a great time to check out all the varieties of apples available.  Cloverbuds will have their favorite but bring in different kinds of apples for a tasting party.  Before you show them the apples read the story The Little Red House with No Doors and No Window and a Star Inside. Here is a link to the story: https://www.ncagr.gov/agscool/commodities/redhouse.htm

See if they can guess the answer to the riddle before you finish the story.  After you show them the star inside the apple, let your Cloverbuds taste the other varieties of apples you brought and let them decide which kind is their favorite by making an apple graph.

Below are some other apples activities and recipes to enjoy.

Activity 1:  Apple Science

When apples are exposed to air they start to turn brown. Try experimenting with kitchen ingredients and see which items will work so apples do not turn brown.

You will need: milk, baking soda mixed with water, vinegar, lemon juice, 6 small bowls, knife for cutting the apples and of course apples.  In small bowls put each of the ingredients and leave one bowl with nothing.

Cut up your apples and place them in the bowls. Pour each ingredient over the apples and wait and see what happens. (While waiting you could read a story about How Apples Grow by Betsy Maestro or choose any book about apples.) Check on your apples and see which item worked best. Discuss with your Cloverbuds why they think one worked better than another.

Activity 2: Apple Art

Use your apple star and dip in paint to have Cloverbuds make apples creatures. You will need paint, construction paper, markers, paper towels for clean-up, and plastic bag paint shirts to protect clothes.

Activity 3: Apple Snacks

  • Apples sandwiches – Cut apple in round slices so you can see the star. Cut out the middle with the seeds. Spread with peanut butter, hazelnut spread or cream cheese. Fill with raisins, chocolate chips, coconut or whatever snack you would like.
  • Apple Pie in a Cup – Layer in a cup diced apples, graham cracker, and whipped topping. Don’t forget the caramel topping.
  • Yogurt Delight –Layer apples in a cup and top with yogurt. You can add sprinkles too.

Let the fun begin as you explore the world of apples with your Cloverbuds!

Autumn Activities for Cloverbuds

It seems like summer flew by and we are looking towards autumn. This is the time to enjoy some of those last outdoor activities before the weather turns really cold.

Start Simple.

Activities do not have to be complicated and require a lot of planning. Just doing things together is important. What might you do?

  1. Visit a pumpkin patch and pick out a pumpkin to paint or carve
  2. Rake up a pile of leaves to play in – Remember to think about safety and make sure that the pile is deep enough if your children are going to jump in it.
  3. Take a walk – visit a local park or your own backyard and enjoy the sights of autumn. Ask your child to describe how nature looks different at this time of year.
  4. Pick apples together. Eat them plain or make a salad or dessert from what you bring home.

Fall is also a great time to try new science activities or get a little crafty. Try these activities:


How Do Leaves Change Colors

from https://www.123homeschool4me.com/why-do-leaves-change-color-science_52


Supplies:

Glass jars

Coffee Filters

Leaves

Rubbing Alcohol

On your nature walk collect a variety of leaves. Sort the leaves by color into the glass containers. Cover with the rubbing alcohol and grind the leaves up.

Make a cone shape from the coffee filter and place the tip in the container. Allow to sit long enough to absorb the liquid. It may take a little while to absorb the liquid. As the liquid travels up the coffee filter, it separates into the colors that were inside the leaf.

THE SCIENCE BEHIND IT…

Plants create the oxygen that we breathe through photosynthesis. They turn water and carbon dioxide into oxygen and glucose. We breathe the oxygen. The plants use the glucose to grow. Photosynthesis means “putting together with light”. Chlorophyll is used for photosynthesis and gives plants their green color.

Sunlight is an important part of photosynthesis. In the winter when the days are shorter, plants are exposed to less sunlight. Because of this lack of sunlight, plants go into a resting state. They use the glucose that they stored over the summer to live through the winter. The green chlorophyll disappears from the leaves and we start to see the fall colors like orange and yellow which have been in the leaves all along.

Leaf People

This is a simple activity that you can get creative with.

Collect a variety of leaves of different shapes and sizes. You can also collect small twigs and other natural materials to use. Have on hand craft supplies such as google eyes.

Using glue, glue dots or double sided tape, attach the leaves to a piece of paper create people (or even a favorite animal). The leaves might be all the parts of the person – head, body, arms and legs. You can also use the leaf as the head/body and use twigs as arms and legs. Just allow your child to be creative.


Images from MyMommyStyle.com, handsonaswegrow.com, fun-a-day.com, smallhandsbigworld.com

Fall is a great time to explore activities with your Cloverbud age youth.

Cooking with Cloverbud Science

Kids love to experiment, so what better way than by using kitchen science? The best part about beginning kitchen science is a lot of ingredients are already available as common items in the kitchen. Children will be able to:

  1. Experience scientific method

When looking at scientific method, there are basically five points to take a look at:

  • Observe/Question: What do you want to find out?
  • Hypothesis: Predict what will happen.
  • Experiment: Conduct you experiment.
  • Draw Conclusions: What happened? Was your prediction correct?
  • Share Results: What did you learn? Share with your fellow Cloverbuds
  1. Explore the differences between a mixture, solution and a reaction

A mixture is when two or more items are combined and no reaction takes place. A solution is a type of mixture that is formed when one substance dissolves in a liquid with no reaction.  A reaction occurs when two materials are combined and a reaction occurs or something happens.

Materials list for each Cloverbud: ¼ t salt, ¼ t pepper, ½ t sugar, ¼ c water, 1 t baking soda, ¼ c vinegar, three small cups, small stick for stirring, small snack baggies and one sandwich size zip lock bag. Prepare one baggie for each dry ingredient.

Activity 1

  1. Have the Cloverbuds predict what will happen if they put salt and pepper together in a small cup.
  2. Have the children mix salt and pepper together in the small cup.

Did anything happen? Can you still see the salt and pepper? Did your prediction come true? What is a mixture? What other ingredients could you use to make a mixture?

Snack mixes make great mixtures because you can still see what ingredients you used.  You can use any snack ingredients such as pretzels, cereal, veggie chips, peanuts, or corn chips. A fun activity is to have several different snack items available and let the Cloverbuds make up their own recipe and name for a snack mix.

Activity 2

  1. Have the Cloverbuds predict what will happen if they put sugar and water together.
  2. Have them stir the sugar and water together in a small cup.

Did anything happen? Can you still see the water and sugar? Did your prediction come true? What is a solution? What other ingredients could you use to make a solution?

Smoothies work for making a solution. Here is a simple fruit smoothie recipe: 8 strawberries 1 banana and ¼ cup milk. Put in a blender to combine.

Activity 3

  1. Have Cloverbuds predict what will happen if they mix vinegar and baking soda.
  2. Put baking soda into sandwich size zip lock bag. Pour vinegar into small cups. Place cup into plastic baggie and seal. Dump the vinegar out of the cup and watch what happens.

Did anything happen? Did your prediction come true? What is a reaction? What other ingredients could you use to make a reaction?

Because of yeast, bread making is another way to show a reaction.  Mix together 1 ½ c warm water, 1 T honey, 1 ½ t salt, 1 T yeast. Let sit 5-10 minutes until there is bubbling or a foam on the top. Next knead in 3 ½ – 4 cups flour until it is no longer sticky. Make small balls (for number of Cloverbuds) and cover for 20 minutes. Preheat oven or toaster oven at 400 degrees. Bake 15-20 minutes.


These are just some fun activities you can do to encourage learning by doing. Not only will your Cloverbuds have fun, but they will also be learning some science knowledge.

Sound Science: Craft Stick Kazoos

We often think of science and the arts as being on opposite ends of the subject matter spectrum. In reality, the two are much more connected than many of us realize. Music is a prime example of this concept. It is possible to enjoy the beautiful music that is produced by an instrument, while at the same time having an appreciation for the mechanics that make the music possible.

In this activity, Cloverbuds will construct a kazoo, learn to produce sound, and investigate how a musical instrument works.

Materials needed:

  • Jumbo Craft Sticks
  • Large Rubber Bands
  • Small Rubber Bands
  • Straws
  • Scissors

Steps:

  1. Start with a large craft stick and a large rubber band. Wrap the rubber band from end to end on the craft stick.
  2. Cut two pieces from the straw approximately 1 inch long. Place one piece of straw under the rubber band about 1 inch from the end of the craft stick. Place the other piece of straw on the opposite end of the craft stick on top of the rubber band. See Photo 1.
  3. Place another craft stick on top of the first, sandwiching the straws in between. Fasten each end of the craft sticks together with the small rubber bands. See Photo 2.
  4. Put the edge of the kazoo up to your lips and blow. Experiment with different positions and blowing at different strengths to see what happens.

Photo 1

Photo 2


After the Cloverbuds have finished making their kazoos, ask questions. Why do they think the kazoo makes a sound? What would happen if the straws were closer together or farther apart? What if the straws were bigger? If time permits, let them experiment to see if their guesses are correct.

Kazoos work on the same principle as most woodwind instruments. The musician blows air into the instrument, which causes vibration of a membrane or reed (or in this case, a rubber band). The vibration inside the instrument then produces sound. Kazoos do not have buttons or valves like other instruments, so the player must use their voice to change the pitch of the sound produced.

Once your Cloverbuds have learned to play their kazoos, see if they can play a song. You can have them perform for their parents or other club members. Science and art- a beautiful combination!

Sources:

Hearts of Knots

Background: If you can’t sleep, count sheep….Why do we count sheep to go to sleep? Is this just an old wive’s tale to help us fall fast asleep? Perhaps, we remember stories from centuries ago that tell us how shepherds counted their herds of sheep every night before bedtime. Legend has it, knowing that all their sheep were in a safe place relaxed and calmed the shepherds, allowing them to fall asleep quickly.

Sheep are multi-purpose animals; they can give us meat, milk, and wool. With today’s lesson, we are going to explore more about wool. The wool from one individual sheep is called fleece, while wool from many sheep combined together is called a clip. Wool can come in different forms depending on the sheep. Long wool sheep have the heaviest fleece; it is normally long and coarse. Medium wool sheep grow a lighter weight fleece, while fine wool sheep produce the more valuable, smaller fiber wool that is less likely to itch when made into clothing.  Wool can be used for clothing, rugs, hats, carpets, blankets, yarn, felt, socks and so much more. However, there is a greater demand for wool than the sheep can produce. To solve this problem, we have to turn to technology. In the 1980’s, textile researchers at Malden Mills in Lawrence, Massachusetts experimented with a fur like fabric made from polyester.  The product was called “polyester fleece” or “polar fleece.” Polyester fleece is extremely warm due to its structure, which allows a space for air pockets between the threads. This polyester fleece can be found in many everyday clothing products.

We are thankful to sheep for giving us wool and science for developing polar fleece which meets so many of our daily needs. As part of our lesson we are going to learn about giving to our community, our loved ones, and people in need. Just like service is a big part of being in 4-H, many careers involve giving back to the community. Today we will explore service career options and use polar fleece by making a no-sew blanket, which we will give to someone in need. We will also make heart pillows to take home that remind participants of the careers we will explore and the feeling youth experience by giving to someone in need.

Local Career Connections:

Careers to discuss that provide community service needs:

  • Caregivers: Social Worker, Counselors, Senior Care, Child Care, Health Care.
  • Emergency Responders: EMS Personnel, Nurse, Firefighter, Emergency Room Doctors.
  • Environmental: Scientists, Engineers, Conservationists, Park Rangers, Government Agencies, Foresters.
  • Community Organizations: Homeless Shelters, Animal Shelters, Food Pantries, Drug Rehabilitation Centers, Veterans Organizations, Crisis Counselors, Educators.

Science Behind :

Polar Fleece, or polyester fleece is a synthetic or man-made material that has been used to make underwear for astronauts, deep sea diving suits and even ear-warmers for winter-born calves. Due to its light-weight make up and ability to hold heat, it is perfect for cold weather clothing.  You would never guess that it is made from recycled plastic bottles!  First, the plastic bottles are shredded into small chips, then sorted by color and cleaned. Next, the plastic chips are dried in a large oven, until all moisture is removed. Then the plastic is melted into a dense liquid that is pushed through a showerhead-like nozzle which forms a thread like structure.   At this point, the thread is still weak so it is heated, combined, and stretched to increase the strength. The final process is to tear apart or crimp the thread so that it looks like fabric. At this point, the short, fluffy, hairy fibers look very much like wool. The fibers are then inspected and sent to a carding machine where it is made into rope-like strands called fleet. The thick ropes are then fed into a spinning machine and twisted into a much finer diameter, and the yarn is collected on a large spool.  Next, the circular knitting machine weaves the yarn into a continuous tube of cloth.  To make the material fuzzy, it needs to run through bristles which are called the napper which makes little loops. It is then sent to the shearing machine to be trimmed, and smoothed out, giving it the fluffy feeling we enjoy. Once the plastic is completely transformed into cloth, the manufacturer will cut and sew the cloth into a garment.

What to Do: (Depending on time or skill level of participants,  the instructor could pre-cut the heart patterns.)

Step 1: Cut squares large enough for your heart pattern.  Place two of the fabric pieces together and trace your heart pattern with chalk.

Step 2: Cut both pieces of fabric along the chalk pattern.

Step 3: Trace a smaller heart pattern within the large heart. Be sure to leave at least 2-3 cm between the two borders. See pattern enclosed with lesson. Heart Pillow Pattern-zq8odw

Step 4: Cut small strips around the heart, making sure they are long enough to tie. The strips can be about half an inch wide.

Step 5: Tie the two pieces together in a knot. Once you have most of the knots tied, stuff the heart with stuffing or cotton. Finish tying the rest of the knots.

Step 6: Optional- Trim the knot strips around the heart.

Go Over Findings:

Investigate, Create, & Take:  Investigators can take with them:

  • Small Heart Pillow
  • Service Career Options

Additional add on activities:

  • Bring in samples of real fleece, wool clothing or other wool products.
  • Show pictures of sheep, goats, llamas or other animals that are also used for fiber products.
  • Visit a sheep farm, or have a lamb visit the classroom.

Sources:

Real men wear wool, Sheep101.info, http://www.sheep101.info/wool.html

How Products are Made, Polyester Fleece, http://www.madehow.com/Volume-4/Polyester-Fleece.html

How It’s Made-Wool, https://www.youtube.com/watch?v=uEYsmzophTA

How It’s Made Recycled Polyester Yarn, https://www.youtube.com/watch?v=uEYsmzophTA

Developed and Reviewed By:

Tiffany Sanders Riehm, Gallia County 4-H Program Assistant, Ohio State University Extension 4-H Youth Development, riehm.11@osu.edu. Tracy Winters, Gallia County 4-H Extension Educator, Ohio State University Extension 4-H Youth Development and Michelle Stumbo, Meigs County 4-H Extension Educator, Ohio State University 4-H Youth Development