Below you will find the step-by-step protocols to complete pollination investigators. CLICK HERE to download this protocol
Step 1: Unpacking the Toolkit
In your toolkit you will find:
- Envelope containing sweet pepper seeds
- Mesh exclusion bag and twist ties
- Plant labels, E=Exclusion (1), O=Open Pollinated (2).
- Three paper bags for pepper harvest, E=Exclusion (1), O=Open Pollinated (2).
- Two pieces of construction paper and labels for pepper seeds
- Data sheet. CLICK HERE for electronic version.
In addition to these items you will need: one three-ring tomato cage (NOTE you will want the small 3-ring not the 4-ring size so that your cage fits over it), duct tape, pen, grocery-sized bag, a fence post or garden stake, and access to a food scale.
Step 2: Establishing Sweet Peppers
Ohio is in the 5 and 6 USDA plant hardiness zones, with frost free dates ranging from mid-April to mid-May. To determine the frost free date for your location CLICK HERE. The twelve sweet pepper seeds can be started indoors up to four weeks prior to this date. You can use seedling trays or any small containers for this purpose, such as clean yogurt cups. Just make sure your containers have draining holes. Keep the seedlings moist and place them in a sunny location. One week prior to planting outdoors harden off your seedlings. Start with 2-3 hours in outdoor sunlight and increase daily for 7 days.
Select a location in your garden to plant three of your seedlings. The plants should be established adjacent to one another with a 2.5 foot spacing. Any remaining seedlings are not needed for the experiment. You can add them to your garden if you like sweet peppers or give them away. Important—record your planting date on your data sheet.
Step 3: Establish the Pollination Services Treatments
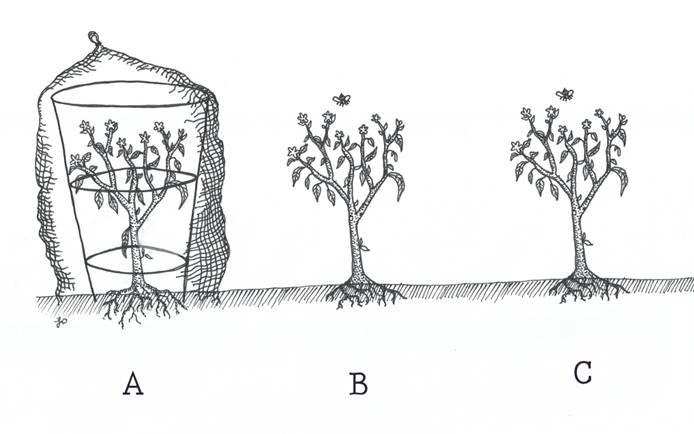
Your three pepper plants should be assigned to the following treatments as illustrated in the figure below:
- Exclusion: Illustrates the yield and seed set that a pepper plant produces in the absence of insect pollination. (Plant A)
- Open Pollinated (2 plants): Indicates the yield and seed set a pepper plant produces with ambient insect pollination. (Plants B and C)
Mark each plant with its labeled plant marker: E = Exclusion (Figure 1, plant A), O1 = Open Pollinated (Figure 1, plant B) and O2 = Open Pollinated (Figure 1, plant C).
Figure 1. The Pollination Investigators experimental treatments
Exclusion Open Pollinated Plants
Step 4: Experiment Instructions
Plant A Exclusion: Erect the tomato cage and inspect carefully for rough spots by running your hand along wires. Use duct tape to cover any rough spots, especially where two wires are soldered together as these can otherwise create holes in the mesh bag. Dig a 5 inch deep trench around the outside of the cage, place the mesh bag over the cage and bury one end of the fabric in the soil to prevent insects from accessing the plant. Pull the other end of the fabric up over the cage and secure with the twist tie. If your cage seems unstable, secure by placing a step-in fence post adjacent to it. Attach rope around the twist tie and secure the cage to the post. This treatment will remain in the mesh bag until harvest. Note—if a storm knocks over the cage re-establish it as soon as possible and re-secure the mesh bag. If holes appear in the bag use duct tape to patch.
Plant B and C, Open Pollinated: After planting, this treatment is all set! Insects will visit flowers as they appear, providing pollination. No need to do anything to this treatment until harvest.
Other Notes:
- We suggest that you do not use fertilizer on your garden. However, if you do fertilize your garden, make sure to provide the same amount of fertilizer to all test plants.
- Please avoid applying any pesticide to the test plants for the duration of the study.
- Make sure that the test plants are subjected to the same amount of weed pressure. If your exclusion treatment becomes very weedy inside the mesh bag detach the bag at the top and remove weeds. Inspect your plant for insects and reattach your bag.
Step 5: Collecting Data
Peppers should be harvested 70 days following seed sprout (not seed planting date). Remove the cage from the exclusion treatment. Harvest all mature fruit (peppers 3 inches or longer) from plants A, B, and C. Place the fruit from each plant into the labeled paper bags. Note your harvest date on your data sheet. Take the bags of peppers indoors to collect the following data:
Fruit count: Count the number of fruit per bag and record on your data sheet.
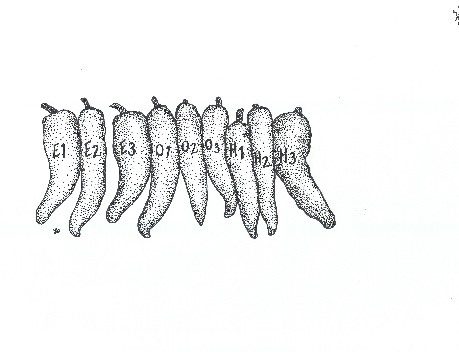
Fruit weight: Reach into each bag and select three fruit at random per treatment. Use a marker to label the fruit with the treatment (E, O1, or O2) and a number (1, 2, or 3) so that you can keep track of them (see drawing below). You should have nine total fruit. Weigh each fruit using a food scale and record the weight on your data sheet. Note—if you do not have a food scale, visit your post office. In most lobbies you can find a mail scale that will work great for this purpose. You can educate others in line about the importance of pollination in the process!
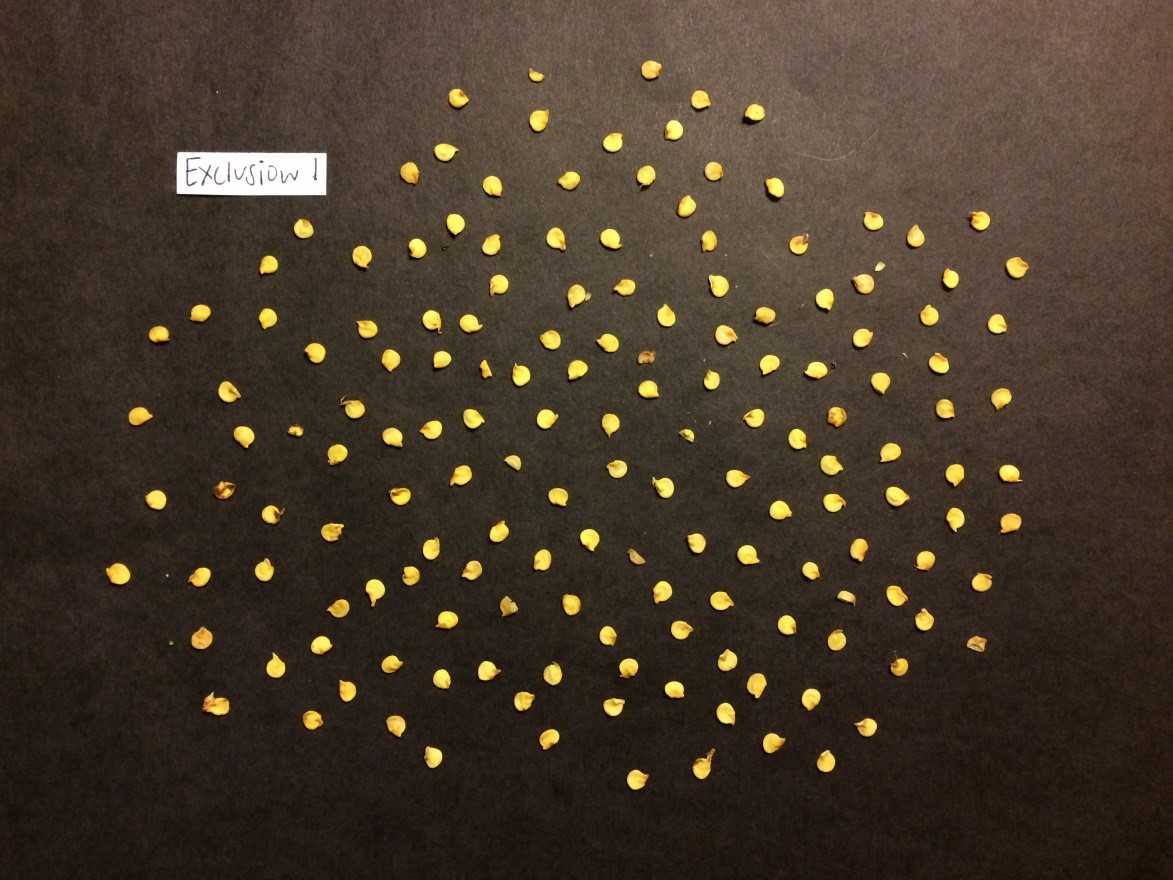
Seed Count: After weighing, cut open each fruit and remove all seeds. If seeds are wet, pat them dry with a paper towel or let them air dry. Place the seeds from one pepper onto the piece of black construction paper with the correct treatment label included in your toolkit (either Exclusion 1, Exclusion 2, Exclusion 3, Open 1.1, Open 1.2, Open 1.3, Open 2.1, Open 2.2., or Open 2.3). Take care to put the correct label onto the construction paper! Spread the seeds out on the black construction paper such that each individual seed is clearly visible and can be accurately counted. Take a picture of the paper with the seeds on it and the label clearly visible (see picture below). You should have 9 pictures, one for each pepper.
Pepper Plant Count: The final step in the data collection process it to count the number of pepper plants you are growing in your garden (excluding test plants) and record this on your data sheet. This includes all peppers including bell peppers and other sweet and hot varieties.
Step 6: Submitting Data
Send your completed data sheet and the 9 pictures of the seeds to pollinationinvestigator@gmail.com. We look forward to receiving your data! We will post the findings of the experiment on our website and alert participants on our Facebook page when new findings are posted!