Watch Out for Cucumber Beetles

Striped cucumber beetles start flying around even before many of our plants emerge. This means they are often there just as the cucumber, squash, pumpkin and melon seedlings push through the soil, eating off the stems and first leaves to emerge. Later, adults feed on leaves, vines and fruits that survive. Larvae feed on the roots of the plants, weakening them and making them susceptible to other problems.

One problem these beetles cause is a disease called bacterial wilt, a serious disease of many vine crops. The bacteria overwinters in the bodies of hibernating beetles which introduce the bacteria to the plants during feeding. Infected plants quickly wilt, the leaves dry, and the plants eventually die. Cucumber beetles also spread the squash mosaic virus.

Bacterial wilt and mosaic virus must be prevented since they cannot be controlled once the plant is infected.  Inspect plants frequently for the striped cucumber beetle (the adult is about 0.2 in. long, tan in color with three black stripes down the back). Row covers provide some protection, but must be removed during pollination. Some resistant varieties are available, and there are a few products labeled for control of the beetle.  Always read and follow pesticide label directions when used.

Cover Crop Experiments

One of the best ways to improve a patch of ground is by using a cover crop.  Cover cropping is when you plant a certain plant or mix of plants into an area to solve an problem or improve the soil. Things cover crops can do include:

  • add biomass
  • smother weeds
  • drill through hardpan
  • increase fertility
  • prevent runoff and erosion
  • tie nutrients up in the soil

Almost sounds too good to be true, but it is not.  Cover crops have been used for a long time in agriculture and with the increased focus on preventing nutrient loss into our waterways and the resulting problems this has resulted in, you will be hearing more about them in the future.

Currently I am monitoring/helping with three different small scale cover crop experiments.  I do not have 100 acres of corn or soybeans so I am observing them in three different community garden experiments.

Experiment 1: Demonstration garden at the fairgrounds. 

Tomatoes into no-till residue

Tomatoes into no-till residue

Rob and Rebecca planted winter rye, crimson clover and vetch into the raised beds last fall and crimped them over in spring, the tomatoes went straight into holes in the residue and are doing great.  This cover crop mix added fertility from the legumes, mulches the soil to prevent disease and water loss, prevented erosion over winter and added biomass from the top growth and root remnants. The tomatoes are doing great.  If you go to the garden, you will see they are outperforming tomatoes planted into straight compost.

Experiment 2: Logan Community Garden
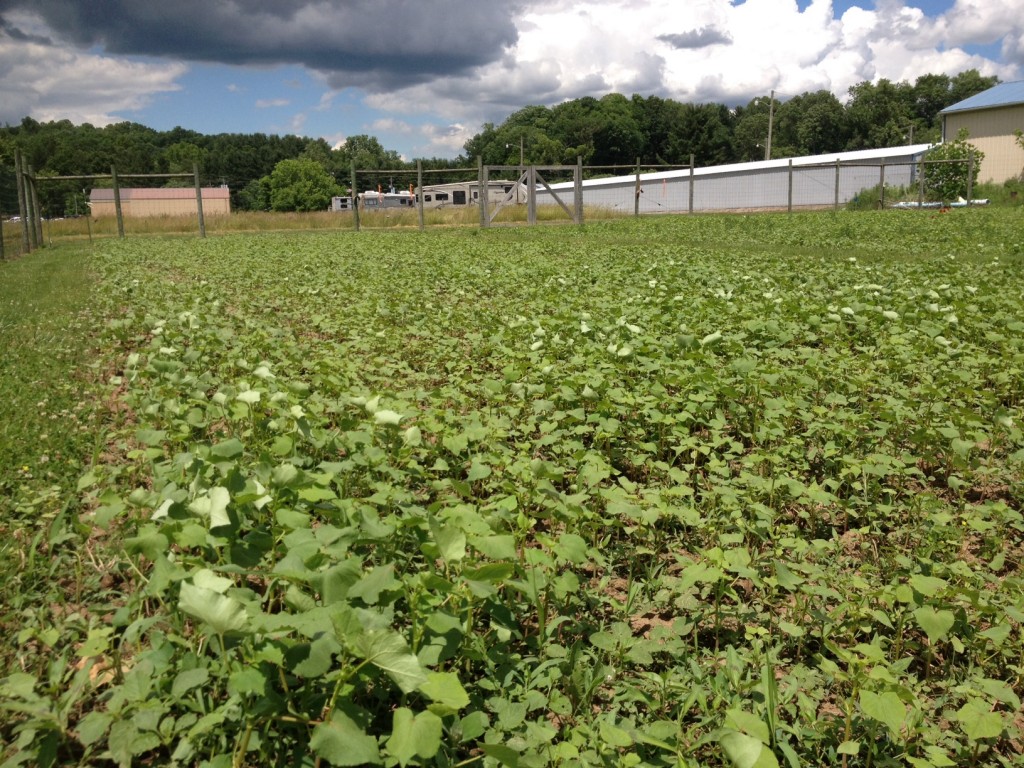
Buckwheat in unused plots

Buckwheat in unused plots

The Logan Community Garden had some space that needed filled that was not going to be used this season and had a fair amount of weeds present.  The cover crop for this area needed to smother weeds, prevent erosion,  keep the soil in use, tie up nutrients and be easy to manage. The crop chosen was Buckwheat, which is elite at all these needs.  The crop is entering flowering right now if you visit the garden and will be a magnet for pollinators, helping the vegetables the gardeners have as well.  It will be mowed to prevent it from setting seed and allowed to decompose in place adding organic matter.

Experiment 3: Wallace Community Garden

BMR sorghum x sudangrass

BMR sorghum x sudangrass

Sheesh,  what guy planted this? (me).   This spotty planting of BMR(brown mid-rib) Sorghum X Sudangrass is being used as a three year rotation in my garden plot.  My needs are for weed control, increased fertility, increased biomass/organic matter and sub-soil drilling through hardpan.  I have not used this variety before, but have heard many wonderful things about it and its reputation is stellar.  It will get very tall, like corn, and should completely take over this plot by mid summer.  I will mow it to keep it a couple/few feet tall which will signal the roots to double down on root growth.  I will let you all know how this turns out over the season.

Would you like to learn more about cover crops?   I will be talking about cover crops as well as Fertilizers, Organic Matter and Soil Health on Tuesday June 14th at 7pm in a FREE class at the Youth Center,  bring friends and questions and hope to see you there.

Save the Date – May 10th, FREE CLASS “Pests and Diseases in the Garden”

Last class I offered in the Seed to Storage gardening series drew some folks all the way from Washington County.  Feel free to make the drive to the Hocking County Fairgrounds on May 10th at 7pm for a FREE class on “Pests and Diseases in the Garden”

hornwormA Beneficial and a Pest


This Tomato Hornworm was snacking on my Juliets.  When those little white egg cases hatch the Braconid Wasps will feed on the Hornworm and then spread throughout my garden doing good things.

Transplanting Into the Home Garden

It is that time of the year when the soil is warming up and people are starting to put in their garden starter plugs that they grew indoors. Starting plants indoors is a great way to get a “head start” on things and be safe from some late frosts that occur in April and May.  When you are transplanting some of these plants, be sure to check the frost tolerance and make sure you put them out during the proper times.

Besides the frost, plants have to acclimate or “harden” from indoor conditions to outdoor conditions. When a plant grows indoors the light conditions can be as much as 40 times less intense than the full sun, and exposure time can be less than half of what it will be outside.  Plants will generally grow thicker leaves and produce more chlorophyll to make better usage of the light energy provided to the plant when they are grown in low light conditions (indoors).  This is actually one reason why lettuce is grown in partial shade.

Low Light vs High

(Plant Physiology 3rd ed.)

Taking this idea a bit deeper (down to the roots); it is important to remember that the water and nutrient uptake is essentially all done through very fine and tender root hairs. When a plant is moved many of these hairs are damaged and water uptake can become insufficient for the plant’s needs.

Seedling

So let’s combine the problems now: A plant is moved to 12 times the sun, with increased chlorophyll and 2 times the light exposure that it is used to.  On top of that the plant cannot get the water to support the increased photosynthesis demand in that direct sunlight.  That could set the plant back, and all the sudden that “head start” might not be so advantages anymore.


Some tips from OSU Extension:

  1. Slowly transition the plant from indoors to outdoors by bringing it out for a few hours at a time without damaging the root hairs during the move (keep it in the original container).
  2. Don’t put out frost sensitive plants too early.
  3. Wait for the soil temperatures to warm up nicely (60 degrees or greater).
  4. When transplanting the starter plant, don’t let it get too big and don’t shake off too much soil from the root mass (root hair damage).
  5. Be sure to actively water the plant during the first week especially. This will compensate for the decreased water uptake ability of the plant.
  6. If you are utilizing weed control, make sure the pesticide doesn’t have a long residual period (refer to the label).

These tips will work for both gardening and landscaping; so when you buy a plant from a nursery, ask about the growing conditions. Things like: “Has the plant been growing indoors or outside?”  And “How long has it been out and how much sun is it getting here?”

Anticipation of Asparagus

This article originally appeared in the March 28, 2016 issue of The Journal-Leader.

Asparagus is one of the first spring vegetables ready to harvest in Ohio. The enticing green stalks begin to pop out of the ground in early April and asparagus lovers start to get excited. Harvest time typically stretches through June. Did you know that a successful patch of asparagus can produce a crop for up to (and beyond) 20 years? However, getting it established can be tricky.

Asparagus is picky about the soil it grows in. It does not tolerate soils that are acidic and it prefers well-drained sites. Planting crowns (which are segments of plant roots and emerging stems) in your garden is quicker and easier than starting asparagus from seed. It is important to give the crowns or seedlings time to establish before harvesting the stalks. One-year old crowns should not be harvested until they have been in the garden bed for at least a year and seedlings need two years. The reason they need this time is that the stalks, which we eat, will grow out into a fern and make energy to send down to the roots. When you harvest the stalks, energy is lost from the roots and if this happens too early the asparagus will not produce in subsequent years.

Asparagus is diecious (which means it has separate male and female plants). After the female plants growing out into a fern they will produce flowers and eventually seeds. Removing the seed stalks from the plant before the seeds form helps save energy in the roots for the next year. Seed production can be avoided by specifically purchasing crowns of only male plants.

After the asparagus has had time to get used to its new home and harvest time comes, pick it when the stalks are about the length of your hand (7-9 in). You can snap the stalks off at the soil, or to avoid cutting the tough part of the stalk off later, leave an inch or two sticking out. Harvest every week or two until 75% of the stalks are about the circumference of a pencil. To store fresh asparagus, place the ends upright in a shallow tray of water to keep them sweet and tender (if you buy fresh asparagus at a market, look for bunches that have been stored this way to get the best taste and texture). Once the harvest period has passed, let the remaining stalks grow out into ferns again to store energy for next year.

If you’re not a fan of asparagus (like me), maybe it is time to give it another try. The spring issue of OSU Extension’s Chop Chop Magazine features a recipe for Cheesy Roasted Asparagus that I plan to make with dinner sometime this month:

Ingredients: 1 bunch of fresh asparagus, 2 tbs. olive oil, ¼ tsp. salt, ½ cup grated parmesan cheese, and ½ of a lemon

Directions: Preheat oven to 450°F. Spread asparagus on a baking sheet, drizzle with oil, sprinkle with salt, coating the asparagus. Roast in the oven for 5-10 minutes, until bright green. Sprinkle asparagus evenly with cheese and return to the oven until the cheese melts and turns golden (about 2 min). Remove from the oven, squeeze the lemon juice over the roasted asparagus, and serve.

Happy Tasting!

Small planting window – early spring vegetables

The ten day forecast has us looking at warm wet weather.  Normally in March I would say wait a few weeks before planting much outside, but this is an opportunity to get some seed or transplants if you have them in the ground.  Don’t get crazy with planting right now, but if you have a few square feet in your garden you can put seed in that if you are successful will give you an early vegetable harvest.  I would still follow with another planting or two in a few weeks to stay on a normal rotation.

I plan on putting some transplants in that I started when I did a Seed Starting Program for the Four Seasons Garden Club in Logan.

plant1

They will go under cover in my kitchen garden.  I am not really worried about the cold, but the squirrels and bunnies will eat them if I don’t.  Deer would be a problem as well.  There is very little food out there for wildlife right now, so don’t plant any for them.

plant2

This is also a great time to take a look at your compost pile and think about giving it a mix.  If your compost pile looks like this:

s18

Stir it up and let Mother Nature water it for you.  I am definately a cold compost pile person, but even a little bit of improvement will go a long way towards finished compost later in spring.

plant3

Producing High Quality Fruit at Home

Pruning- Pruning the fruit tree is an important step in improving fruit quality. Fire blight, powdery Fruit treemildew and summer rots can be reduced by carefully pruning out limbs harboring disease inoculum. Pruning trees should be done according to the desired structural shape of the tree.

Prune out all broken and dead branches and any sucker growth around the bottom of the tree trunk. Once the dead and broken material has been removed, the general shape of the healthy tree can be seen. Correct pruning helps improve overall air movement and sunlight penetration into the canopy. It also helps reduce disease and insect pressure. A rule of thumb I often use when pruning fruit trees is, “When in doubt, prune it out”. All pruning should be completed no later than mid-March for best results here in Ohio.

If trees have been neglected for several years, they may need to be rejuvenated. A second step is to decide how big/tall the tree should be. A tree with dwarfing rootstock can be maintained at about 8 to 10 feet tall, semi-dwarf rootstock at about 12 to 16 feet and a standard rootstock at about 16 to 20 feet tall. If your trees have not been pruned in many years, you should not cut them to the desired height in one year.

Your plan should be to reduce the tree height over a period of about 3 years by removing no more than one-third of the height each year (ex. 25’ tree to a final height of 16’— lower at a rate of about 3’ each year). Do not cut all the limbs in half or “Top” the tree, like some people and or tree trimming companies do with shade trees, to reduce their height. Pick and choose limbs that can be cut back to the approximate desired length, at a lateral branch, and make the cut there. “Work” the tree height down systematically over the time period rather topping.

When working with neglected trees do not feed the tree with nitrogen after pruning. Nitrogen applications would stimulate growth and compound the problem you are trying to fix. Water sprouts will likely develop around or below pruned areas during the spring and summer. Removal of this vegetative growth should be frequently done by rubbing off or pulling off the shoot while it is still short and green around the bottom (<10-12 inches in length). Pulling is recommended rather than cutting so you remove the entire shoot and not have a short stub remaining. If the shoots become brown and woody at the base, pulling may no longer be an option because you may cause unwanted tearing into the bark. Cutting is then preferred.

Disease Control- Early spring is the best time to apply sprays to control certain insects and diseases. Gardeners who have had problems in the past years should consider applying early season sprays to prevent or minimize pest damage to the leaves and fruit of the trees. Additional applications of fungicide and insecticide sprays during the growing season may be necessary to control specific pests. Early application of the proper sprays should minimize the use of pesticides during the remainder of the growing season.

Dormant oil sprays are intended to be used before the leaf or fruit buds open in the spring. This can effectively control many scale insects, European red mite eggs and aphids. Be sure to check the label, for temperature restrictions before applying dormant oils. Early season fungicide sprays should be applied at the green tip through pink or white bud growth stages. These sprays will help minimize diseases. Application of fungicides while trees are blooming may be made, but insecticide sprays should not be made during the flower blooming stage to protect pollinating bees. Additional applications of fungicides or insecticides may be needed to insure high quality fruit later in the season.

For more information about pruning specific trees or applying sprays correctly, contact Mark at the Monroe County Extension office at 740-472-0810. Bulletins and factsheets are available which contain pruning information. Also available are spray guides to help you produce high quality fruit your trees are capable of producing.

Seed Starting – Save the Date

I have been in the basement planting many things getting ready for the upcoming gardening season.  This El Nino winter already has me thinking spring.

There will be a Seed Starting workshop at the Youth Center at the Hocking County Fairgrounds on April 12th, tuesday, at 7pm.

s8

Hope to see you there.

Fruit and Vegetable Lost Yield Documentation for the Racine Locks and Dam Peninsula Area in Meigs County

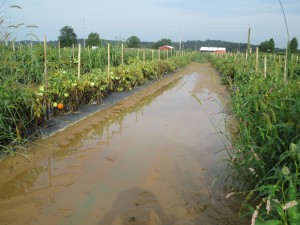
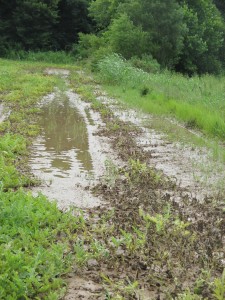
Farmers in Meigs are suffering significant yield losses due to the extreme weather the area has experience this summer. We just finished one of the wettest Junes on record in Ohio. While obtaining a precipitation report for the months of May and June from the Racine Locks and Damn, Kim Johnson, NPR, pointed out that June of this year is the highest monthly total of precipitation that we have recorded for several years. The heavy rainfall, consistently wet weather, and cool temperatures are creating serious problems in the fields. A few major problems include (but not limited to): saturated and flooded fields, bacteria and fungus explosions, rapid weed growth, and leaching of field nutrients. Getting into the fields to combat these problems was extremely difficult due the to constant rain events and soil compactions issues.

These fruit s and vegetable producers have also been experiencing another problem in addition to field damage and diseases; unsellable produce. Producers have been undergoing short windows to harvest available produce. However, produce in the field has become water logged causing aesthetic problems (blemishes and crack) and transportation issues. Although some of the produce is perfectly edible, it is still being rejected due to aesthetic reasons. As a result, customers are reducing and cutting orders. For example, one farmer experienced a 1200 box (10 lbs/box) order cut from a major grocery store chain. This is only one example of such cuts.

All pictures were taken by OSU ANR educator Marcus McCartney on farms across the Racine locks and dam peninsula area to document the damage and diseases associated with the extreme wet weather events experienced during the months of June and July.

#1. Flooding

A. Pepper Field                                                  B. Tomato Field                                  C. Watermelon field    and    D. Watermelon field after water receded

IMG_0649IMG_0624  IMG_0672  IMG_0674

*NOTE:  Peppers are growing in the Lakin loamy fine sand soil series. According the NRCS soil description, the natural drainage class is listed as “Excessively drained.” However, due to the amount rain    and rainfall events, ponding and flooding occurred in highly drainable soils.

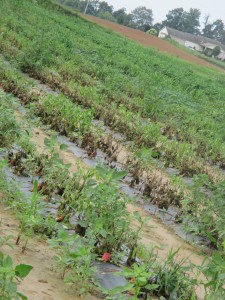
#2. Phytophthora blight in peppers

A) water-soaked patches                      (B) “Powdered sugar” Phytophthora spores    (C)  Infected row              (D) large section of field infected

IMG_0637IMG_0633IMG_0642IMG_0651

#3 Early Blight

A)  concentric rings surrounded by a yellow halo   (B) elongated spots with lighter-colored centers  (C) Infected row

IMG_0025IMG_0010 IMG_0620

#4 White Mold explosion

A) Underneath watermelon                (B) Cantaloupe                                      (C) Cucumbers                                        (D) White mold on weed in field

IMG_0614  IMG_0615 IMG_0023IMG_0611

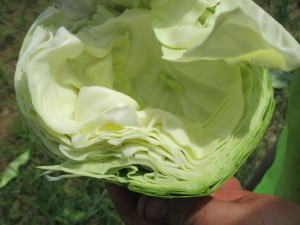
#5 Poor quality and rejected produce

A) Rejected tomato fruit due to cracking                    (B)  Cabbage – loosely rolled heads, not tight leaf layers

IMG_0684 IMG_0691

The above information and pictures were generated into a report to depict the damage in Meigs County due to the excessive rainfall.  This report was sent to FSA and then forwarded to Columbus.  Also, the above pictures and information is just a sample from the report’s content.