Summer Activity for Families – Ice Cream in a Bag

The weather might be cooling off for a few days in Ohio, but within the next week the heat will be back! Summer is is in full swing, so you might be looking for some inexpensive, fun activities to spend some quality time and cool off with your family. Keep reading to check out this easy homemade ice cream recipe activity from Growing a Jeweled Rose.

This may contain: an ice cream bag with a green spoon in it

Ingredients for the Ice Cream Bag:

  • 1/2 cup heavy whipping cream or half and half
  • 1 tsp vanilla
  • 2 1/2 tsp sugar (turbinado or granulated)
  • 6 tablespoons of coarse kosher salt
  • Sandwich bags
  • Gallon size resealable bag

Steps to make Ice Cream in a Bag

  1. Place these ingredients into a tightly sealed sandwich sized bag, pressing the air out as you seal it.
  2. Then put this into another tightly sealed sandwich bag.
  3. Fill a gallon size resealable bag half-way full of ice cubes, and mix with 6 tablespoons of coarse kosher salt.
  4. Then put the sealed sandwich-size bag into the middle of the ice, and seal the larger bag.
  5. Mix up the ice cream! This can be achieved by simply shaking the bags around for five minutes. However, you can make a fun game of mixing up the ice cream with move-around games like tag.
  6. Enjoy the ice cream!

You can make this fun, hands-on experience into an educational one as well! Check out this article from Britannica Kids to learn more about the history and production of ice cream: https://kids.britannica.com/students/article/ice-cream/275028 


Adapted from: https://www.growingajeweledrose.com/2013/07/summer-fun-ice-cream-in-bag.html


DIY Winter Decor for Families

Now that your Christmas and holiday decorations are down, you might want to find ways to keep your house decorated and festive for the winter. Whether you’re home for a snow day or looking for a fun craft to do on the weekends, here is a quick and easy craft for you and your family!


Supplies:

12” by 12” paper

Crafting scissors

Optional snowflake templates: https://assets.marthastewart.com/d29/perfect-paper-snowflakes-1015/perfect-paper-snowflakes-1015.pdf?_ga=2.90616730.1692996583.1610948935-22653803.1602503328 


Instructions:

Step 1:

Fold your paper in half, bringing the top left corner down to the bottom right corner to create a triangle.

how to make paper snowflakes step one paper


Step 2:

Fold the paper in half again, bringing the top right corner down to the bottom left corner. This should allow for the pointed corners to meet and create a smaller triangle.

how to make paper snowflakes step two fold paper diagonally


Step 3:

Next, fold your paper into thirds, overlapping the left pointed corner over the triangle.

how to make paper snowflakes step three fold triangle in half


Step 4:

 Overlap the right pointed corner over the triangle. Adjust the folds until the sides match up and don’t crease the paper until the folds are aligned.

how to make paper snowflakes step four fold triangle in half


Step 5:

Trim off the pointed ends to create a triangle.

how to make paper snowflakes step five fold into thirds


Step 6:

Using whatever cutting pattern you prefer, cut out the snowflakes! Use variation to create a diverse range of snowflakes, each of them being unique. You can also incorporate the snowflake templates for a more uniform pattern.

how to make paper snowflakes step six cut bottom with scissors


Step 7:

Unfold your snowflakes to reveal the final product! Enjoy your homemade decorations!

how to make paper snowflakes step seven snowflakes


If you want to spice things up, use multiple paper colors! If you want to smooth out creases from folding, use an iron on a low heat setting. Additionally, use spray starch to hold the snowflakes in place!


Adapted from: https://www.marthastewart.com/266694/decorating-with-paper-snowflakes 


If this decor project was a hit in your household, check out more DIY Winter projects here: https://www.goodhousekeeping.com/holidays/christmas-ideas/g34004079/winter-crafts/ 

Fall Craft For Families – Turkey Windsocks

Happy Fall, ya’ll! As the weather gets cooler, you might be wondering what kind of activities can keep your kids entertained indoors. Check out this fun and cost efficient craft for your family!

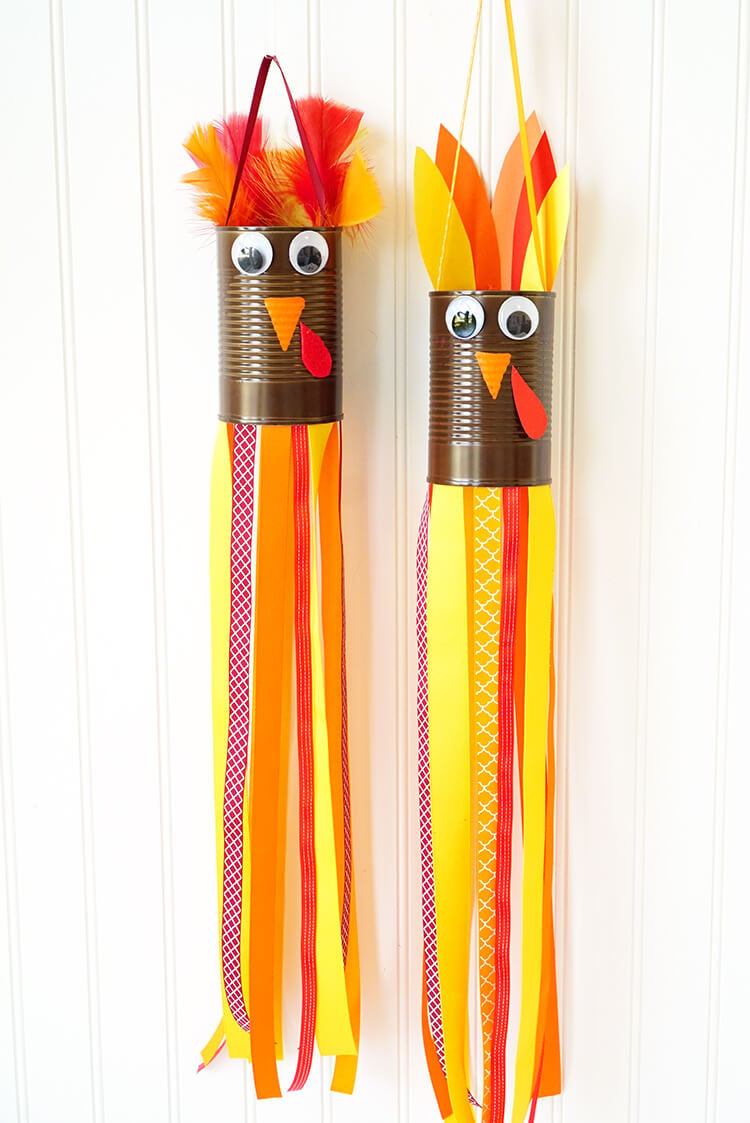
thanksgiving kids craft turkey windsocks

(Image from Happiness is Homemade)

What you’ll need:

  1. Recycled Aluminum Can
  2. Brown Paint
  3. Craft glue
  4. Orange Paint Pen
  5. Large Googly Eyes
  6. Ribbons-Fall Colors
  7. Feathers, Felt, and/or Construction Paper-Fall Colors
  8. Scissors
  9. Masking Tape (optional)

Directions:

  1. Start by painting the Aluminum Can with the brown paint. 
  2. After the brown paint is dry, use your orange painter’s pen to draw an upside-down triangle as the turkey’s “beak.”
  3. Then, attach the googly eyes using your craft glue.
  4. Using your choice of feathers or construction paper, create the turkey’s “tail” by gluing the feathers/construction paper to the top of the back of the can on the inside rim. The can will have sharp edges, you can apply the masking tape there to protect your fingers.
  5. Cut 10-15 pieces of ribbon at about 18” in length.
  6. Apply a thick layer of craft glue to the inside rim at the bottom of the can, and then place your ribbon streamers. Allow the glue to dry.
  7. Cut out a red waddle (in either felt or construction paper). Use your craft glue to attach it beside the beak.
  8. Attach ribbon to the inside rim of the top sides of the can using craft glue to create a handle.

Adapted from: Happiness is Homemade. For more fun, Fall crafts, check out their website:

https://www.happinessishomemade.net/thanksgiving-kids-craft-turkey-windsocks/ 

Scrabble Tile Zipper Pull

You’ll Need:

  • Scrabble tiles
  • Popsicle stick
  • Binder clips
  • Glue-On Bail
  • Lanyard Clip
  • Heavy Duty GlueBackpack with attached scrabble tile zip pull

Directions

  1. Measure and trim a popsicle stick so all the tiles will fit.
  2. Add glue to one side of the stick and arrange tiles straight & evenly. Leave enough room at the top for the bail. Clamp binder clips to the tiles and let set for 2 hours.
  3. Apply the bail to the back using glue. Secure with a binder clip and let set for two hours.
  4. Attach the lanyard clip to the bail and clip it on your backpack!

No bail? Try using the silver piece from an extra small binder clip instead!

Adapted from: https://www.momtastic.com/family/diy-for-kids/448307-scrabble-tile-zipper-pull/