Here are three takeaways I would like to share.
Learning Style

(https://www.google.com/url?sa=i&url=https%3A%2F%2Fwww.tejedastots.com%2Fteaching-different-learning-styles%2F&psig=AOvVaw0i-jHN2qQlKVMUgqKnQaKE&ust=1650246906186000&source=images&cd=vfe&ved=0CAwQjRxqFwoTCNCp9ff-mfcCFQAAAAAdAAAAABAJ)
What are Learning Styles?
The term learning styles is widely used to describe how learners gather, sift through, interpret, organize, come to conclusions about, and “store” information for further use. As spelled out in VARK (one of the most popular learning styles inventories), these styles are often categorized by sensory approaches: visual, aural, verbal [reading/writing], and kinesthetic. Many of the models that don’t resemble the VARK’s sensory focus are reminiscent of Felder and Silverman’s Index of Learning Styles, with a continuum of descriptors for how learners process and organize information: active-reflective, sensing-intuitive, verbal-visual, and sequential-global.
There are well over 70 different learning styles schemes (Coffield, 2004), most of which are supported by “a thriving industry devoted to publishing learning-styles tests and guidebooks” and “professional development workshops for teachers and educators” (Pashler, et al., 2009, p. 105).
Despite the variation in categories, the fundamental idea behind learning styles is the same: that each of us has a specific learning style (sometimes called a “preference”), and we learn best when information is presented to us in this style. For example, visual learners would learn any subject matter best if given graphically or through other kinds of visual images, kinesthetic learners would learn more effectively if they could involve bodily movements in the learning process, and so on. The message thus given to instructors is that “optimal instruction requires diagnosing individuals’ learning style[s] and tailoring instruction accordingly” (Pashler, et al., 2009, p. 105).
Why Are They So Popular?
Pashler and his colleagues point to some reasons to explain why learning styles have gained—and kept—such traction, aside from the enormous industry that supports the concept. First, people like to identify themselves and others by “type.” Such categories help order the social environment and offer quick ways of understanding each other. Also, this approach appeals to the idea that learners should be recognized as “unique individuals”—or, more precisely, that differences among students should be acknowledged—rather than treated as a number in a crowd or a faceless class of students (p. 107). Carried further, teaching to different learning styles suggests that “all people have the potential to learn effectively and easily if only instruction is tailored to their individual learning styles” (p. 107).
There may be another reason why this approach to learning styles is so widely accepted. They very loosely resemble the concept of metacognition, or the process of thinking about one’s thinking. For instance, having your students describe which study strategies and conditions for their last exam worked for them and which didn’t is likely to improve their studying on the next exam (Tanner, 2012). Integrating such metacognitive activities into the classroom—unlike learning styles—is supported by a wealth of research (e.g., Askell Williams, Lawson, & Murray-Harvey, 2007; Bransford, Brown, & Cocking, 2000; Butler & Winne, 1995; Isaacson & Fujita, 2006; Nelson & Dunlosky, 1991; Tobias & Everson, 2002).
Importantly, metacognition is focused on planning, monitoring, and evaluating any kind of thinking about thinking and does nothing to connect one’s identity or abilities to any singular approach to knowledge. (For more information about metacognition, see CFT Assistant Director Cynthia Brame’s “Thinking about Metacognition” blog post, and stay tuned for a Teaching Guide on metacognition this spring.)
Notability – A Great Application for Taking Notes
Document Management & Creation
If you’re trying to stay organized using Notability, the app provides two essential tools — subjects and dividers — to help you stay on top of everything. This is helpful when you need to keep track of multiple documents simultaneously or create several notes in a single day.
Overall, Notability’s document management is straightforward: From the main screen, you’ll create a subject on the left sidebar and house all notes within that subject.
You can also drag and drop notes between subjects, so relocating a misplaced note is simple and easy.
Strictly speaking, this level of organization isn’t even required. Notability has sorting tools that allow you to sort notes based on name, modified date, and created date. If you’re just creating notes on an ad-hoc basis, you could keep everything in the “All Notes” tab and access every note that way.

Taking Notes
Within the app, you’ll see a set of features and tools to help you get your thoughts and ideas onto the page. You’ll be able to change the layout, color, and design of your paper.
You’ll also have access to a toolkit. Include each of the following tools for your immediate use:
Pen
Highlighter
Eraser
Lasso Tool
Text Box
What’s more, Notability has real-time audio recording features that are completely unmatched by anything else on the market.
Notability gives users the ability to create dashed and dotted lines with its pen tool. Meanwhile, Notability offers the same selection options for its eraser and highlighter that it does for its pen, giving users a wider selection overall. Notability also provides a favorites bar, where you can add a selection of your personalized tools for quick and easy access. The favorites toolbar is limited to three items on the free plan and 12 on the premium plan.

(https://cdn.shopify.com/s/files/1/1644/5247/files/1290x900_Blog_-_Goodnotes_vs_Notability_-_Image_5_c0f943ad-6dc0-4351-b17d-c8b88f314e4d.jpg?v=1649122927)
Cornell Note
Divide the paper into three sections.
Draw a dark horizontal line about 5 or 6 lines from the bottom. Use a heavy magic marker to draw the line so that it is clear.
Draw a dark vertical line about 2 inches from the left side of the paper from the top to the horizontal line.
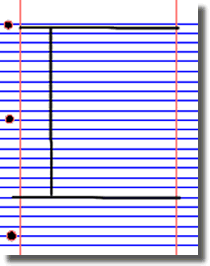
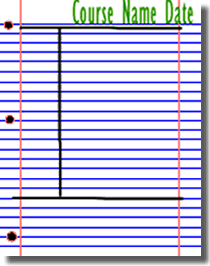
Document
Write course name, date, and topic at the top of each page.
Write notes.
The large box to the right is for writing notes.
Skip a line between ideas and topics.
Don’t use complete sentences. Use abbreviations, whenever possible. Develop a shorthand of your own, such as using “&” for the word “and”.
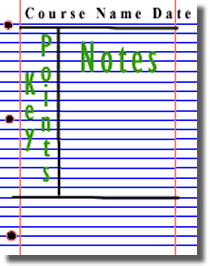
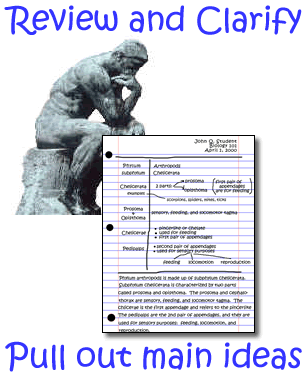
Review and clarify.
Review the notes as soon as possible after class.
Pull out main ideas, key points, dates, and people, and write these in the left column.
Summarize.
Write a summary of the main ideas in the bottom section.
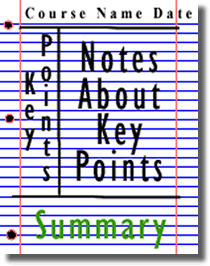
Study your notes.
Re-read your notes in the right column.
Spend most of your time studying the ideas in the left column and the summary at the bottom. These are the most important ideas and will probably include most of the information that you will be tested on.

Citation:
https://cft.vanderbilt.edu/guides-sub-pages/learning-styles-preferences/
https://paperlike.com/blogs/paperlikers-insights/app-review-goodnotes-vs-notability