Wormboss
(Previously published on Wormboss, Tests and Tools, Management Tools, Sheep)
Problem: Continuous  re-contamination of the paddocks with worm eggs that develop to larvae is a major cause of ongoing worm problems for sheep or goats.
Solution: Preparing low worm-risk paddocks to prevent animals from becoming heavily infected with worms is a key strategy in effective and profitable worm control.
Benefit: Low worm-risk paddocks for key classes of stock at particular times of the year reduce both production loss and the need for chemical (de-worming) intervention. In turn, fewer [treatments] result in
- Less cost
- Less labor
- Slower development of de-wormer resistance
Strategic preparation of low worm-risk (“clean”) paddocks can also benefit other classes of stock due to a lower overall level of worms on the property.
Which stock class and when to prepare will vary according to region.
What are low worm-risk paddocks
To merit the description, “low worm-risk” these paddocks need to have such a low level of infective worm larvae on them, that when sheep or goats—just treated with an effective [dose of de-wormer]—are introduced, it takes a few months before worm numbers build up to levels that cause illness in the stock.
Preparation of low worm-risk paddocks
This involves:
- Allowing time for most of the existing worm eggs and larvae to die
- Preventing more worms for contaminating the pasture
Allowing time for most of the existing worm eggs and larvae to die
A very large proportion of the worm larvae on a paddock must die before being considered low worm-risk. This is generally about 95% from when a pasture is moderately to heavily contaminated. While an 85–90% reduction may sound significant, it is usually not enough.
In Australia, a 6-month period is sufficient for 95% larvae to die, and this can sometimes be reduced to a 2-month period in very hot, dry locations.
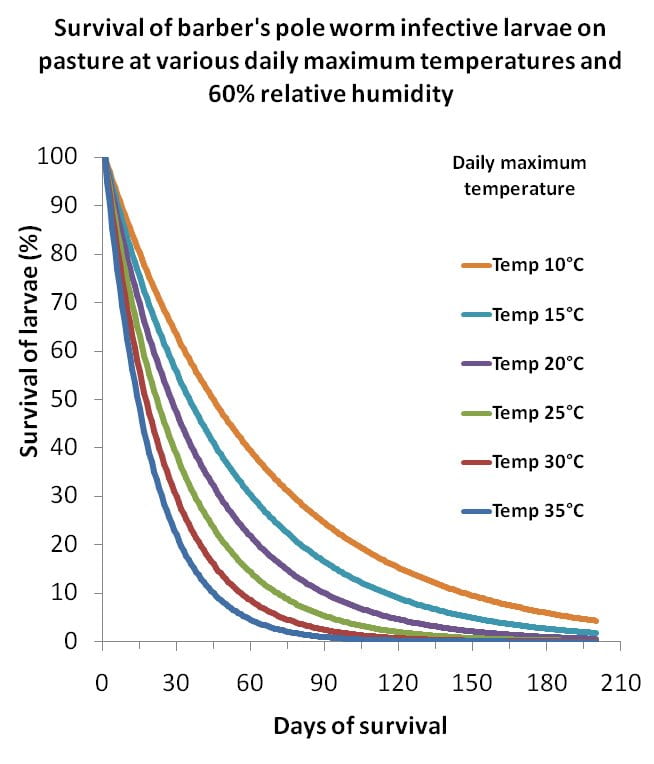 The following graph shows the rate at which barber’s pole worm larvae die, but is quite similar for scour worms. Choose the temperature line that fits your location in the few months prior to when the low worm-risk pasture is required and find where larval survival (left side of graph) drops to 5% to show the number of days required for 95% larvae to die.
Your program will describe the times required in your region to prepare a paddock.
Preventing more worms from contaminating the pasture
While the larvae on the paddock are dying, further contamination must be prevented. The simplest and surest way is to exclude sheep or goats (and alpacas) from the pasture during the preparation period.
However, this may not be the best use of the paddock.
Where possible, utilise feed by grazing with cattle or horses (not sheep, goats, or alpacas).
Or use the paddock for growing a crop or making hay or simply leave the paddock empty while the pasture is regrowing.
You can graze the paddock with sheep, goats, or alpacas under very specific conditions.
After they receive a [dose of de-wormer] proven to be effective on your property, graze in the 2–4 weeks after the drench, and then remove the stock.
- 2 weeks for goats
- 3 weeks for sheep in barber’s pole worm areas
- 4 weeks for sheep in scour worm areas
If a long-acting product is used, grazing can be longer in line with the actual amount of persistence the product provides on your property. You should monitor worm egg counts to identify what length of protection you actually achieve.
Grazing with sheep when eggs cannot develop to larvae
In lengthy periods of cold, heat, or dry, worm eggs cannot develop to infective larvae. In these periods, pastures to be prepared as low worm-risk paddocks can be grazed by sheep regardless of their worm burden. The conditions and time required for this strategy will depend on the worm species (see ‘Factors contributing to paddock contamination with worms’).