
Once a year the Museum of Biological Diversity at Ohio State opens its doors to the general public for a day of science and fun. This year’s theme for museum open house was ‘Magnified’ and we at the Triplehorn Insect Collection could not be happier.
We all love big bugs, but the reality is that the vast majority of insects are small and go mostly unnoticed by people. In order to study these (mostly tiny, but fascinating!) creatures, scientists use a suite of optical and digital imaging tools to make them look bigger so we can see details we would not be able to see otherwise.
Here at the Triplehorn Insect Collection, my primary job is to handle and operate all things involving the production of high resolution publication quality photographs of insects. My work ranges from taking photos of large butterflies to microscopic hairs on a bee’s leg. The photos we take are constantly being added to the collection’s database in association with the specimen label data for scientific use.
-

- Example image of a tiger beetle.
-

- Example image of a rusty patch bumble bee.
For this year’s open house we thought of using the techniques and protocols we developed for the scientific imaging to create a stunning and scientifically accurate display to illustrate to visitors 1) the beauty and surprisingly intricate detail found in the body of a relatively familiar insect, and 2) the revolutionary power of digital imaging technologies for the study of insects.
The challenge was to produce the largest image we could do within the constraints of a very small budget and the space we had available.
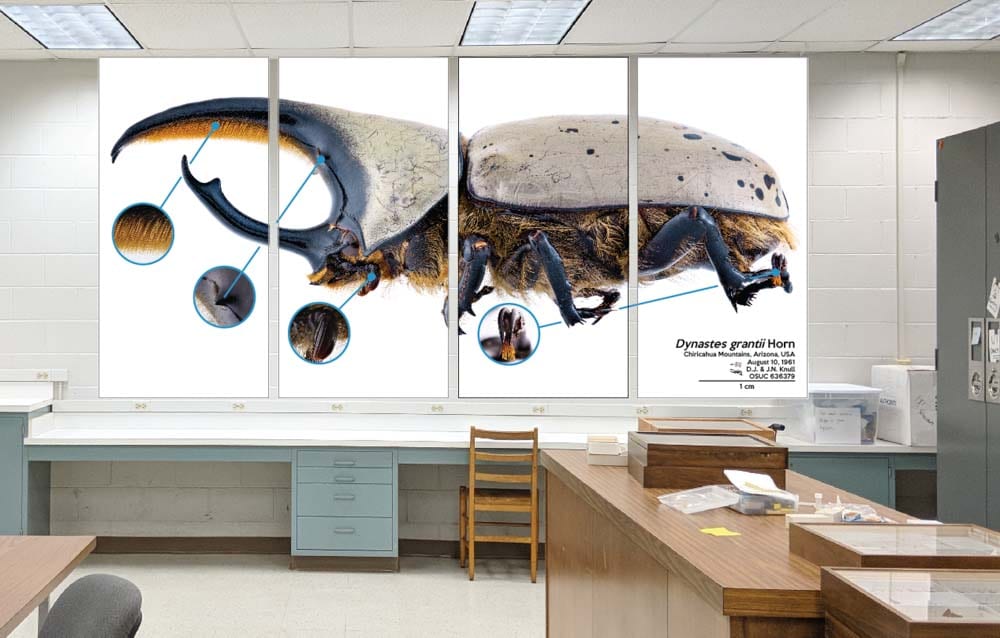
During our brainstorming sessions for open house, Dr. Lu suggested a large 12 ft x 6 ft wall in the collection that would be an excellent spot for a display. After some discussion over the theme ‘Magnified’, we decided to use the space to show a single large scale photograph of an insect. In the past, the collection produced large banners that functioned as a way to display photographs and information. In a similar fashion, I would span a single image over four separate banners to create a large scale photograph. This would fit our goals and our budget.

A 6ft x 2ft display banner made for a previous open house.
We naturally gravitated towards beetles because of the rich collection of these insects available here at OSU. Our insect of choice was the male Hercules beetle, with its characteristic coloration and magnificent horns. We initially thought of using a species native to Ohio, Dynastes tityus (Linnaeus), but the specimens in the collection’s holdings were not adequate for the image we wanted to produce. We finally chose a stunning specimen of Western Hercules Beetle, Dynastes grantii Horn.

Dynastes grantii Horn specimen.
The next step was the fun part! In order to turn this plan into a reality, I needed to photograph the insect!
At the collection, we have a lab with both a microscopic and macroscopic cameras to cover the gamut of insect sizes. For this specific project, I used our macro-camera since the insect was roughly 3 inches long. This consists of a Canon 5D mark ii, Canon 100mm f/2.8 lens, five LED light panels, copy stand, Stackshot Macro Rail, and proprietary software.
For those interested, an abridged version of how I create a photograph with our equipment:
1. Have the DSLR Camera, lights, and other equipment all on, connected, and arranged correctly.
2. Open up Helicon Remote (computer to camera communication software)
3. Set the limits of the photograph by finding the top and bottom of the specimen
4. Calculate the number of steps and images that need to be taken
5. Create a proper exposure and arrange the lighting environment
6. Start the shooting process, allowing the camera to travel down the rails taking a picture every couple centimeters.
7. After shooting the images, transfer them to Helicon Focus (image stacking software)
8. Stack the images in Helicon Focus
9. Save
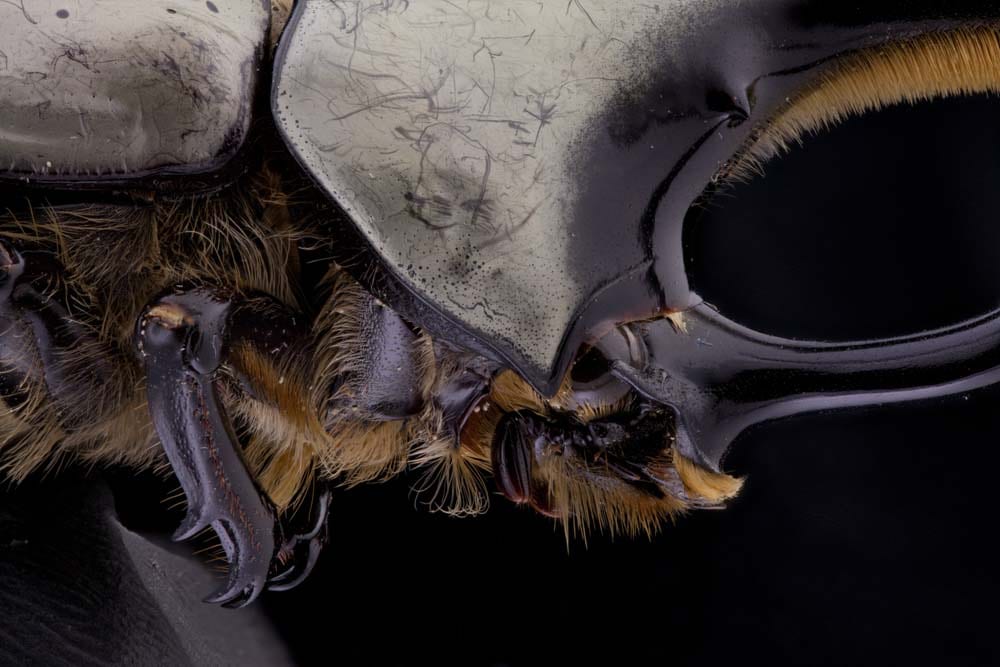
In order to enlarge this beetle to the size of a rhinoceros, I would need the most amount of detail possible. Through a technique known as ‘ultra-montage image’ I would achieve an ultra-high resolution image that would be more than suitable for such a size. This involves photographing sections of the insect with a stack of 30+ images resulting in a single extended focus image. I then repeat this process several times until every section of the bug has been imaged. Then I would stitch these stacked images together creating one ‘ultra-montage image’.
Example of a stacked section of a photograph.
Before I began photographing the specimen for the final image, Evie Moran (a photography major at CCAD who was doing an internship here at the collection between January and June 2018) and I would have to do several of lighting tests to achieve the correct look. When it comes to photographing insects, their size, shape, and texture can really determine the difficulty in achieving a well lit image. In this case, the size was ideal, but the shape and texture were a little bit more difficult. With beetles in general, the bulbous shell creates difficult reflections, highlights, and shadows that are caused by the lights. In most instances we have to diffuse and even block light on certain sections of the insect to create the kind of highlights, shadows, and contrast necessary for the image.
-

- Preparing to image dorsal view of beetle.
-

- Imaging stage with lights.
Once the lighting was finalized, we started photographing the specimen using the ‘ultra montage’ technique as mentioned earlier. After a couple hours, we had the eight sections stitched into one single ultra-high resolution image.

Ultra-montage image straight out of the camera.
From there I transitioned into the editing of the image. This included things like color correction and editing the image using Adobe Photoshop to erase the pin, specimen manipulator, and mites that were on the specimen.

Editing out the pin and adding a white background.

Final image with color correction and Photoshop touch-ups.
After both the dorsal and lateral habitus views were imaged, I moved on to imaging the ‘detailed’ sections of the image. These detail shots were taken as a single stack of 20+ images that would be “magnified” in the finished display.
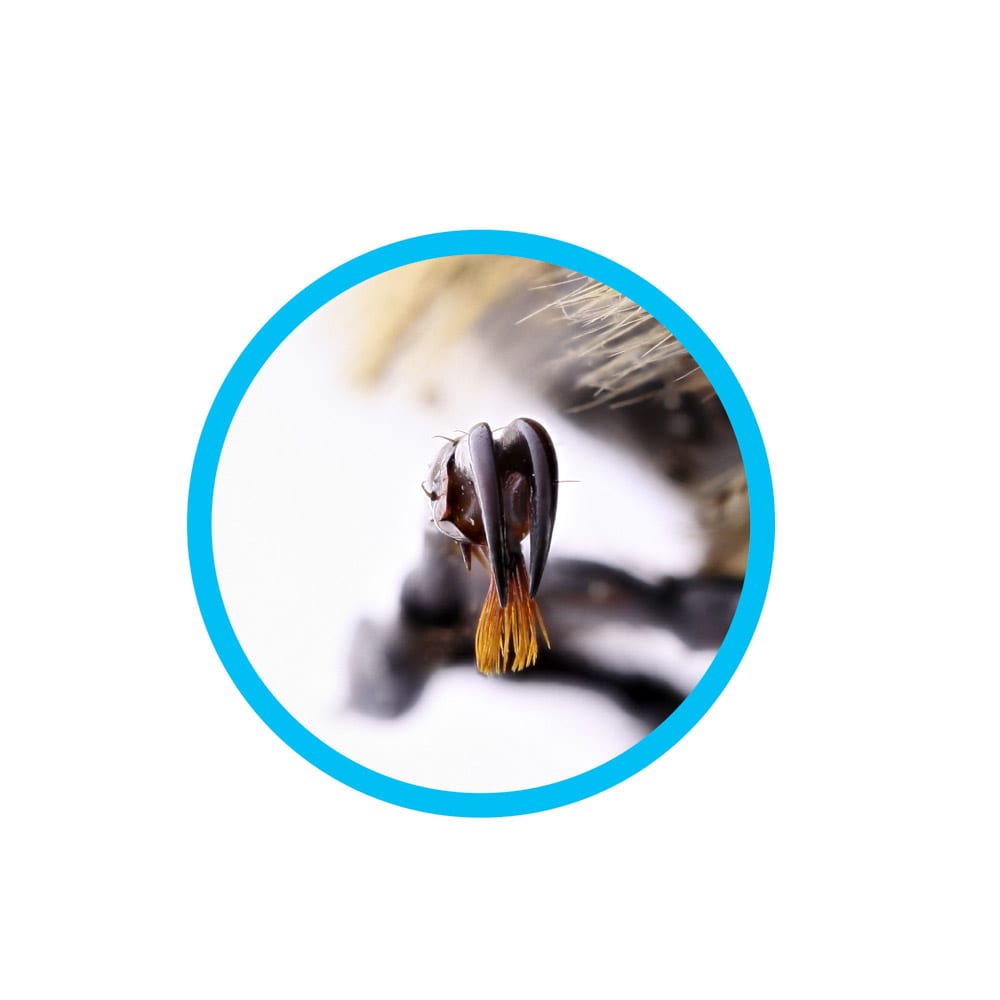
Detail shot of tarsal claws.
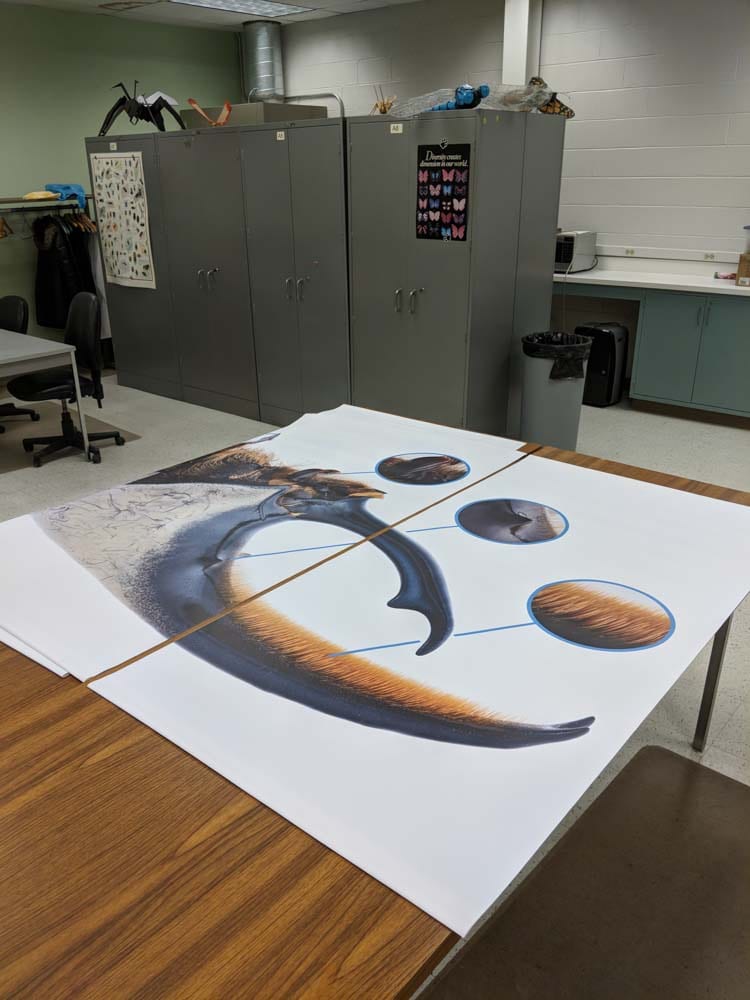
From that point on, I worked in Adobe Illustrator to design the final image utilizing all the photographs we had taken. The design process, just like everything else, was a lot of trial and error, seeing what worked and what didn’t.
A proof of concept mock-up for the display.
After a good amount of work, I arrived at a point where everyone was happy, and it was time to export the final images for printing. We sent off the images and within a couple of days we received the results!
The prints arrived.
The last step was the installation of the banners. With a couple of dowel rods, eye bolts, and fishing line, the banners were hung from the drop ceiling waiting to be revealed to the visitors of the Museum Open House. You can watch a time lapse video of the installations made for this year’s open house HERE.

The banner finally installed in the Triplehorn Insect Collection.


Open House 2018, Photo by Tamara Sabbagh.
I hope this image hangs at the entrance of the Triplehorn Insect Collection for some time, and that every guest gets to enjoy it as much as I do. I would like to thank Evie Moran for providing assistance with the photographing process. Having an extra pair of hands and another artist to bounce ideas off of is always invaluable. Of course, this would not have been possible without Dr. Luciana Musetti. Her enthusiasm for insects, art, and creativity is what drives work like this to be done. I am extremely thankful for the opportunity to have produced this, and have it displayed for the staff and guests who love insects most.
About the Author: Jordan Reynolds is a new-media artist concentratied on the intersection of art, architecture, and design. Jordan is also an Ohio State alumnus who studied Art and Technology. He currently works at the Triplehorn Insect Collection as an Imaging Technician and Research Assistant. You can contact Jordan and see more work through his website.