Fall Maple Assessment – Get Ready for Next Season

The leaves have changed and have mostly fallen from the trees.  In some corners of Ohio, the first snow has already fallen.  For maple syrup producers, that means the push to get ready for a new season is upon us.  This is the best time of year to walk through your entire operation and systematically appraise your operation.  Now is the time to walk your sugarbush with a notebook in hand.  This assessment process allows you to locate the little things that make a big difference when the sap starts flowing.

Begin by looking at the most logical place first – your trees!  What condition are the trees in?  Are they healthy?  Did the June storms cause wind damage to the crowns?  The health of the trees will determine the number of taps per tree, and to some extent, the depth of your taphole.  If trees appear stressed, consider tapping a bit shallower (1.5 inches) rather than the full 1.75” or 2” depth.  It is not unusual to rest a tree for a season, allowing it to overcome obvious stressors.

Now reflect on your tubing system’s performance the very first year it was installed.   Compare that year to the way your system performed last year.  Have you noticed a drop-off in performance? It is easy to blame a poor season on the weather; in reality, the cause could be the age of your system and some neglected repairs.  For many producers, the first inclination is run out into the woods looking for squirrel chews and start repairing lines.  Do not get me wrong, that is important, but it is just one stage of a more holistic leak detection process.  The first order of business should be to inspect the lines for more systemic degradation and disrepair.  I hope that everyone is starting every season with all new spouts?!  However, your assessment should look deeper still.

When was the last time you changed the drops?  How long are the drops?  Are they long enough to allow you to reach around the tree?  Thirty-two inches is a good starting point for drop length in established systems.  What condition are your tees in?  Bad tees lead to micro leaks that sometimes are worse than squirrel chews because they are harder to locate and might be ignored an entire season.  What condition are your laterals?  Do they need to be replaced?  Are you noticing a mold buildup in the lines?  Are your lines patched together because of multiple repairs and damage?  When you replace laterals, it is a good time to look at the overall layout of the lateral system?  Count your taps on each lateral to determine if one is overloaded.  Remember, any given lateral should only be carrying 5 to 7 taps.  Also look at the slope of each lateral.  Is it running straight and tight and downhill for best performance?  What about your saddles, are they leaking?  Old saddles, just like old tees, need to be replaced on a regular basis – at least every 5 years.  Old saddles are often one of the major causes of leakage in maple tubing systems.

The next area of concern is the mainlines.  Ultraviolet light and wind damage are major causes of stress on mainlines.  Mainlines are good for 10 to 15 years, but eventually they must be replaced.  Yes, that is an expensive project!  However, the benefits outweigh the cost.  Installing new lines also allows you to remove damaged and unwanted trees during the repair.  Sugarbush stand improvement is important as it will improve the overall health and productivity of your sugarbush in the long-term.  Hazard trees, such as standing dead ash, should also be dealt with during a mainline replacement project.

It is easy to see how performing a pre-season assessment of your tubing system can be beneficial.  And that is just the tubing system!  After you walk your sugarbush – clipboard in hand – go back to the sugarhouse and develop an improvement plan. What must you buy?  In what quantity?  When will it arrive?  Are their supply chain delays?  Rank everything you have found in order of importance and start chipping away at your list – sap season will be here before you know it!

Optimizing the Performance of My Vacuum Tubing System, Part III

The goal of the previous two articles (Part I, Part II) and this final installment is for you to realize that there are many factors that go into installing and running a maple vacuum tubing system. All the factors are interrelated and each one needs to be careful considered on the part of the operator.  The below information is contained in the Cornell New York State Tubing and Vacuum System Notebook (NSTVN) written by Cornell University’s Maple Specialist Steve Childs.  Much of the information is these three posts is a synthesis of past content with some more recent best practice guidance.

Part I introduced basic concepts of vacuum in a tubing system, some different variants within vacuum systems, and the different factors (most well within the control of the producer!) that influence vacuum levels throughout a system.  Part II walked you through how to calculate vacuum levels within your system and how to ensure your production needs are met by your system’s capacity.  The final installment will help direct you towards a vacuum pump that will do the job you need it to do.


When someone brings up the subject of vacuum, one of the first questions producers ask is, “What size vacuum pump will I need to run my system?” They will also sometimes ask, “Will the old rotary vane pump my grandfather abandoned in the barn 10 years ago (or longer…) do the job?” The question I also ask back is this, “What vacuum level do you want to run at today and into the future?”

We should get the second question out of the way first. Grandpa’s pump was designed to milk cows, and Bessy would get a little fussy if the vacuum level were to jump above 15 Hg. So the simple answer is that Grandpa’s pump will work, but it is not designed for optimizing maple production. But if you are happy with a modest increase in production beyond simple gravity-fed lines, dust off the old rotary vane pump and run it at the recommended RPM. Moving on to where the maple industry has evolved.

To review, vacuum pumps are designed to remove air from the system, and we already know that vacuum pumps are rated in terms of their ability to remove cubic feet per minute (CFM) from the system. Two additional factors come into play when comparing vacuum pumps. One is the horsepower rating, or the power required to remove air at high levels of vacuum. As the air is removed from an enclosed area the molecules of air in that area become very sparse. A pump must work very hard to remove the remaining molecules of air in the system. The pump must also overcome the force of the negative pressure inside that enclosed area, and this challenge requires more horsepower. A larger pump with a higher CFM rating has a higher capacity to accomplish this task but bigger pumps also require higher horsepower motors. The final factor is pump speed. If you turn a pump faster your will move more air thereby increasing the pump’s capacity. However, over-speeding a pump can cause excessive wear on the pump. This becomes a critical factor when sizing a gasoline of diesel motor driven pump. Pullies need to be sized correctly or performance is sacrificed.

Caption: Vacuum gauge measuring 26+ inches of vacuum

Most of today’s liquid ring, flood vacuum, rotary claw and new age rotary vane pumps are designed to run at vacuum levels up to 29 inches. An important thing to remember is that all pump ratings and vacuum level capacities are preformed using a standard test at the factory removing air from a sealed vessel and a performance curve is developed. This is done in a controlled environment. Now the question becomes what happens when you lower the air temperature and increase or decrease the barometric pressure? The result is confusion. Today, many maple equipment companies are simply listing pump sizes by motor horsepower instead of by CFM capacity. I have personally never seen optimum conditions out in a sugarbush in February and March, and as pointed out above, motor horsepower is only one factor determining pump capacity.

Another question I have is this – “What is the likelihood of that pump reaching 29 inches of vacuum in your sugarbush?” How many times have you heard producers tell you that the pump gauge mounted somewhere near the inlet of the pump is reading 28 inches of vacuum and therefore he must be producing 28 inches of vacuum at every tap in his woods? The harsh reality is that out in the woods he might be struggling to produce 15-20 inches of vacuum. What has the producer not factored in? First, line loss because line diameter can be restricting flow and impairing the ability of the vacuum pump to remove all the air from the system. Second, the producer might have an abundance of leaks in his or her system. The reality is that the only vacuum reading that counts is the reading that is taken out in the woods at the last tap. Today in the age of maple tubing system monitors, producers can know exactly what level of vacuum they have at the end of each line. They can also monitor the level of vacuum at the releaser and make the comparison to the end of their lines and isolate and correct problems as they occur.

To determine what sized pump your operation requires, you should begin by constructing an evaluation like the one used in the NY State Maple Tubing and Vacuum System Notebook. Start by calculating the proper line size for the number of taps you have now and do not forget to think ahead regarding possible expansions you may make in the future. Factor in your equipment such as the releaser you want to run, whether you have lifts in your system and other CFM consuming features. Do not forget to build in some reserve performance to allow for possible leaks and for keeping up with your during peak runs. At this point, you should have a good idea of the right-sized pump for your operation. If you are right on the edge of meeting CFM demand, you should strongly consider buying a pump one size or even two sizes bigger than you planned especially if expansion is in your future. What’s the old adage? Buy once, cry once.

The Bottom Line

You have now made all the calculations and are beginning to understand the logic and principles behind setting up a vacuum tubing system. So what is the return on investment (ROI) for spending money on a bigger pump and increasing the size of your lines? For that answer, let’s look at yield research done at UVM Proctor Research Center. For the UVM study, the goal was to determine yields in systems up to 25 inches of vacuum. The results showed that sap yield doubles when vacuum is taken from 0 to 15 inches (8 gallons per tap). From 15 to 20 inches, the payoff was a 3 gallon increase, and pushing vacuum another 5 inches to 25 Hg resulted in an additional 2.5 gallons. At 25 inches vacuum, you have added nearly 14 gallons of sap per tap.  Even at 20 inches of vacuum, the additional yield is still over 10 gallons. In today’s market you can add a modern vacuum pump, a releaser, and moisture trap for less that $10,000. If you increased your production by 75% on 1000 taps, you would go from 250 gallons a year to 400. If those 150 extra gallons sold on the retail market for $50.00, your return would be $7,500 dollars. At that rate, you have paid for your vacuum upgrade in two years. What are you waiting for?!

This is the final installment in the 3-part series dedicated to optimizing your vacuum tubing system.  Be sure to leave questions or comment below.

Author: Les Ober, Geauga County OSU Extension

Optimizing the Performance of My Vacuum Tubing System, Part II

The goal of the previous article (Part I), this article, and the next is for you to realize that there are many factors that go into installing and running a maple vacuum tubing system. All the factors are interrelated and each one needs to be careful considered on the part of the operator.  The below information is contained in the Cornell New York State Tubing and Vacuum System Notebook (NSTVN) written by Cornell University’s Maple Specialist Steve Childs.  Much of the information is these three posts is a synthesis of past content with some more recent best practice guidance.

Part I introduced basic concepts of vacuum in a tubing system, some different variants within vacuum systems, and the different factors (most well within the control of the producer!) that influence vacuum levels throughout a system.  Part II will walk you through how to calculate vacuum levels within your system and how to ensure your production needs are met by your system’s capacity.

It is not uncommon during a peak or flood run for your vacuum to drop. If you maintain your lines and are running a tight, leak free system what is the possible explanation for this sudden drop in vacuum? One possible reason is CFM Allocation (air flow measured in Cubic Feet per Minute). In the most basic systems, all vacuum lines are properly and equally sized with the same number of taps per line and all running to a single collection point. The CFM requirements to maintain optimum vacuum will be equally distributed across the whole system. For example, if you have 4 lines of equal diameter connected to a 60 CFM vacuum pump each line would receive 25% of the vacuum CFM (15 CFM). According to theory that would be enough vacuum to run 1500 taps on each line. To use another example, if you are using a 20 CFM pump on a system with 4 equally sized lines and each line serviced 200 taps each for a total of 800, then you would be allocating slightly less than 5 CFM to each line – still more than enough to run each line. However, Total CFM utilization is not always dictated by the number of taps in the woods. One must account for the CFMs utilized by other components of the system, such as if you run a mechanical releaser and other add-on features like lifts or reverse-slope releasers. This reduces the number of available CFMs to accommodate tree loss and leak loss.

Caption: Vacuum Pump with Vacuum Gauge

Now let’s add some complexity to our scenario. Let’s say you expand your 800 tap operation by adding 600 taps to the backside of one of your 200 tap lines. What happens to your 20 available CFMs if you remove a 1” line and replace it with a 1 ¼” line to service the line that now has 800 taps. Now you have 3, 1” lines and the new 1 ¼” line servicing 1400 total taps.  Now you must calculate your line allocation to determine proper CFM distribution.

The first step is to calculate the cross-sectional area of each pipe which is easily accomplished with basic geometry’s “area of a circle” equation.

Cross-sectional Area of a Pipe
Diameter Area
¾” 0.44 in2
1” 0.78 in2
1 ¼” 1.23 in2
1 ½” 1.77 in2
2” 3.14 in2
3” 7.07 in2

Second, you need to determine the percentage of your total vacuum going to each line.  As a reminder, our example has 4 mainlines: 3, 1” lines and a single 1 ¼” line.  Here is a simple way to determine vacuum distribution.

The cumulative cross-sectional area of our 3, 1” lines = 0.78 + 0.78 + 0.78 = 2.34 square inches.  And for the single 1 ¼” line, 1.23 square inches.  The grand total sums to 3.57 in2.

Now divide the cross-sectional area of each line by the total to see what proportion or percentage of vacuum is being applied to each line.  You will find that each 1” line is pulling 22% of your overall CFMs which leaves 34% of the vacuum for the 1 ¼” line.  By CFMs (remember you started with 20 CFMs), each 1” mainline is pulling a maximum of 4.4 CFM and the single larger line is hovering just under 7.

You can quickly see that you are sending way too many CFMs to each of the 1” lines and not enough to maintain good vacuum on the 1 ¼” line.  A quick solution would be to combine the 3, 1” lines into a 1 ¼” manifold with the existing 1 ¼” line going directly into the releaser. That would result in the releaser with just two lines coming out each equally sized at 1 ¼”. This solution would re-allocate 50% of the CFMs to each line solving the problem of line allocation.

It is important to remember, you need to account for leaks that will introduce more air into lines. You might be able to maintain peak vacuum on most average days, but will your system  keep up with sap flow when the big run hits and you need to move as much air as fast as possible to maintain vacuum levels. If you have your lines sized properly, you now need to take the next step to determine what size pump you should purchase.

Stay tuned for Part III (What Pump to Purchase?) on Thursday and be sure to leave questions or comments!

Author: Les Ober, Geauga County OSU Extension

Optimizing the Performance of My Vacuum Tubing System: Part I

The goal of these next 3 articles is for you to realize that there are many factors that go into installing and running a maple vacuum tubing system. All the factors are interrelated and each one needs to be careful considered on the part of the operator.  The below information is contained in the Cornell New York State Tubing and Vacuum System Notebook (NSTVN) written by Cornell University’s Maple Specialist Steve Childs.  Much of the information is this and the next two posts is a synthesis of past content with some more recent best practice guidance.

When we talk about tubing systems, we have two roads to travel. One is a gravity system and the other is a vacuum system. A conventional 5/16” gravity system is not much different from running sap into a bucket. The yield is much the same as collecting sap in a bucket. When we add vacuum to a tubing system, we increase the sap yield 5% for every inch of vacuum we generate in our system. For example, if we produce 15 inches of vacuum in a line, we should be able to almost double our sap yield.  The first year after installation is always the best. As time on a system accumulates, wear-and-tear hampers performance.

Caption: Year 1 Production with a Brand-New System Should Provide Your Best Vacuum Levels

The definition of vacuum is the absence of air. The maximum level of vacuum achievable on any given day is determined by the barometric pressure. This means that our vacuum level can never exceed the barometric pressure in the location of our sugar bush. There are two way to measure vacuum pump performance, Inches of Mercury (hg) and Cubic Feet per Minute (CFM). Inches of mercury measures the negative pressure produced when air leaves the line. For example, if 50% of the air is removed then the inches of mercury should be somewhere between 14 and 15. At 25 inches of mercury, approximately 85% of the air has been removed from the lines. CFM on the other hand measures the amount of air being evacuated from the lines in units of cubic feet per minute. This is the amount of air that a vacuum pump is pulling out of the system in one minute’s time. Where is the air coming from? The answer is gas that is forming inside the tree and being expelled through the tap hole. As a rule of thumb, there is a 1 CFM requirement for every 100 taps on the line.  However, the biggest contributors are leaks allowing air to enter the system through damaged or aging tubing. This statement emphasizes the importance of managing leaks in a vacuum tubing system.

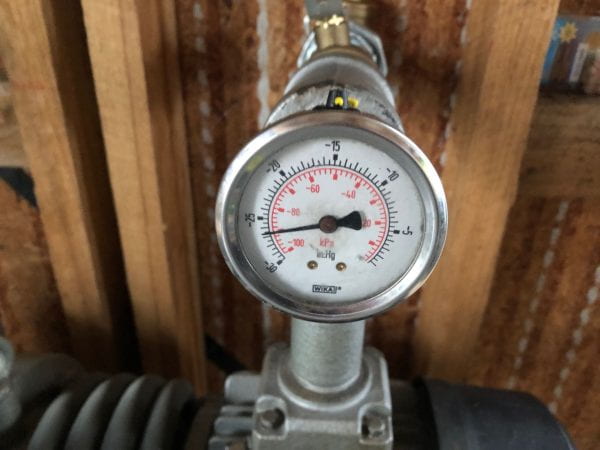
Caption: Vacuum Gauge Measuring Vacuum in Inches of Mercury (hg)

Speaking of leaks, the most important part of operating any maple syrup system is the time you spend in the woods making sure your vacuum tubing system is leak-free. Much of the rest of the article is spent discussing different technologies and equipment, but the simple fact of the matter is this – the best equipment with poor care in the woods won’t do you a lick of good when it comes to putting more maple syrup on tables of your customers. You must always account for leaks that introduce air into lines. You might be able to maintain peak vacuum on average days, but your system will show its weak points when sap flows are running fast and you need to move as much as air as fast as possible to maintain vacuum levels. Being able to spot and repair leaks quickly is essential. To accomplish this, you should design your system so you can isolate lines to pinpoint problems. This can be done by compartmentalizing your system with valves and vacuum gauges placed at the starting point of each line. The installation of a tubing monitoring system can be a wise investment as well, and the time saved and extra sap produced will pay for the cost of the upgrades in short order.

Back to our lesson on vacuum and barometric pressure. There are factors that have a direct effect on barometric pressure. One is altitude. As the altitude increases the maximum barometric pressure declines (rule of thumb: for every 1000 feet of elevation you lose 1 inch of vacuum). For example, at sea level, or 0 altitude, the average barometric press can be 29 inches; at 2000 feet, the average maximum barometric pressure obtainable is only around 28 inches. In addition, barometric pressure changes under different environmental conditions, and variations in barometric pressure caused by atmospheric changes can occur multiple times in a day. If we are running a vacuum pump under a low barometer at 2000 feet elevation, we might struggle to maintain 28 or even 27 inches of vacuum on a very tight well-maintained tubing system.

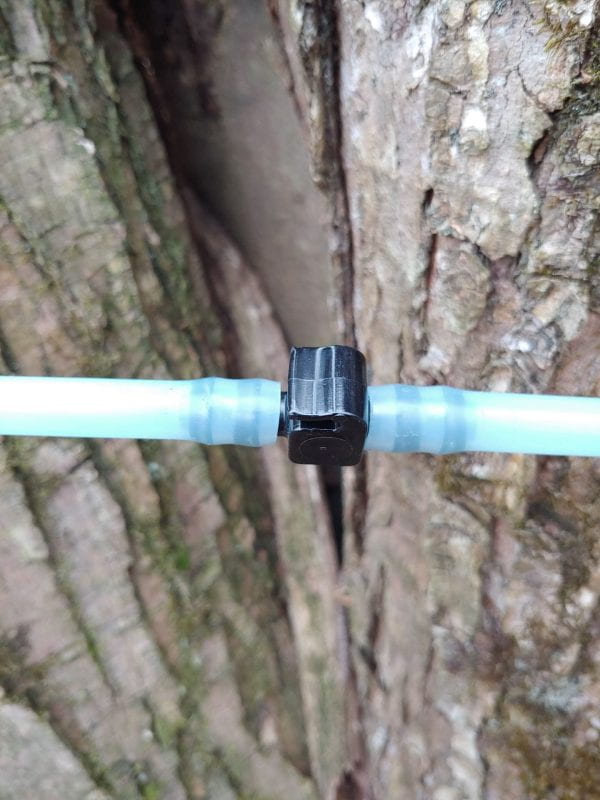
Sap moves down the line by gravity on a system of tubes suspended with wire. The basic components are spouts, tees, and drops moving sap from the tree into lateral lines. A lateral line should have no more than 5 to 10 taps per line and should be no longer than 100 feet in length. The lateral lines flow into main lines. In large systems, secondary mains flow into Wet-Dry lines and or trunk lines (large diameter lines) that move the sap to a central collection point.   To properly function, sap lines should be straight, pulled tight, and sloped downhill. To this point gravity systems and vacuum systems are similar, with the gravity system relying on slope and Newton’s law of gravity to move the sap.

Caption: 65 CFM Bush R-5 Vacuum Pump

When vacuum is added to the system, sap flow is aided by the movement of air.  The components of a vacuum tubing system are the vacuum pump, which is connected to lines via a sap releaser. Even though it is called a vacuum pump, it is not a pump in the conventional sense of the word and that is a bit confusing. A conventional pump moves liquid creating pressure ahead of the liquid and suction on the backside of the liquid. There are other types of pumps used in maple production. For example, a diaphragm pump is a conventional pump and that creates enough suction (secondary vacuum) to draw sap from a tree. However, if liquid is not present in the lines that suction can be lost.  A true vacuum pump moves air, not liquid and it creates a higher level of vacuum (absence of air) as the air is removed from the lines. That level of vacuum can be maintained with or without sap in the lines and will only drop if a leak allows outside air to enter the line.  Because the pump is designed to move only air, the liquid must be separated from the pump. This separation process is performed by a sap releaser. If sap enters the vacuum pump severe damage to the pump can occur! To prevent this from happening, a moisture trap is placed between the pump and the releaser.

Caption: Sap house releaser (right) with Vacuum Piston Pump (left)

A properly sized vacuum pump with a proper CFM rating will be capable of removing air faster than it is introduced. However, there is one factor that can interrupt and slow that process – line size. Vacuum lines are designed to conduct air to the pump. If your line diameter is too small, the air movement will be restricted requiring more time for the pump to clear air from the lines. This phenomenon is referred to as line loss. The smaller the line the more the air flow is restricted resulting in higher line loss. As an example, a 60 CFM pump set at 15 inches of vacuum hooked to a 3“ line can maintain over 40 CFM out to 5000 feet. However, that same pump hooked to a ¾” inch line is incapable of delivering 15 inches of vacuum at 2500 feet from the pump. Line loss increases the time (recovery time) needed to evacuate air from the line and restore peak vacuum level.

What is missing from this equation? The capacity of the line to conduct liquid. Every diameter of pipe has a maximum liquid capacity. The size of the pipe that is needed is determined by the number of taps flowing into the pipe. Each tap during a peak flow might contribute upwards of 0.2 gallons of sap per hour. Once you calculate the amount of sap flowing in you can determine the size of the pipe that is needed. There is however one caveat, the steeper the slope the faster the sap moves through the line thereby effectively increasing the capacity of a given-sized line on steeper slopes. Slope can also influence sap flow in other ways. The portion of the line, 50 feet or longer with the least amount of slope, will strongly influence sap flow. Examining this critical portion of your line might dictate a necessary increase in line diameter to allow for adequate air and liquid flow. Remember, you need to move air as well as liquid through a maple pipeline. To do this you must maintain the proper ratio of air to liquid inside the line so as not to inhibit sap movement. If you look at a working cross section of tubing it should contain 60% air and 40% liquid. This is a primary consideration when determining what size of line to use in your sugarbush.  If the liquid level increases beyond that ratio or is uneven (wavy), the air movement will be restricted resulting in a drop in vacuum.

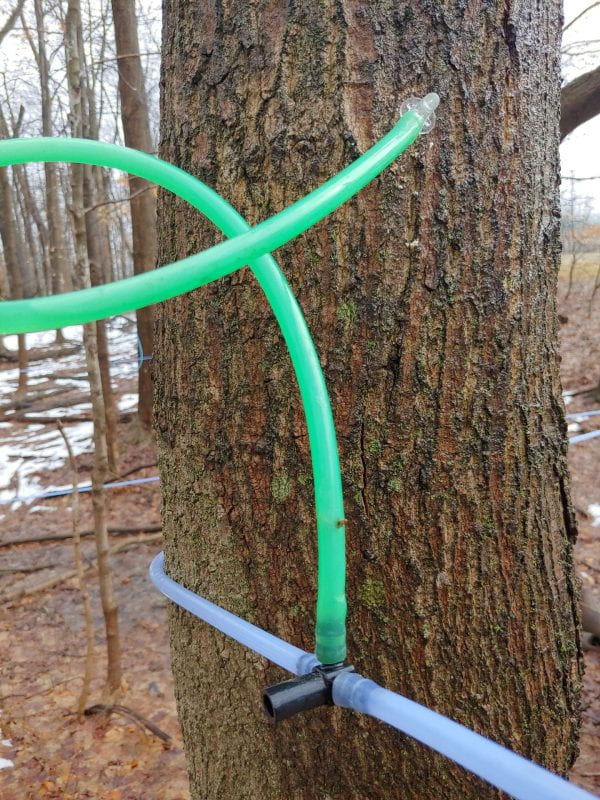
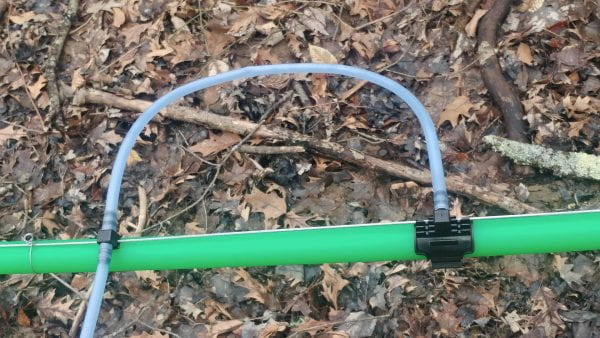
Caption: Whip Connection to a Wet-Dry Line.

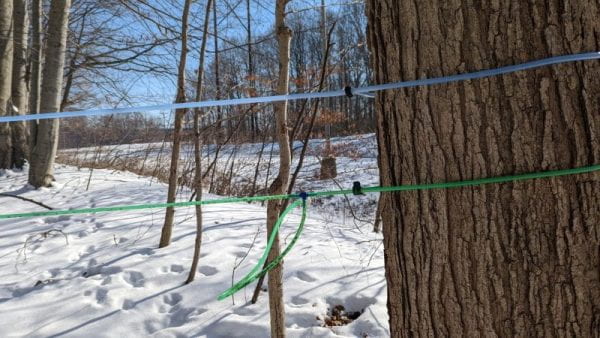
There are two ways to solve this problem. The first would be to increase the size of your main lines but 1 ½” inch and 2” tubing is expensive, and it adds to the overall expense of the tubing system. Still, increasing tubing size may be justified if you have a large number of taps coming into a trunk line. The other alternative is to install a dual-line conductor commonly known as a Wet-Dry Line. Composed of two lines of equal size (or a dry line slightly larger than the wet line), a Wet-Dry system can excel at moving sap across flat areas or areas where multiple secondary mainlines merge. Secondary mains may enter the Wet-Dry line at a booster, or a line configuration called a whip. This allows sap to move down the wet line without impeding the airflow in the dry line. This set-up is particularly useful in flat areas where slope in minimal and sap flows slowly which may inhibit the necessary amount of air flow. Wet-Dry lines can be a cost-effective way to move sap through areas of minimal slope.

Stay tuned for Part II in a couple of days and be sure to leave questions or comments!

Author: Les Ober, Geauga County OSU Extension

The Most Important Time You Will Spend in Your Sugarbush

A month or two before the sap starts flowing your mind should be cranking through your to-do list to ensure your operation is in tip-top condition. Mid-December is a great time to inspect lines and to make adjustments to your tubing system. The work you do before the season will probably determine how well your system will perform during the season. Here are some things to consider and watch for as you work on your tubing system prior to tapping.

How many times have you said to yourself, this system just does not perform as well as it did when we installed it? You have to realize the first year of maple tubing system’s life will be its best year, simply because it is brand new. The spout and drops are new and everything is tight and working properly. After the first year a system’s performance will depend on how well it is maintained. Leaks will develop and those leaks can expose flaws in the system. Finding and repairing leaks is the first step to achieving high vacuum. The problem with doing work on lines prior to tapping is that you do not have the benefit of finding leaks aided by a running vacuum pump. However, with careful inspection you can spot and repair many potential trouble spots that will cause problems later.

The first step is to walk the woods making sure that all of the lines are up and running tight and straight. Inspect all the tubing that is in contact with tree trunks. These areas are where you will find the vast majority of squirrel chews. If the critters have been chewing, this should be relatively easy to spot. Make sure you not only look for chew holes but also scrapes where the little vermin start to chew and back off for whatever reason. Next you need to look for old connections on tees that have been stretched and twisted, replacing old tees where they are needed. If your system has some age, you might consider replacing all drops and spouts. Research out of the Cornell University maple program found that production can skyrocket 50% just by installing new spouts and drops in an older system. A couple of interesting side notes are that you can come very close to this by keeping the old dropline and installing a new check valve adapter every year. Many producers are finding it more convenient to replace the spout every year and the drops every third year. A helpful tip is to use a different color tubing on new drops so that you can quickly identify the drops that need to be rotated out.

Three areas to check on main lines are the saddles, boosters, and line connectors. Check for old, worn, or stretched saddles. If the loop line going to the saddle has become disconnected and is pulling hard on the saddle itself replace the saddle immediately. Once the seal on the saddle is twisted you will more than likely not be able to properly re-seat the saddle without leakage. Saddle leaks are notoriously difficult to detect and can quickly become the site of major vacuum loss. Another trouble spot are the boosters on a Wet-Dry line. Most of these are made of PVC plastic. PVC plastic was developed for indoor plumbing in buildings. It is not designed to be left in direct sunlight for long periods of time, and the result is degradation of the plastic due to ultraviolet (UV) light from the sun’s rays. The UV Light and exposure to hot and cold will also breakdown the glue in the joints. All PVC fittings should be inspected and replaced on a regular basis. If you use a PVC line from your vacuum pump to your releaser, including your moisture trap, make sure you inspect this area for loose or cracked joints as well. These areas are not only exposed to UV light but experience major vibration that can cause damage to the line over time.

Another location where vacuum leaks can occur is where lines are joined together with Cam Lock couplings. Producers need to replace the rubber gaskets on the inside of these couplers on a regular basis. Also try not to exert a lot of outward force on these connections. The work best when they couple together with little force.

Most of the above locations can be inspected without having to run the vacuum. Of course, the final inspection will need to be made once the taps are in and the vacuum is running, but you will be ahead of the game if most of the obvious and routine checks are complete ahead of time. If you can flush lines with water prior to using them, many leaks will also appear during this process. However, this may not be possible due to weather conditions. Early inspections and maintenance can offset hours of costly repairs and down time once the season starts, and disruptions at that point affect the bottom line – production.

Author: Les Ober, Geauga County OSU Extension