Choosing the Right Fuel (Evaporator Series *BONUS* Post)

When it comes to selecting a fuel source for your evaporator, operators should choose based on efficiency, not convenience. To convert 2% sap into 66 brix syrup, 400,000 BTU are required – this is constant for all fuel sources. The two most popular fuel sources, in today’s maple world, are wood and fuel oil.  Additional choices include natural gas, liquefied petroleum (LP) gas, and various wood products such as pellets have been adapted to fuel maple evaporators.

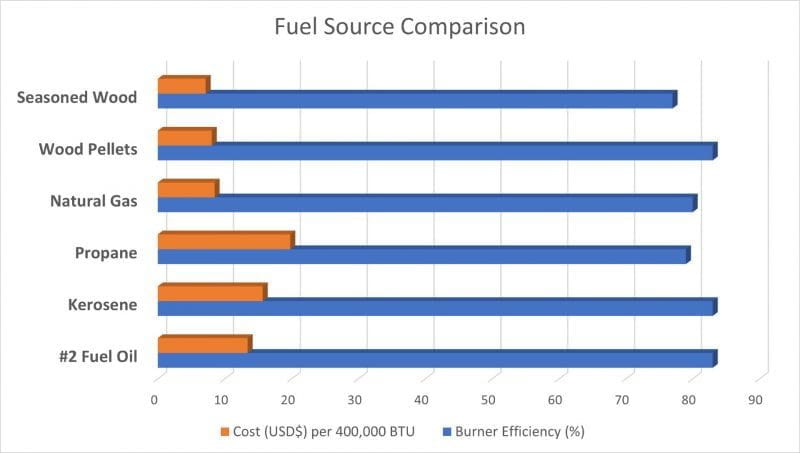
I created the above figure based on estimates generated from the Southern Maine Renewable Fuels Institute.  Based on the statistic above – 400,000 BTU are required to produce a gallon of syrup – I derived production cost estimates for each fuel source and compared burner efficiency. Fossil fuels have a slight edge when it comes to fuel efficiency. The reason they are so efficient is based on the type of burners used and the ability to extract a higher percentage of heating units from each fuel source.

How do you choose the right fuel source for your maple operation?

The ambiance of making syrup on a roaring wood fire has never been challenged. Wood is by far the most popular fuel source for evaporators. It is readily available. And most producers look at dead wood scattered about the sugarbush as something that needs to be disposed of anyway. For that reason, the true value of wood is seldom considered. As we will see later, the value of wood is very close to the value of fuel oil when it comes to making syrup. The true value of wood is based on the dollar value of cordwood. There is an old saying “cordwood has no value until it cut and stacked.” Its value is representative of your time and labor.

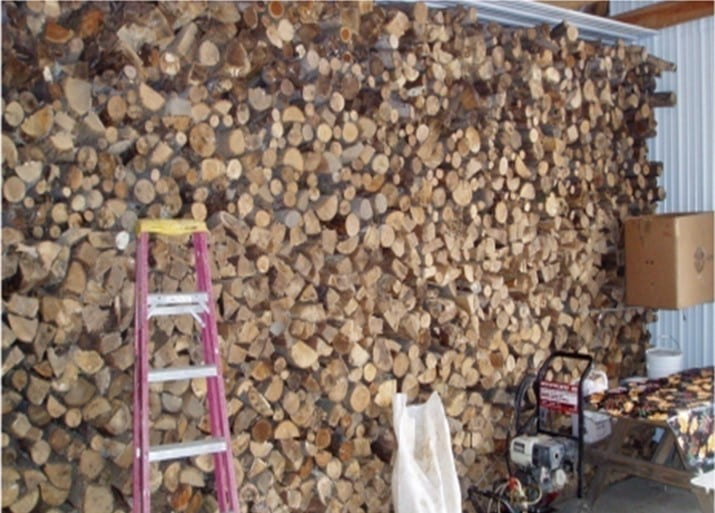
A standard evaporator will produce 22 gallons of syrup from a cord of dry wood. Without the major advances in wood burning technology, most open evaporators are rated at 40-60% efficiency. Heat units are lost at multiple locations across the evaporator. You can quickly see why many producers made the shift to more efficient oil evaporators even though they now had to pay for fuel. The efficiency of a wood-fired evaporator is in the design. No matter what the design, the basic principle of operation remains the same. A wood-fired evaporator draws heat from the flame produced in the firebox. The heat consisting of flame and burning gases is drawn by air movement under the pans and out the stack. The arch is designed to pull and lift the flame up a moderate incline eventually compressing the heat into the flues of the rear pan. The heat exits the evaporator through the stack at temperatures of 600-800 degrees F. Stack dimensions must be designed correctly for proper draft. Wood needs to be placed in the evaporator to facilitate maximum heat without choking the air and dampening the flame. This usually means the firebox should not be filled to the top. You need to allow space for air to enhance the flame. The wood should be fired at regular intervals. A general recommendation is every 5 minutes.

There have been many changes in modern wood arch design that increase the overall efficiency of the evaporator. Forced air injection along with highly insulated arches and firing doors make the modern wood-fired evaporator as efficient as their oil-fired counterparts. Some are rated 85-90% percent efficient. Such high-performance levels are the result of being able to totally burn the wood that is loaded and the ability to re-burn gasses given off during the combustion process (gassification).

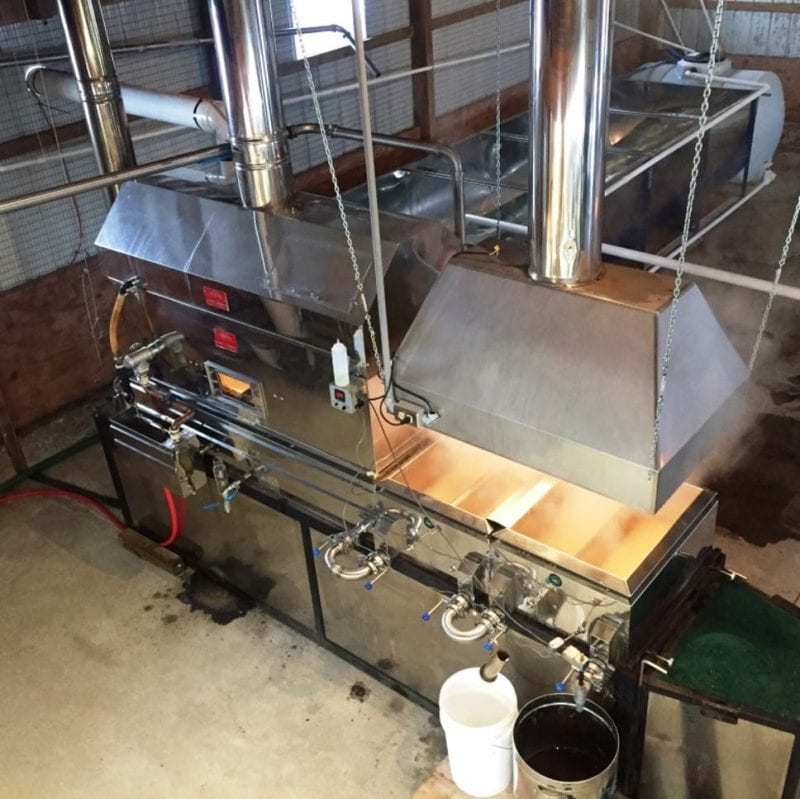
Fuel oil is another popular choice among maple producers, and there are several reasons for this. Fuel oil burns clean and hot and is an ideal choice for larger operations that require high volumes of fuel. This logic has been tempered in recent years with the increasing use of reverse osmosis to produce high Brix concentrate and reduce fuel demands. Efficiency is relatively high nearing 80%, and 1 gallon of syrup can be produced for under 4 gallons of fuel oil.


Bio-diesel Evaporator.

Unlike wood-fired arches, oil-fired evaporators require a minimal draft. Oil-fired arches are designed to develop radiant heat. The burner flame creates a ball of radiant heat and that heat then hovers beneath the pans. Temperatures in an oil arch can reach 1000 degrees F. The movement and intensity of the heat is controlled by a barometric damper that restricts the movement of air through the stack. The damper maintains a uniform temperature by controlling the airflow thru the evaporator. If this control device is not present, the heat can quickly be lost up the stack and the performance of the machine will be impaired. The burner nozzle size and fire rate determine the intensity of the heat. If everything is working correctly, the flame will burn cleanly and the flame ball of burning fuel oil will be suspended in the middle of the fire box never touching the sides of the arch.

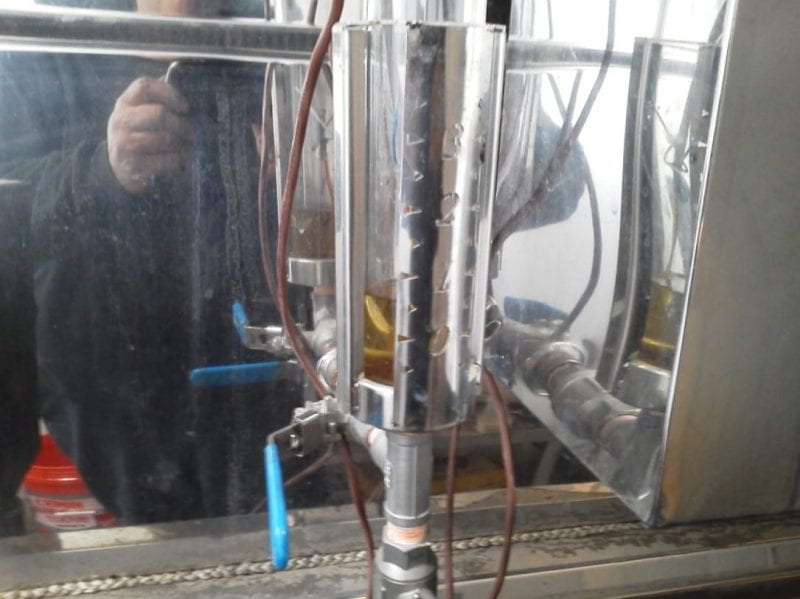
Natural gas is very similar to fuel oil. In fact, the burners today are very similar in operation. Natural gas is convenient and is probably a cleaner source of fuel than oil; additionally, efficiency mirrors fuel oil. Though the original natural gas burners were often inconsistent resulting in hot and cold spots across the pans, there is now little difference in performance as compared to oil-fired evaporators. The biggest drawback is the availability of natural gas. Unlike oil that can be hauled to a remote location, gas needs to be piped in and is not readily available everywhere. If you are fortunate enough to have natural gas available, it is an excellent fuel option.


Natural Gas Evaporator.

The biggest drawback for oil and gas is the variability in cost as the oil market fluctuates. In 2020, we are living in a down cycle for oil and gas and prices are more appealing entering the 2021 syrup season. Within a few years, that could be a completely different story. Time will tell.

I would be remiss if I stopped the article there.

Regardless of what fuel source you choose for making maple syrup, the best single investment a producer can make is to add reverse osmosis to their operation. Despite the high initial cost of reverse osmosis, the cost of processing syrup is reduced significantly and the pay-off is long-term. Reverse osmosis not only allows a producer to process sap quicker, but it also opens the door to expand one’s operation. The savings on fuel are obvious. Before ROs, as reverse osmosis is commonly called, became popular the size of the operation was limited to the amount of sap that could be boiled on an evaporator. The only way to add capacity was to add evaporators, and some of the larger operations were running four, five, and even six to handle peak sap flow. Today, those same operations now employ modern RO systems with multiple membranes that can handle sap coming from thousands of taps. And using less time and space to do so. Reverse osmosis revolutionized the North America Maple Industry.

Author: Les Ober, Geauga County OSU Extension

All Things Evaporators: Part IV

In this final post of the evaporator series, we will examine a few remaining factors to account for when considering the boiling process for maple syrup. As you will see, a few instruments enable the necessary precision to ensure a high-quality batch of syrup every time.

In case you missed them, here is Part I, Part II, and Part III of the series.

Barometric Pressure Matters

One of the biggest factors influencing the boil in an evaporator is barometric pressure. Barometric pressure and weather fronts are frequently responsible for the day-to-day erratic behavior in the way sap boils. The boiling rate is directly associated with the barometric pressure on any given day. If you experience a high barometric pressure, sap boils faster; with low barometric pressure, the boil slows. Meteorological shifts can happen several times per day, and whenever pressure fluctuates the boiling point of water (212 F) will vary. Producers must adjust their thermometer to accurately produce syrup consistently at 219 F. Make sure you calibrate your thermometer in boiling water before the start of each boil and throughout the day as needed. A thermometer will give you a ballpark reading, but to get ultra-precise and guarantee 66 Brix syrup of the highest quality, additional instruments should be utilized.

Having the Right Instruments

You will choose one of three instruments to determine your syrup density coming off the evaporator.  Only one is the best and most accurate for reading syrup straight off the evaporator. As previously stated, syrup’s finishing point is 219 Fahrenheit, 7 degrees above the boiling point of water. Because barometric pressure influences boiling point, using only a thermometer can result in inconsistent finished syrup density. One better option is to use a refractometer, but the syrup sample has to be temperature-stable and filtered to get an accurate reading. For this reason, we do not recommend using a refractometer on syrup coming directly off the evaporator for obvious and practical reasons. (Refractometers are, however, the instrument of choice for measuring the density of cooled and filtered syrup during canning).

The most recommended instrument to determine the density of hot finished syrup is the hydrometer.  A hydrometer should be floated in a sample of finished syrup that is at least 211 degrees F. Hydrometers have two lines, one for cold and one for hot. You will use the hot line for your syrup density determination straight off the evaporator. Bring the instrument up to eye level or set it on a stable object close to eye level for the most accurate reading. The hydrometers red line should float even with syrup level in the container. Most hydrometers also have two scales, one for Brix and one for Baume (Baume measures specific gravity of a solution). The Brix scale is the most popular and frequently used today. Avoid letting scale build up on the outside of the glass as it will impact the density reading, and producers should regularly validate their hydrometers for accuracy. Once you confirm finished syrup of the proper density, you will filter your syrup for clarity and to remove niter. You can then use a color comparator to determine the grade of your syrup.

Conclusion

The evaporator has become the center piece of many maple operations. It is the first thing visitors see in your sugarhouse no matter what time of year they visit.  It is also one of the most essential pieces of equipment in your operation.  After all the process of making syrup requires that we must heat maple sap to 7 degrees above the boiling point of water to produce pure maple syrup. This results in the caramelization of maple sap into maple syrup. The addition of heat to maple sap results in the amber color we desire and the maple flavor we love.

Author: Les Ober, OSU Extension Geauga County

All Things Evaporators: Part III

Part 1 and Part 2 of our Evaporator series focused on managing the flue pans and the syrup pans in your evaporator rig. Now the focus will be on controlling two factors that can wreak havoc on the syrup-making process: foam and niter.

Controlling Foam

Foam occurs naturally during the boiling process, and foam problems become more prevalent later in the season when bacterial growth is greatest. A bad foaming issue can make it appear as though your evaporator is boiling over.

Let’s look at the practice of defoaming an evaporator. Think about the last time you boiled syrup on the stove to make candy. A pot with syrup will boil over very quickly. To prevent this, you can smear butter along the rim of the pan. On an evaporator, we do the same basic thing only on a larger scale. Foam build-up starts in the flue pan. Foam bubbles contain liquid that is being pulled away from the pan surface suspending it above the hot liquid below. This reduces the depth of liquid in the pan. Shallower liquid will boil off faster creating hot spots that show up first as areas of intensified steam. These steaming volcano-like hot spots are the first indication you may be headed for trouble. All of this can be avoided by keeping foam to a minimum. Regardless of where the hot spots are located, there are only two places to put defoamer, in the inlet corner of the flue pan and, only if needed, at the draw-off point. One of the biggest mistakes is to put defoamer randomly across the middle of the pans, especially in the syrup pan. Doing this disrupts the gradient, kills the boil, and promotes intermingling of syrup of different densities. This is the most common reason for drawing off the dreaded big batch.

Today we use commercial food-grade defoamers or organic products like canola oil to defoam a pan. There are several methods to place defoamer into the evaporator. One is to simply put it in by hand. If this method is used, the defoamer should be put into your evaporator somewhere near the rear of the flue pan. The most consistent results can be obtained by placing a precise number of drops into the flue pan every 5 to 10 minutes or every time you fire the rig. The number of drops used varies anywhere from 3 drops for small rigs up to 10 drops on larger rigs. The width of the evaporator determines the number of drops, and the rule of thumb is 1 drop for every 6-8 inches of evaporator width. Three drops in a 2-foot rig, 4-5 in a 3-foot rig, and up to 10 drops on a 6-footer would be appropriate application rates.

The biggest problem I have (and I suspect other producers as well) is remembering to place the defoamer in the flue pan because we are not using wood and not firing on regular intervals. A timer works well to remind you to keep on schedule. Other methods would be the use of a defoamer cup in the corners of the pan or injection devices that administer a precise number of drops over time. Defoamer cups work well on larger rigs where the boil in the flue pan is very aggressive.

If your syrup tastes a little oily, you are probably using too much defoamer. If you are an organic producer using organic canola oil, be especially wary of over-application. These cooking oils are not as effective as commercial defoamer and require higher application rates. Over-application can result in off flavors or a greasy feel to the syrup when tasted.

Controlling Niter

What is niter, or as the old-timers called it – sugar sand, and where does it come from?

Niter is a suspension of minerals and other solids that precipitate out of the sap during the boiling process. The amount of niter present in sap varies from season to season, from woods to woods and time of year. These suspended solids are removed during the syrup filtration process. The prevention of niter build-up is critical.

In an evaporator heat must be transferred through the thin metal surface of the pan into the liquid to create the boil. A portion of the suspended solids tend to adhere to the heated metal surface of the pan. In extreme cases, the caked niter will scorch, burn, and that excess heat will eventually buckle the metal pan. Allowing niter build-up insulates the liquid from the pan surface causing the metal surface to burn. Due to the higher concentration of solids in the sap, niter build-up tends to increase the closer you get to the draw-off point. Depending on the volume of syrup moving through the evaporator, removing niter must be done once daily or several times during a boil. As you move further away from the draw-off point, niter build-up is a lot less and the boiling action tends to break the niter down. However, all your front pans need to be cleaned and rotated on a regular basis. Starting the day with a clean syrup pan is a necessity.  Pans can be cleaned with the use of white vinegar and hot water. This is a very effective way to clean pans with a minimal amount of elbow grease.

Author: Les Ober, Geauga County OSU Extension

All Things Evaporators: Part II

Scroll down or click under the Evaporators and Finishing Archive tab to read Part I.

Managing Your Syrup Pan

What happens in the syrup (or front) pan determines the success or failure of every producer’s season. It is here that all the standards of maple syrup quality come together. Ideally, the right density meets the right color and the right flavor. The science is using instruments to determine the exact time to draw off the syrup. The art is that sixth sense of knowing when everything is moving toward the perfect draw-off. That sixth sense is something that requires experience and is often handed down generation to generation. If the science and art come together properly, the result is golden amber maple syrup with the perfect maple flavor.

When sap transitions from the flue pans to the syrup pans, many gallons of water have already been removed leaving a sap concentration of roughly 18-19 Brix. If syrup represents 1 gallon of the remaining liquid, approximately 9 more gallons of water still need to be evaporated in the syrup pans. The speed at which this happens is relative to the size of the evaporator you are running and the quality of your fuel source. In most rigs, the transition happens quickly, and operators must devote their undivided attention to avoid problems and ensure a quality product.

Unlike flue pans, the front or syrup pan is a flat bottom designed to create a surface with even heat exchange. There are several types of front pans on the market today. Traditional drop flue evaporators were equipped with a standard reverse flow pan which allowed the operator to change the side used to draw off when niter (sugar-sand) built up. Over the years, this style of evaporator has seen modifications.

One improvement included designing the pan so that the flow can be reversed while allowing the draw-off to remain on one side. This is accomplished with a series of valves and external plumbing directing the flow of sap from one side to the other. An example of this would be the “Leader Revolution Pan.” Producers found this improvement to be helpful to avoid the movement of draw-off equipment from one side of the rig to the other.


Cross flow design on a raised flue evaporator.  Electronic floats calibrate sap depth between the back and front pans.

Another front pan configuration is the cross-flow design. Cross-flow pans are installed setting across the arch hooked in series with the draw-off near the front of the last pan. There can be anywhere from two pans on a standard rig to four pans on bigger rigs designed to handle “High Brix Concentrate”.  Because niter tends to accumulate in the draw-off pan first, that pan needs to be switched out to avoid excessive niter build-up. Most producers using this system have one or two extra pans cleaned and ready if the draw-off pan needs to be switched.

The depth of the sap in the front pan is determined by the design of the evaporator. A drop flue rig will maintain the depth set by the flue pan float, but a raised flue rig allows producers to set a separate depth in the front plan. Producers should carry approximately 2 inches of liquid across the front pans allowing syrup to boil evenly to the draw-off point. As pointed out in the first evaporator post, if hot spots develop, that area of the pan will tend to boil faster increasing the risk of burning. The trouble usually occurs when you draw off large volumes of syrup at one time. This causes the liquid level to become very uneven, you might have 2 inches in one part of the pan and only a half-inch in another.  Removing small batches more often will prevent uneven syrup levels and ensure a steady even boil.


Site gauge for monitoring sap depth on a raised flue evaporator.

It bears repeating that producers should pay close attention to bubbles in the sap. As liquid temperatures go above 219 F, the liquid will gravitate toward the hot area, localized boiling becomes more intense over the hot spot, and steam and bubbling from the more intense boil becomes more concentrated and noticeable. The result is that the sap is becoming more concentrated in the hot zone. This means the sap is becoming more concentrated in that area. As concentration increases and sap thickens to syrup, the thicker liquid will not flow evenly toward the draw-off point, and you could be headed for trouble. At this point, you need to let more liquid into that portion of the pan to re-establish flow toward the draw-off. Maintaining a constant even flow of syrup in the form of low volume draw-offs stabilizes the process. Make all your adjustments in small increments and remember it takes time for that adjustment to affect the process.

Three important factors must be controlled to maintain a constant boil.

  • First, maintain a steady even fire in the firebox.
  • Second, control your foam in the flue pan.
  • Finally, control niter build-up.

In Part 3 of this series, the focus will be on controlling foam and niter build-up in the syrup-making process – come back next week!

Author: Les Ober, Geauga County OSU Extension

All Things Evaporators: Part I

A Simple Yet Complex Process

Many producers refer to boiling as the art of making maple syrup.  Boiling on a modern evaporator is a process requiring about 45 minutes to move from the inlet at the start to the draw-off at the finish.  Bringing 2% sap through a float at the back of the machine and moving the sap forward  through a series of channels until it reaches 66 Brix at the opposite end may sound quite simple; however, properly boiling syrup is a very complex scientific process based on physics, chemistry and microbiology.

To meet USDA Standards, maple syrup must be at least 66 percent sugar. This is referred to as syrup density which is measured in Brix. Brix is a measurement scale based on the percentage of sugar in a sample. Because Syrup is made up of over 98% Sucrose sugar, we simply define the density of maple syrup as percent sugar. In this case, 66 Brix syrup would be 66 percent sugar. Once we know the percentage of sugar in sap, we can determine the amount of sap that it takes to make a gallon of syrup. To do this we apply a simple formula – the “Jones Rule of 86” – where you take the factor of 86 and divide it by the percent sugar to obtain the number of gallons of sap required to make one gallon of syrup.  For example, 86 divided by 2% sugar content sap equals 43 gallons of sap to produce one gallon of syrup.

You can start to see how chemistry and a little math plays a role in converting sap to syrup. What about physics? When sap is boiling, a gradient is formed causing the heavy syrup to move in front of the lower density sap. If the pan on the evaporator is boiling, then the two will not mix unless you suddenly lower the temperature in one section of the pans. Disrupting the boil results in an intermingling of sap temperatures which causes a drop in boiling intensity. The result is the dreaded big batch and improper syrup density.

Microbiology comes in to play when colonies of microbes begin to increase. Lack of microbial sanitation is the most common reason for the darkening of syrup potentially resulting in an off flavor. Microbial action changes the sucrose to invert sugars (glucose and fructose). As the percentage of invert sugar increases, heat causes syrup color to darken. It is possible to darken the syrup to a level where the color and flavor are severely impacted. If you ignore any or all of the science involved, you could end up with something that you will definitely not want to put on your own table let alone sell to your neighbor.

Managing Your Flue Pan

The flue pan is where all the heavy lifting of the boiling process is done. There are two basic types of modern evaporators, raised flue and drop flue. The level of sap in a pan is controlled by a float box. With a drop flue, you only have one float box controlling the depth of the sap throughout the entire machine. The sap level is maintained at 1.5-2 inches from back to front. Two inches depth is a safe starting point for beginners. Any change you make to the float at the back of the evaporator will be transferred forward to the draw-off point. Thus, all changes should be minimal and incremental. A raised flue evaporator has two floats, one for the back pan or flue pans and one for the front pan or syrup pans. Though you are still running just one evaporator, you can control two separate processes. The double float design allows you to run your depth in the back pan at 1 inch while running the front pan between 1.5-2 inches. The dual control increases evaporator efficiency, more rapidly boils off water, and better controls the draw-off process. The shallower you can run the back pan the more heat you transfer into the sap and the harder the boil. If you run your back pan too deep, the boil slows, and efficiency is reduced.


Raised Flue Evaporator with device to evacuate away steam from boiling process.

Which style of evaporator you prefer is strictly a personal preference. And once you learn your evaporator’s sweet spot, once the depth is set, you can generally leave it alone. All evaporators should have at least one sap level gauge on the flue pan (raised flue evaporators should have a second gauge between the two front pans). A properly calibrated gauge allows you to know the exact sap level no matter if the flue pan is hooded or clouded with steam.


Drop Flue Evaporator with reverse front flow pan.

When running your evaporator, the basic goal is to maintain a boil across the entire rig with the hardest boil occurring in the flue pan. There is an old saying among maple producers, “You haven’t earned your producer’s badge until you have burnt a pan.” Trust me if you have never scorched a pan, or come close to burning one, consider yourself lucky. Usually the most common reason for burning a pan is human error, usually caused by a distraction. When you are running a rig, you are dealing with extreme heat. Stack temperatures can run between 600-1000 degrees F. You are applying that heat to a relatively small skinny volume of liquid (2 inches spread across the surface of the pan) separated by a thin layer of stainless steel. The only thing that keeps that metal from melting is the thin layer of sap on top. If the sap boils out because you forgot to turn on a valve or you ran out of sap, bad things happen very quickly. Uncontrolled high temperatures can go from a scorch to buckling a pan in just a few short minutes. Your season could be over if you cannot find a replacement.

Tracking bubbles in your sap is a good way to monitor your boil. The bubbles in the pan should be moving slowly in one direction toward the draw-off. If the boil decreases and the bubbles move back and forth then an adjustment needs to be made immediately. If you spot trouble the first thing you must do is avoid panic. Move quickly and precisely. This is where knowing what to expect and what to do is vital and that only comes with experience.

Stay tuned for Part II next week!

Author: Les Ober, Geauga County OSU Extension

Fighting Foam, a Never Ending Battle

Now that the syrup season is in full swing, here are a few tips to keep your evaporator running smoothly. When running your evaporator, the goal is keep a steady boil across the entire rig with the hardest boil occurring in the flue pan. It’s important to remember you remove 80% of the water is removed in the flue pan. This requires that you get the maximum amount of performance out of this section of the evaporator. When foam builds up in the back pan, the evaporation rate decreases and the liquid level drops. Once the foam level drops (using defoamer), the float registers that there is not enough sap in the rig and reacts by sending a large slug of raw sap into the flue pan. This immediately slows the boil. This reaction is eventually transmitted across the entire evaporator in the form of a large batch of syrup that comes off all at once, instead of small batches coming off at regular intervals. In most cases, large batches can be traced back to inconsistent foam management.

Let’s take a close look at defoaming an evaporator. First – the products used in this process. Today’s commercial defoamers are made of a natural food grade product. They come in liquid or powder form. Several methods are used to put defoamer in the evaporator. One is to simply put it in by hand. If this method is used, the defoamer should be put into the evaporator somewhere near the flue pan inlet. Other methods would be the use of a defoamer cup in the corners of the pan and injection devices that administer a precise number of drops over a set period of time. The cups work well on larger rigs where the boil in the flue pan is very aggressive. I have found on smaller rigs, especially if no pre-heater is used, the boil never gets close to the cups and the defoaming action is inconsistent. The most consistent results can be obtained with the by-hand method simply by placing a precise number of drops into the flue pan every 5 to 10 minutes or every time you fire the rig. A timer works well to remind you to keep this process going. For me personally, the biggest problem I have is remembering to place the defoamer in the flue pan because we are not using wood and not firing on regular intervals.

The number of drops used varies anywhere from 3 drops for small rigs up to 10 drops on larger rigs. The width of the evaporator determines the number of drops and this increases by 1 drop for every 6 inches of evaporator width, (3 drops in a 2 foot wide rig, 4-5 in 3 foot rig, up to 10 drops on a 6 ft rig). There are only two places to put defoamer, in the inlet corner of the flue pan and, only if needed, at the draw off point. One of the biggest mistakes is to put defoamer randomly across the middle of the pans, especially the syrup pan. Doing this kills the boil and promotes intermingling of syrup of different densities. The result will be the dreaded big batch. Incidentally if your syrup taste a little oily, and I sincerely hope not, you are probably using too much defoamer. If you are organic, use organic Canola Oil in place of commercial defoamer.

Managing foam looks simple (and it is!), but if you forget, the penalty is a bunch of chain reactions that can ultimately end up in inconsistent syrup draw-off and improper density of the syrup that you are processing. You end up constantly trying to compensate in the syrup pan for a problem that should have been handled in the flue pan. If it gets too far out of control and you end up taking too much syrup off your front pan at one time the result could be a scorched pan. When evaporators do not run smoothly bad things happen. Been there done that and believe me it is no fun.

One new item I tried during the 2015 season was Wendell Maple Foam Fighter. It is an electronic device that precisely places defoamer into the evaporator inlet over a precise number of minutes. On the first day of use, we were boiling fast and hard and the foam was starting to really build. I kicked on the new device and within 15 minutes the foam in the flue pan settled down. When it came time for the first draw-off of the day, we expected the usual bigger than normal batch. That did not happen. The first draw-off was average size and the rest were the same and evenly spaced over the time we were boiling. If this any indication what this device will do, it was money well spent.

Author: Les Ober, Geauga County OSU Extension