Journal 5: Completing and sharing my own project

The maker culture and Arduino community embrace all open-source values and view openness and sharing as essential tools for progress. Sharing projects of all kinds is essential to the growth and sustainability of this community. Therefore, my goal for the final phase of my journey was to create a project of my own and make it available for anyone to access online.

I decided to use the last project that I completed (called Arduino Web Server LED Control from startingelectronics.org) as a starting point for this one. In this project, the Arduino and Ethernet Shield are used as a web server. Together they serve up a simple HTML page with a form that allows you to control an LED on the breadboard that is also powered by the Arduino.

I made the following modifications to this project.

Adding Styles

With my design background, I was interested in learning ways to add CSS to the web page. I learned how to add HTML and CSS files to the SD card as templates and also learned how to add styles directly to the Arduino sketch. I felt that this addition to the previous project could be very helpful for new developers who are not familiar with CSS. Styling is rarely addressed in tutorials that I have seen. The styling that I added is very minimal, but it gets newbies set up to easily add more if they would like.

Adding a second LED

To get more familiar with the code from the original project I decided to add a second LED to the breadboard and adjust the sketch accordingly. This required me to create a new LED variable, a new HTML form element, and define a new ProcessCheckbox function. After making these changes, we now have two checkboxes on the web page, which separately control the two LEDs on the breadboard.

Making a fixed IP address accessible to outside networks

Typically, when you reference the Arduino’s IP address we are just calling an internal address. This means that only devices connected to the same network will have access to the page. I started looking into fixed IP addresses and ways to access the web page outside of my local network. This requires messing with router configuration and by nature will be a different process for each person, therefore, I did not include this in my tutorial. I was, however, able to successfully get a fixed address set up for my device!

I found the following resources very helpful in getting that configured:

Sharing the final project

I made a tutorial for the final project and posted it on instructables.com. Instructables.com was one of the easiest sites to use and ended up being the quickest way to get a tutorial posted.

Below are screenshots of the set-up and a video of the final working product. Code and tutorial are available at https://www.instructables.com/id/Arduino-Web-Server-LEDs/

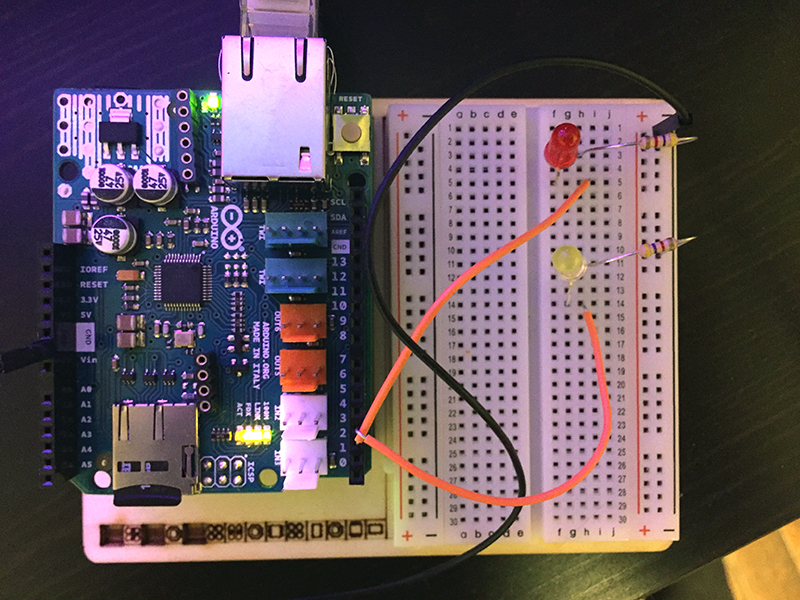
Figure 1. Arduino Circuit Set-Up

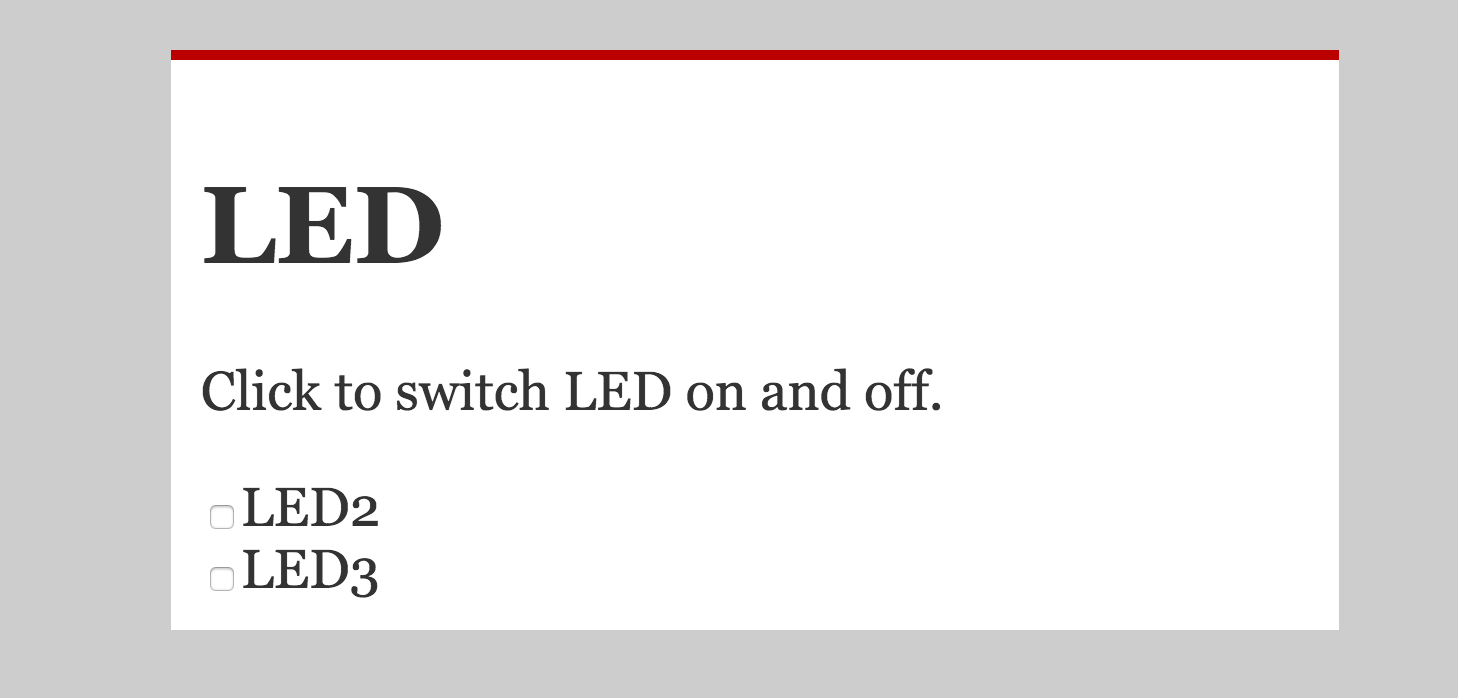
Figure 2. Screenshot of webpage served up by the Arduino

The Maker Mindset

I learned through this process that vulnerability often comes with the openness and sharing part of the maker culture. Posting my first tutorial was very scary for me, and if I had not set this requirement for myself early on I probably would not have done it. My project is quite simple, most likely not perfectly coded, and has very little real-world use as is. In the tech world that I am used to, posting something like this would immediately be criticized by other developers. However, I am slowly learning that every accomplishment is worth sharing. The act of sharing is an important part of the learning process. Makers are simultaneously playing the role of student and teacher. And I think that is one thing that makes this maker culture different than others that I have experienced in STEM.

While this project may seem quite minuscule to compared to other projects, I hope it can help a newbie like myself learn how to make adaptions to a beginner project. With each new post, I expect my confidence to grow. I also hope that this post can help others like me overcome their hesitation to share and celebrate their work, regardless of the complexity!


Sources

Hammel, B. (2008). Connecting Arduino: Programming And Networking With The Ethernet Shield. CreateSpace Publishing.

Startingelectronics. (2013). Arduino Web Server LED Control. Starting Electronics. Retrieved from https://startingelectronics.org/tutorials/arduino/ethernet-shield-web-server-tutorial/web-server-LED-control/

Save

Journal 3: Lessons from Attempting My First Arduino Project

One of my goals for this maker journey is to complete a project that was submitted by a member of the Arduino community. The Arduino companies do a great job at getting people started with the tools, but the most creative and innovative projects are contributed by users within the communities. I feel that completing a project from a non-professional maker is a logical next step in my journey.

With tens of thousands of project tutorials online, how do you choose just one?

I am particularly interested in the ways that making can be used as a tool to foster learning through Project-Based Learning (PBL). PBL is a student-centered instructional method in which students learn by developing solutions to real-world problems. While brainstorming various directions to go with my first project, I tried to keep this idea in mind – what real-world problem can I address with the Arduino?

I also felt it was important to pursue a topic that was of interest to me. This would make the project more innately fun and help to keep me motivated. Therefore, I narrowed my search to projects that involved web development and/or Internet of Things (IoT). Not only is this an area that I find interesting, but since it also relates to my job, I thought it would be easier for me to be able to identify real-world issues to solve.

The final and most important factor in selecting a project was my skill level. I enjoy continuously challenging myself, but jumping into a more advanced project too early can be discouraging. I found that reflecting on my learning and being realistic about my skill level was a very important exercise to do throughout this journey. I learned this very quickly after attempting my first project.

First Project Attempt

After searching through projects on my usual sights, I found a tutorial on instructables.com for a project called Arduino Powered Lucky Cat as Physical Webcounter. The author of this project describes how he used a Gif with a fixed IP address as a web counter for his site. When someone visits the site, Arduino is notified, and triggers a servo motor to move. The servo motor in his example was connected to a Lucky Cat’s arm, so every time someone visited his website, the cat would wave its arm. I thought this was a very interesting concept so I gave it a try.

I very quickly ran into issues and realized I was not quite ready for this project. At this point I had yet to use the Arduino to connect to anything outside of the breadboard. I knew so little about connecting to the internet that I didn’t even know where to begin with trouble shooting.

Instead of creating a post in the Arduino forum asking for help, I decided I needed to take a step back and learn more about connecting to the internet before moving forward with this type of project. That night I ordered the Arduino Ethernet Shield. And began reading up on the things it could do.

Lessons Learned

As a beginner, I found it was very easy to get overly excited about starting a project and lose sight over what is realistic with my skill level. This excitement and willingness to try new things is what makes this community so special, but as a newbie it is important to find a balance so that frustrations from failed projects do not chip away at my drive to continue to learn the tool.

The maker mindset

A maker must be able to embrace failure and learn from their mistakes. Failure must be viewed as a vital part of the learning process, and not a sign of weakness. It is something that all makers at all skill levels face. Makers must also be adaptable both in their learning and their project development.


Sources

Janhimself. (2012). Arduino Powered Lucky Cat As Physical Webcounter. Instructables. Retrieved from http://www.instructables.com/id/Arduino-powered-Lucky-Cat-as-physical-Webcounter/

Journal 2: First Impressions of the Arduino Community

After completing the projects in the Arduino Project Book I began my exploration of the community by reviewing popular maker blogs, forums, and tutorial sites. My primary goal in this exploration was to gain a better understanding of how this online community is structured. I also saw this as a perfect opportunity to see if/how gender is represented in the community, and perhaps even find some female role models! At this point in my journey I felt it was important to not be too structured with my investigation. Instead, I let one resource lead me to the next. If something sparked my interest, I saw where it could take me.

I began by exploring some of the most popular Arduino Blogs and Forums.

But first… A big Ah-Ha moment…

I thought the most logical thing to do would be to subscribe to the primary Arduino blog. It took me a few days and some confusion to realize that there are actually two blogs (Blog.arduino.cc and Arduino.org/blog). While the articles were different, both sites used the Arduino branding and appeared to be official. Why would Arduino do this? After some exploring I made a very important discovery, which quite frankly I cannot believe took me so long to find.

In early 2015, disagreements amongst the Arduino’s original founders and the manufacturers who produce the board caused the company to split into two separate groups (Allan, 2015). Arduino LLC (aka Arduino.cc) was lead by Massimo Banzi and the spin-off, Arduino srl (aka Arduino.org) was lead by Federico Musto. One of the benefits of Open-Source technology is that it gives people an opportunity to replicate and improve on the original product. Unfortunately, in this particular case it appears that the two companies went down such a similar path (especially for site design and branding) that it did nothing but cause confusion. Figure 1 below illustrates some of the similarities in the companies’ most popular boards.

Figure 1. Photograph illustrating similarities between the Arduino Zero Pro from Arduino.org (left) and the Arduino Zero from Arduino.cc (right). (makezine.com)

This was an important discovery for me. After reviewing a few blogs and forums around this issue, I realized I was not the only one in the dark. I was aware of the fact that there were two manufacturers, but I was under the impression that the separation was due to regional constraints and was not aware that there were two entirely different companies. Subtle differences between the boards and IDEs are enough to cause confusion for a beginner like myself.

Fortunately, this feud came to an end and around October 1st, 2016, when Banzi and Musto announced that both groups were going to join forces (Arduino Team, 2016).  However, those subtle differences between boards, IDEs, libraries, and websites remain.

Arduino Blogs

Arduino blogs are comprised of short articles submitted by users. These articles are sometimes used to highlight important makers in the community or innovative projects. Thus far I have focused on the two Arduino blogs previously mentioned: Blog.arduino.cc and Arduino.org/blog.

I was surprised to find that some of the top blogs on the Arduino.org site were written by a woman. It was here that I discovered Tenaya Hurst, also known as THE Arduino Woman. Tenaya has a background in theatre and fashion and her interest in science lead her to the Arduino (Tenaya Hurst, 2017). Now she is the Education Accounts Manager for Arduino.org.

Aside from Tenaya, I found it very difficult to specifically seek out active females in the community for inspiration.

Arduino Forums and Tutorial sites

In contrast to blogs, the Arduino forums and tutorial sites have a much bigger focus on interaction between community members. Thus far I have chosen to focus on three sites due to their activity level and high number of users: Reddit.com/r/arduino, Arduino.stackexchnge.com, and forum.arduino.cc.

Of the three, Reddit appears to have the biggest variety of questions. Posts on this site focus more on individual questions rather than full project tutorials, and if you have a question, Reddit appears to have a very fast response time! The Arduino Stack Exchange is another great resource with a similar feel, but it does not have as many posts as Reddit.

The Arduino Forum was the most organized, in my opinion. Within this forum, posts are nicely structured into predefined topics, which makes it more efficient to search through old posts and quicker to get a response on new posts. As a member of the forum you can comment and ask questions on the existing posts or start a new one. I found their “how to use the forum” post extremely helpful for getting started and learning proper etiquette in the forum.

I was surprised at how kind people were to one another and how much people jumped at the opportunity to help new people out. In a post on June 16, 2017 titled “Felt in Love with Arduino – please, advice how to BECOME an EXPERT J” the user LordKelvin asked for recommendations on how to master the Arduino. A open-ended question like this would have received very angry responses in web development forums that I am used to. Instead, within four days this post received 21 positive responses. I personally found this to be a very helpful and encouraging post!

Figure 2. Screen shot of post from LordKelvin a beginner Arduino user.

Experts can easily be identified in this community based on their rank name and the number of stars they have on their profile. It is not entirely clear how you move up, but I’ve read that it is related to activity in the forum. Ranks include a wide variety of names like newbie (the default for new members), Jr. Member, Edison Member, all the way up to God Member.

First impressions of the community

Active participation and collaboration between members of all levels

This was especially noticeable in the forum and tutorial sites. Communication is literally constant, as people from time-zones all across the world are contributing to conversations. The online platform makes the collaboration between members more visible as well. One member’s questions may lead to a new idea for someone else which may then lead to even more questions for others. The most encouraging thing for me was the fact that members were typically very respectful, and appeared to be generally interested in helping one another. The kindness and patience towards new members was also evident, and is refreshing to see in the tech community.

Gender is not a big part of online identity in these Arduino Forums

In fact, gender was left entirely out of user profiles on the Arduino Forum. User accounts can include a photo and can be connected to social media accounts, but I have found that very few people make use of these features. It is much more common to see abstract cartoon avatars or images of funny pop culture references then it is to see an actual headshot being used for the profile pic. Activity level, member ranking, and projects shared are the primary things that form the online identity of members.

While technically this may put men and women on a level playing field, it poses problems for people like myself who’s belonging is reassured by seeing that there are other members in the community like them (female). This also poses a challenge for new members in general. Since expertise, projects, and merit equate to identity, it can leave newbies feeling like they are just one in a million.

Current opinion on the maker mindset

As part of an Open-Source community, a maker must value collaboration and sharing of ideas. A maker is respectful of others, regardless of their skill level. They are resourceful and encourage new members to reach their full potential. They should not be afraid to ask questions and seek help when needed. Makers are stronger together.


Sources

Allan, A. (2015, March 6). Arduino Wars: Group Splits, Competing Products Revealed? Make. Retrieved from http://makezine.com/2015/03/06/arduino-vs-arduino/

Arduino Team (2016, October 1). Two Arduino’s Become One. Arduino Blog. Retrieved from https://blog.arduino.cc/2016/10/01/two-arduinos-become-one-2/

LordKelvin. (2017, June 16). Felt in Love with Arduino – please, advice how to BECOME an EXPERT. [web log post] Arduino Forum. Retrieved from http://forum.arduino.cc/index.php?topic=484102.0

Tenaya Hurst. (2017). Arduino. Retrieved from http://www.arduino.org/tenayahurst

[Photograph comparing Arduino boards] Retrieved June 24, 2017 from https://i1.wp.com/makezine.com/wp-content/uploads/2015/03/Arduino-Zero-and-Pro.jpg?resize=620%2C413

Save

Journal 1 – Completing Projects Book

The goal of phase 1 of this project was to familiarize myself with the Arduino Uno board by reviewing the Arduino documentation and then completing nine projects from the Arduino Projects Book. After completing this phase I feel that I am well on my way to becoming a maker and I believe I have begun to lay the foundation for understanding what this community and mindset is all about.

I would first like to start off by applauding the Arduino organization for putting together such amazing documentation. From a designer’s perspective the design of the book, packaging, and documentation are of the best that I have seen in the technology world. From the moment I opened the box I was drawn in. They make use of minimal patterns and gender-neutral colors, and the consistency throughout is like a work of art.

Photo of the Arduino starter kit

Arduino Starter Kit

The project book, whose primary audience is new users like myself, is organized well and their use of minimal vector graphics helped me to break down new, complex subjects. For example, traditional circuit drawings are done in Schematic view, which is an abstract diagram of a breadboard that illustrates how components are connected. The Arduino book also included a second, more realistic view called the Breadboard view, which looks similar to the tools we are using and also shows where components are placed relative to one another. I found that this additional view allowed me to jump into projects much quicker. The Breadboard view is also helping me pick up how to read the Schematic view, which I think is an important skill to have. As I progressed through projects I tried to put more effort into reading both views.

Photo of a page from the Arduino Projects Book which shows the breadboard view and schmatic view that came with each project.

At this point, I have completed the following projects from the Arduino Projects Book:

  • Get to Know Your Tools (Getting started)
  • Spaceship Interface (beginner)
  • Love-O-Meter (beginner)
  • Color Mixing Lamp (beginner)
  • Mood Cue (beginner)
  • Digital Hourglass (intermediate)
  • Motorized Pinwheel (intermediate)
  • Touchy-Feely Lamp (advanced)
  • Tweak the Logo (advanced)

For each project I took notes about questions that came up, difficulties, and “a-ha” moments. I also took a picture and/or recording of each finished project for documentation purposes. These recordings can be accessed through Box.

I’ve been fortunate not to run into too many issues, and this is in part due to the great documentation that the Arduino organization provides. I rarely needed to look outside of the book itself to answer any questions that came up. The only exception to this was actually on the first day that I used the Arduino!

To set the Arduino up, you must first download the Arduino Software IDE so that your computer can communicate with the Arduino board. I followed the instructions step-by-step, but was unable to communicate with my board or run any of the example projects. To troubleshoot, I first turned to the Arudino website where a forum exists for each project in the book, but unfortunately I could not find anyone who had the exact same issue that I was having. I then decided to start going through “getting started” guides outside of Arduino and see if there were any additional steps that I had missed. While doing this I found that FTDI drivers were supposed to be installed automatically on my board, but some users were finding that it was not always the case. After reading into the issue quite a bit, I found instructions on learn.sparkfun.com that showed how to manually install these drivers. I was very hesitant to download and install something outside the Arduino site before I had even completed my first project, but I decided that taking chances was an important part of this journey so after carefully reading into it, I decided to go for it. Fortunately, this did end up being my issue, and everything has worked great since!

Working with the community

The goal of this phase was to get familiar with the tool, and because of the great documentation that the Arduino organization provided; I had very little need to interact with other members of the community for help. By reading comment threads from other beginners I have learned that the community is there for help, but they are not there to answer simple questions that are outlined in the standard documentation. You still need to do your homework, which is what I feel I did in phase I. I am going into Phase II comfortable enough to ask questions.

One thing that I did notice from working alone on these projects is that my knowledge and skills progressed faster then my ability to actually verbalize what it was I was doing. I noticed this pretty early on when I tried to describe what I was doing to a close friend. To be honest, this scared me a little. I was worried I was going through projects too quickly and not taking enough time to reflect on what I was learning. In order to address this, I started to share each completed project with at least one other person and forced my self to describe the set-up to them. I also went back through each project to make note of the key terms and lessons learned. I found that leaving time to reflect and forcing myself to verbalize what I was learning has made me more confident in the material, although I still have a long way to go! I think this exercise has also better prepared me to start communicating with other makers.

Current opinion on the maker mindset

The first phase of this project has taught me that to be a maker, you must take chances. No matter how good instructions are there is almost always going to be something unique about your set-up and you need to be willing to look outside of the box to find solutions. I think it is important to be cautious and well informed, but a maker must also be willing to try things that are out of their comfort zone. Instructions should be used as a guide not a rulebook.

I also view the maker mindset as a sponge, always ready to absorb new knowledge. I’ve learned through some of the projects that there is almost always more then one way to do something. A maker should use good design thinking principles and be willing to continuously improve on what they know.

Save

Save