KineScribe User Guide and Help
Video above by Tony Moreno, Reed College
Graphic and video below by Chris Summers, The Ohio State University
Additional graphics by Emily Kaniuka, The Ohio State University
Photos below by John Luna, The Ohio State University
**Do you need help knowing which symbol(s) to use for which body part or series of motions? Consult Mónika Lisztes’s online adaptation of Albrecht Knust’s Dictionary of Kinetography Laban.**
This User Guide is for both iOS and MacOS versions of KineScribe. In the guide below, instructions that differ for the program versions are delineated by “iOS” and “MacOS.” When the instructions are the same, there is no delineation. “Tap/click” refers to the selection action on both devices: “tap” refers to the iPad, which is one tap of a single fingertip or stylus; “click” refers to the Mac desktop/laptop, which is one left-click of the mouse (adjust as necessary for trackpad fingerstrokes).
Contents
- 1 General Features
- 2 Opening Existing and New Scores
- 3 Symbols
- 3.1 Placing symbols
- 3.2 Manipulating symbols
- 3.3 Erasing symbols
- 3.4 Moving symbols
- 3.5 Text Box
- 3.6 Staff
- 3.7 Floor Plan
- 3.8 Floor Plan pins
- 3.9 Front Sign
- 3.10 Effort Graph
- 4 Help and Information
- 5 Save
- 6 Tools Menu
- 7 Undo
- 8 Troubleshooting
1 – General Features
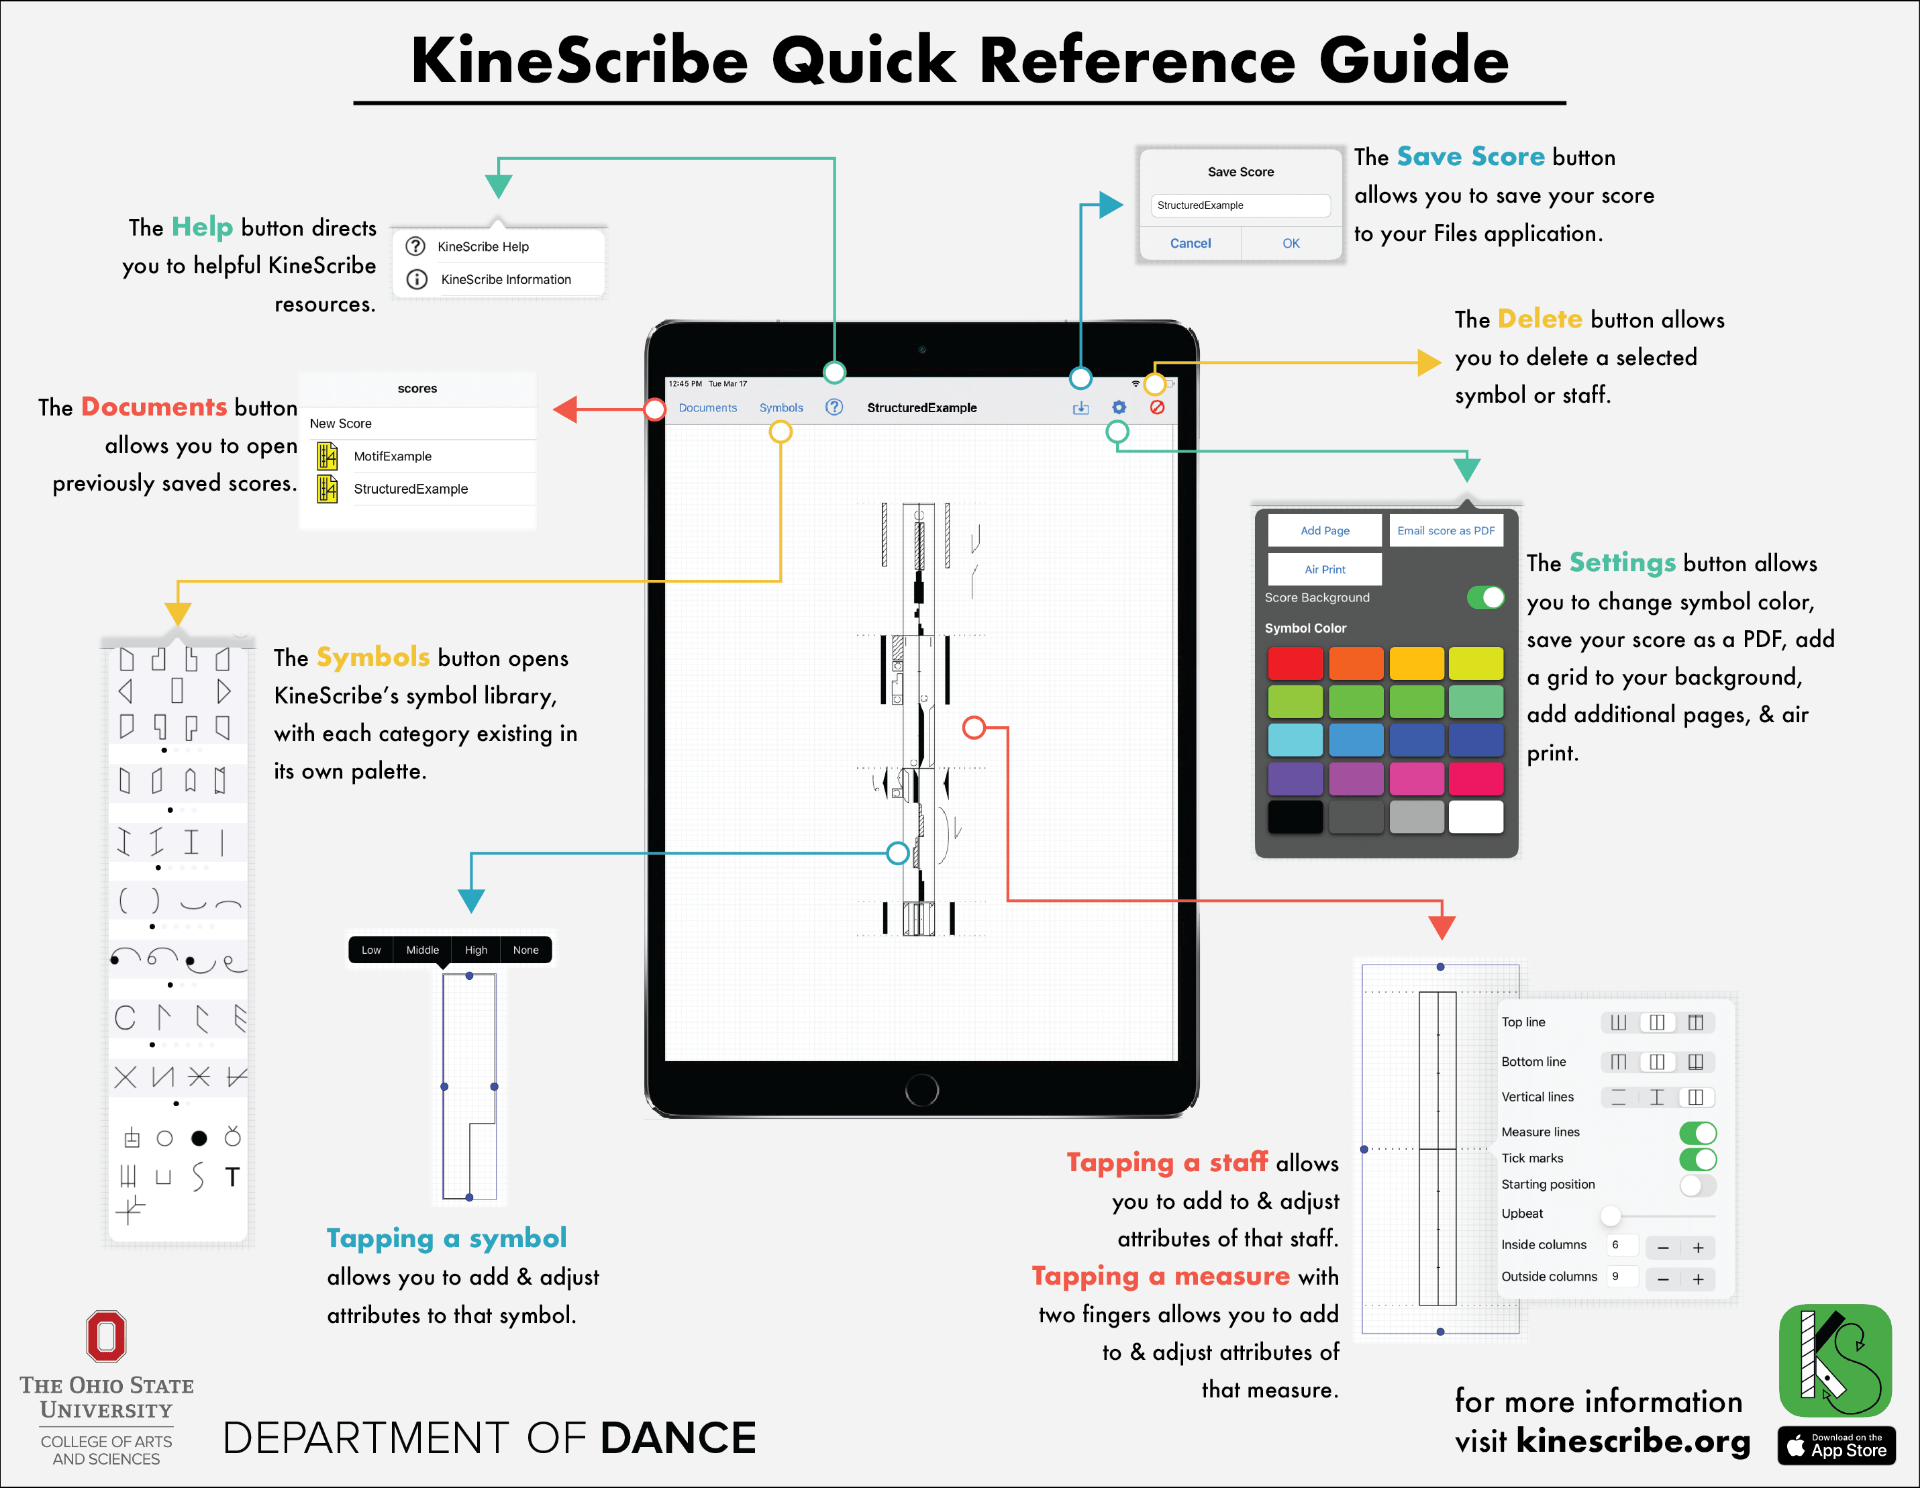
Quick Reference Guide for iOS:
Quick Reference Guide for MacOS:

Zoom in or enlarge the image:
iOS: a) Pinch with two fingers to zoom in and out. b) Double tap with one finger to immediately zoom in fully. Once zoomed in, double tap with one finger to immediately zoom back out.
MacOS: a) Using a trackpad, pinch with two fingers to zoom in and out. b) Double click to immediately zoom in fully. Once zoomed in, double click to immediately zoom back out.
Portrait and Landscape View:
iOS: Rotate the iPad to alternate between portrait and landscape view.
MacOS: This feature is not available in MacOS.
Scrolling:
iOS: Touch, hold, and drag anywhere on the score to shift it around. To scroll through a score with multiple pages, swipe one finger vertically up or down. When you open a score with multiple pages, it will likely open on the final page of the score so you will have to scroll down to the bottom to access the first page of the score. The linen background underneath the score indicates the edges of the page.
MacOS: To scroll through a score, slide one finger (mouse) or two fingers (trackpad) vertically up or down, or right to left side to side. When you open a score with multiple pages, it will likely open on the final page of the score so you will have to scroll down to the bottom to access the first page of the score. The linen background underneath the score indicates the edges of the page.
2 – Opening Existing and New Scores
Accessing existing scores:
All of your files – both those you import from LabanWriter and those you create and save in KineScribe – are accessible by clicking “Open” in the top menu.
iOS: All files are stored within KineScribe. To access them outside the app, click on Files–>On My iPad–KineScribe.
MacOS: All files are stored in “Documents” under Finder and are accessible outside the app. You can determine the file system and access the files by directly clicking on them in the Finder.
Creating a new score:
iOS and MacOS: Tap/click once on New.
Opening an existing score:
iOS and MacOS:
1. Tap/click once on Open.
2. Tap/click once on the desired score.
Importing a score from LabanWriter to the iPad or opening a LabanWriter on the laptop/desktop:
iOS: Consult this file for step-by-step instructions for importing a LabanWriter score (file extension.lw) to your iPad. The first page of this file contains instructions for Mac OS Catalina and later, and the second page includes instructions for Mac OS before Catalina.
MacOS: Navigate to your .lw files when you click on Open.
Nota Bene: KineScribe can import and read (open) all LabanWriter (.lw) files and all symbols in those files. KineScribe does not yet have all of LabanWriter’s symbols in its editing palettes. Please familiarize yourself with KineScribe’s palettes and available symbols before you edit files you import from LabanWriter.
Deleting a score:
All scores are stored as files in the device’s file system.
iOS: Delete the score under Files–>On My iPad–KineScribe.
MacOS: Delete the score in your Finder.
N.B.: In both iOS and MacOS, you cannot delete a score directly from the app. However, if you do not save a score and then click New, this action effectively deletes any unsaved files or work.
3 – Symbols
All symbols can be found in the drop down menu under Symbols. To browse through each row of symbols, swipe left or right. Some of the symbols are “stretchable” (including directions, rotations, pathways, bows, staff) and some place like a stamp (including accents, body parts, contract/extend, hold signs, center of weight, floor plan, pins). Tapping/clicking the Symbols button once brings up the symbol palette. Tapping anywhere off the symbol palette makes it go away.
To display a symbol’s name, do a long touch (iOS) or click and hold (MacOS) on its icon in the symbol palette.
3.1 – Placing symbols
Placing a stretchable symbol:
1. Open the Symbols palette.
2. Tap/click once on a symbol. (The Symbols palette automatically disappears.)
3. On the score where you want to place the symbol, tap/click and drag in one action to create the symbol the length and width you want it to be.
Placing a symbol that acts like a stamp:
1. Open the Symbols palette.
2. Tap/click once on the symbol. (The Symbols palette automatically disappears.)
3. Tap/click once on the score to place the symbol.
3.2 – Manipulating symbols:
To manipulate symbols, tap/click them once. This will encase the symbol in blue lines.
Symbols that can be resized will be encased by 4 blue dots (“stretchables”) or a blue rectangle (“stamps”) when selected.
To resize symbols encased by 4 blue dots, drag the blue dots in the direction you want to stretch the symbol. If the symbols are small, you may need to zoom in to interact with the blue dots.
iOS:
MacOS:

Symbols surrounded by a rectangle in both programs each work slightly differently. A slider or +/- buttons will pop up over the symbol when you tap/click on it, and then you can set the necessary sizing.
3.3 – Erasing symbols:
1. iOS: Tap once on the symbol to select it.
1. MacOS: Click once on the symbol to select it. Click a second time for the pop-up menu to disappear.
iOS:

2. Then, click the Delete button in the upper right-hand corner of the screen.
iOS:

MacOS:

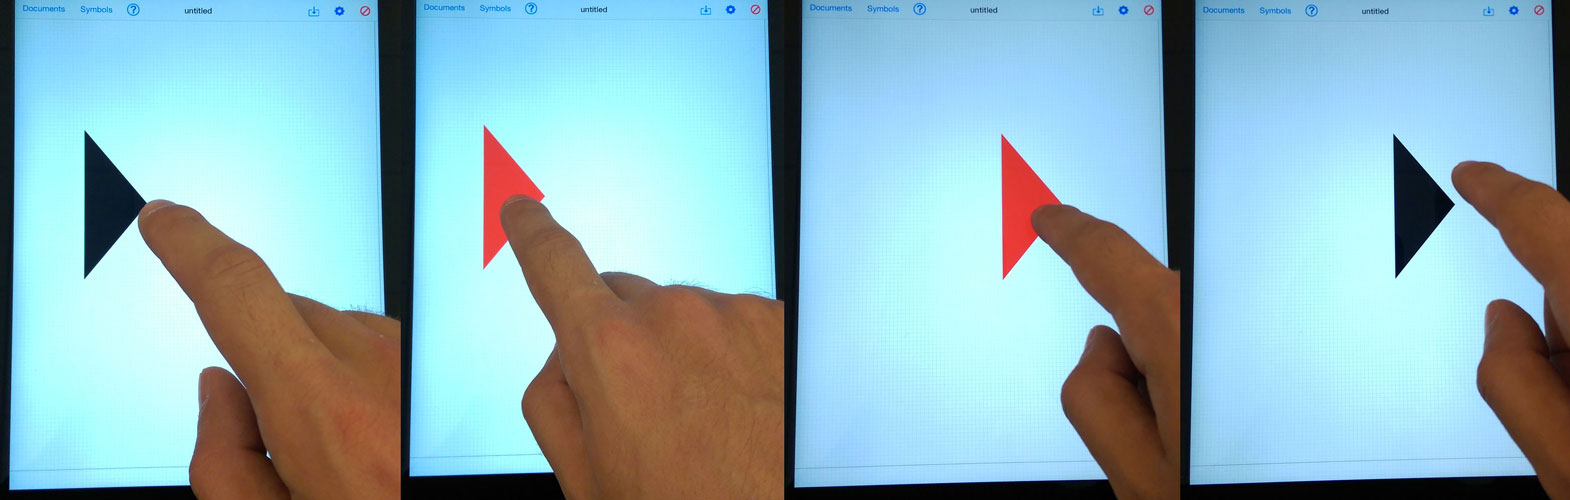
3.4 – Moving symbols
1. Press/click and hold the target symbol (a “long touch” or “long click”) until it turns red.
2. Retain your long touch/click and while it is red, you can move it anywhere on the score.
iOS:
MacOS:

3.5 – Text Box:
The T at the bottom of the symbol palette allows you to draw a text box in the same manner as a stretchable symbol, but specifically by tap/click-and-dragging from left to right. Edit the text by double-tapping/double-clicking in the text box once you have drawn it. Rotate the text by single-tapping/clicking on the text box and choosing Rotate from the pop-up menu.
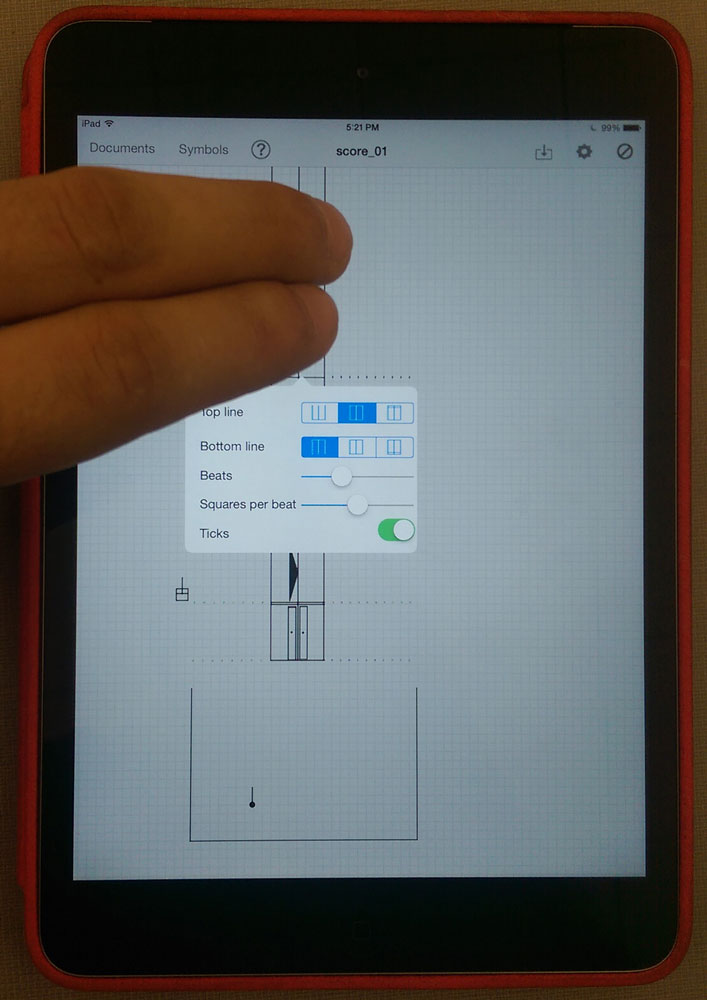
3.6 – Staff:
The staff symbol places a default staff of one measure of 4/4 time when you place it like a stamp. Once you place symbols on the staff, they become part of it and move when you move the staff.
Manipulating an entire staff:
1. iOS: Tap once on the staff with a single finger.
1. MacOS: Click once on the staff.
2. Change the characteristics in the pop-up menu.
iOS:
MacOS:

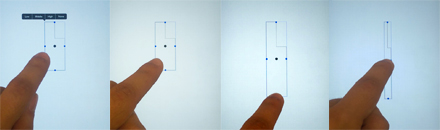
Adding measures:
1. Tap/click once to make the menu disappear but retain the staff selection.
2. Drag up on the blue dot at the top of the staff and release.
3. Repeat to add multiple measures.
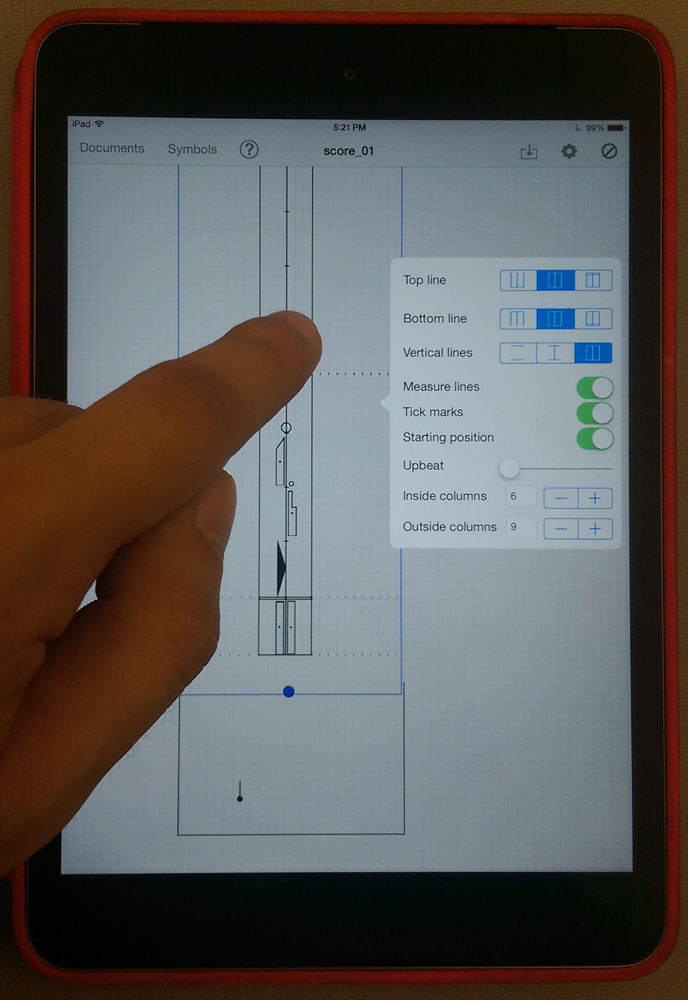
Manipulating an individual measure:
1. iOS: Using two fingertips, tap once on the desired measure (a “double-finger tap”).
1. MacOS: On the desired measure, right-click once (mouse) or hold down two fingers + tap once with thumb (trackpad).
2. Change the characteristics in the pop-up menu.
iOS:
MacOS:

3.7 – Floor Plan:
The Floor Plan symbol places like a stamp. To edit the characteristics of the floor plan, use two fingertips held close together to tap in the middle of the floor plan (iOS) or right-click/Control + click in the middle of the floor plan (MacOS).
(Note: The caption slider enables you to assign space for a caption that will move with the floor plan. To insert a caption, make the text with the text box and then drag the text into the caption space.)
iOS:

MacOS:

3.8 – Floor Plan Pins:
To place a pin, tap/click anywhere in the floor plan. To manipulate pins, tap/click on the desired pin which brings up the following options:
1. A slider to set the pin’s direction
2. A slider to resize pins
3. A delete button, which is the only way to delete pins
4. Options to specify gender signifiers for the pins.

3.9 – Front Sign:
The Front Sign symbol places like a stamp. To manipulate the front sign, tap/click on the front sign to bring up the following options:
1. A slider to set the pin’s direction
2. A slider to resize pins
3. A delete button, which is the only way to delete pins
3.10 – Effort Graph:
The Effort Graph generates individual Effort symbols. It is located in the bottom-left corner of the Symbols palette. It places and resizes like a “stretchable” symbol.
1. Once placed, tap/click on it once to bring up a pop-up menu wherein you can determine the symbol’s characteristics. The default is that all parts/lines of the graph are selected (blue), with the exception of the black diagonal line that is in every Effort symbol.
2. To create the Effort symbol you want, de-select the lines of the graph that do not belong in the specific symbol. When you de-select a line, it turns gray. The graph will generate the Effort symbol from the black diagonal line and any selected blue lines.
3. Once you have made the Effort symbol, resize it like a “stretchable” symbol, or tap/click once to bring back the pop-up to change the symbol’s characteristics.
4 – Help and Information
Tap/click the question mark in the top menu to bring up Help and Information buttons that link you to this online user guide and general information about KineScribe.
5 – Save
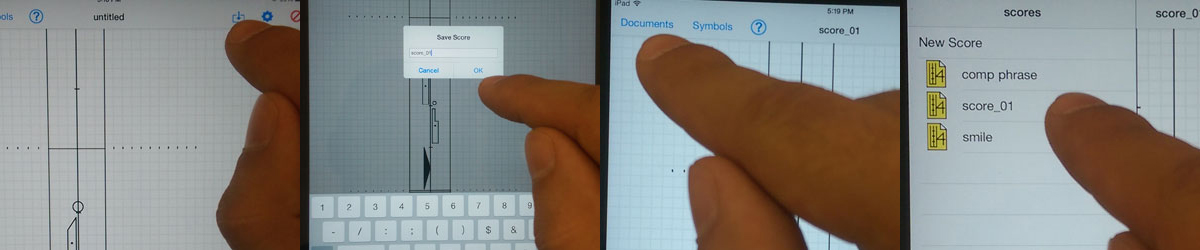
Saving your score:
1. Tap once on the Save button to bring up a dialogue box.
2. Name your score and click Save.
3. Your score will appear in your files in Files–>On My iPad–KineScribe (iOS) or in Finder (MacOS).
iOS:
MacOS:

You can save the same file multiple times under the same name through the Save dialogue box. Be sure to save often while making a score (there is no auto-save).
To save it to your computer as a LabanWriter file, download it via the sync through iTunes (may not be available for more recent operating systems).
6 – Tools Menu

Add Page:
Tap/click once to add a page to your score to create a multiple-page score.
This button adds one page at a time.
Email score as PDF:
Tap/click once to email the score as a PDF directly from KineScribe.
Print:
iOS: Tap “Print” to print wirelessly to an ePrint-enabled printer connected to the same local wireless network as the device in use.
MacOS: Click “Print” to bring up your computer’s print dialogue to either print to a printer or print to PDF.
Score Background:
Slide the Score Background slider (iOS) or tick the Score Background checkbox (MacOS) to have a graph-paper background on your score.
Slide or click it off to have a plain score background.
Symbol Color:
All symbols except for the Staff outline can be turned any of the colors in this palette. To change a symbol’s color:
1. Select the desired symbol.
2. Open the Tools Menu.
3. Select the desired color for the symbol.
7 – Undo
iOS: To undo a delete action, shake your iPad. The most recently-deleted symbol will return.
MacOS: There is not currently a general undo action for MacOS.
8 – Troubleshooting
iOS:
Quitting KineScribe from the main iPad home screen wipes clean most instances of score freezing and if the background turns yellow.
MacOS:
1. Quitting or force-quitting KineScribe wipes clean most instances of score freezing and if the background turns yellow.
2. For best experience, turn off “Dark Mode” in your settings. Most of KineScribe is not visible in Dark Mode.