TOC
Better structure in PDF documents helps readers with visual disabilities and also has SEO benefits. HTML document structural concepts are now pervasive across many formats like Word & PDF so it’s important for content authors/contributors to be familiar with methods of document structuring. Adding paragraph styles for headings and specifying heading tags can aid in better structuring an InDesign document to promote document accessibility. Adding alternative text descriptions to all photos in a document is another important practice to enhance accessibility.
The document accessibility related panels in InDesign are:
- The Paragraph Styles panel
- The Structure panel
- The Object Export Options panel
See Figure F below to see what these panels look like.
Create Paragraph Styles:
Go to the ‘Window > Styles > Paragraph Styles’ panel to start setting up paragraph styles for your normal paragraphs and heading levels (such as H1, H2, and H3). There is typically just one heading level 1, H1, in a page as the page title. A normal paragraph is typically nested within one or more headings.
To create a new paragraph style for a heading:
- Add a text frame with the size and font style you want for that level of heading. Heading 1s typical have the largest font size.
- In the ‘Paragraph Style’ panel choose ‘New Paragraph Style’ from the arrow menu.
- Give it a name like ‘Heading 4 Style’. It takes on the font style characteristics of the text frame you had select.
To give a normal paragraph text frame a heading style select that frame and click on one of the heading (paragraph) styles you created.
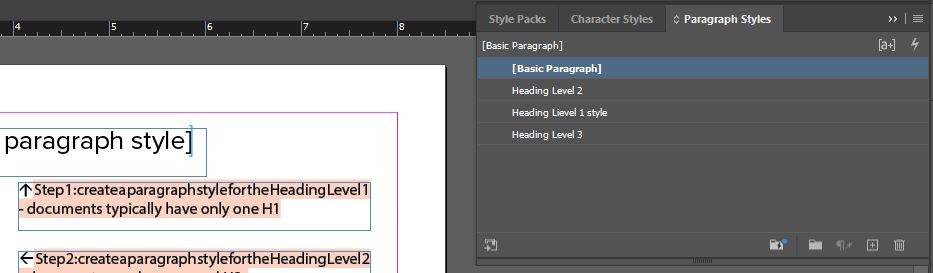
Figure A: The Paragraphs style panel for setting up styles for headings
To map your Paragraph Styles to structural tags:
- Double-click on the paragraph style that you want to assign to a structural tag
- Click on the ‘Export Tagging’ tab.
- Under PDF, choose the type of tag you want it to be. Choose H1-H6 for a heading. Choose P for a normal paragraph.
- If by chance you are also exporting to HTML or ePub, choose the type of tag you want the style to represent such as a heading or paragraph.
- Click ‘OK’ and your Paragraph Style becomes associated with that structural tag.
At a minimum you should probably setup structural tags for heading levels H1-H3 and the normal paragraph.

Figure B: Mapping a paragraph style to an H2-tag for PDF export
Turning regular text in a text frame into a heading (or to another tagged paragraph style)
Use this method after you have already setup tagged paragraph styles. To tag heading text in a text frame (text with a heading paragraph style applied):
- Select the heading text in the text frame.
- Click the heading tag style (such as H4) that you want it to be from the heading tags you created in the Paragraph Styles panel. You will be able to see which text frames have tags applied in the ‘View Structure’ panel. Use the arrows to open nested elements & tags in the structure.

Figure C: Changing regular text into an H2 heading style.
Working with the tag structure panel
Structural tag-related tips:
- Go to ‘View > Structure > View Structure’ to view the document hierarchy structure branching off from the ‘Root’. Use the arrows to open nested elements in the structure.
- Go to ‘View > Structure > Show Tagged Frames’ to visually highlight your tagged frames.
- To change an element (like figure) into another tag (like H4), go to the Struture Panel and right-click on the figure tag. Then choose ‘Tag Element’ and then ‘H4’ from the options. This method is useful if an element in the structure has the wrong tag.

Figure D: The Structure panel and changing an element into another tag.
Adding Alt Text to Images in InDesign:
It’s important for all photos in a document to have alternative text descriptions. You can add alternative text to images, graphics, or photos by using the ‘Object Export Options’ panel.
To add alternative text to an image in InDesign:
- Select the object/photo that you want to add alternative text to.
- Go to: ’Object > Object Export Options’
- Enter alternative text for the object/photo you selected in the ‘Alt Text’ tab. It’s possible to set custom alt text for an image or choose text from a structural tag previously applied.
- Choose ‘Custom’ from the menu to enter custom alternative text for the photo.
See Figure F below to see what the ‘Object Export Options’ panel looks like and where the ‘Alt Text’ tab is.

Figure F: Document accessibility related panels in InDesign
Resources about InDesign and accessibility
Videos about InDesign accessibility:
Blog posts about InDesign accessibility: