LabArchives Tips (1): Setting Up Your Notebook

LabArchives provides a series of five articles to get you started with their lab notebook tool.  This is the first in the series.  All information is taken directly from the tutorials they send by email to new users.

It’s All About The Set-up

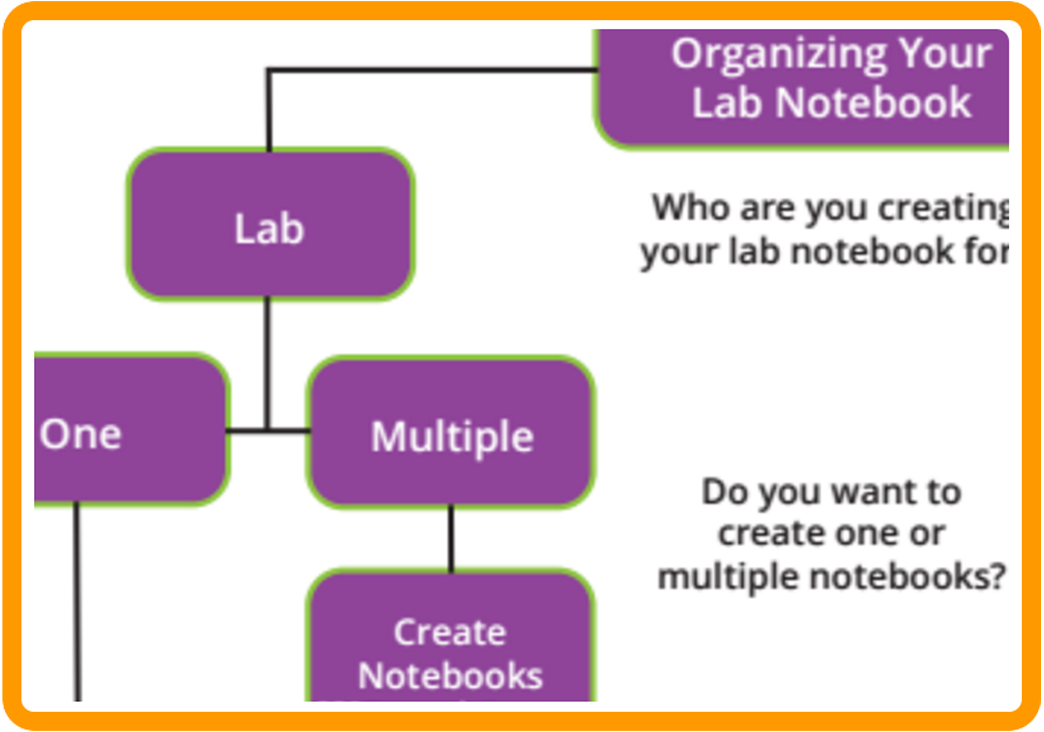
When it comes to transitioning to LabArchives from paper notebooks or even other digital tools, we provide you with several options. Is your lab working on one or more projects? Is it a small lab, or do you have a large number of members? Do you have a regular change in lab members (e.g. graduate students)? Learn more about your set-up options.

We Like Hierarchies

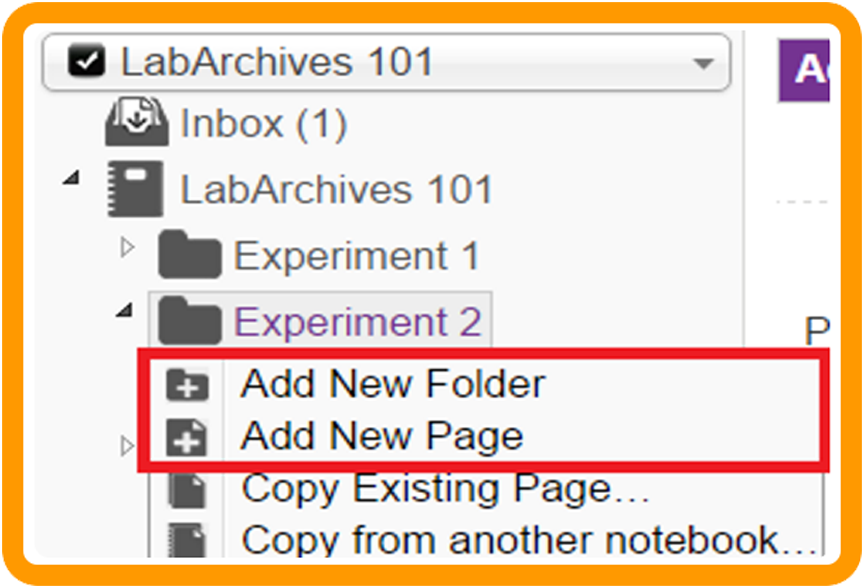
LabArchives uses a standard file system of Folders to organize your laboratory information. Each folder may contain any number of “sub-folders.” There is no limit to the number or levels of sub-folders. Learn more…

LabArchives Blog

LabArchives Video Tutorials

Overview of Canvas Peer Review for Group Work Evaluation

We have discussed peer review in Carmen/Canvas before both on this blog and in previous Flash Friday presentations.  If you would like to catch up on the most recent Flash Friday on Peer Review, click here.  This post will go over some details and instructions for using the Canvas Peer Review tool to allow your students to evaluate one another’s performance in group work.

Peer Review in Canvas was designed to allow students to review work submitted by peers, such as research papers and websites.  If you are interested in using Canvas for this type of peer review, check out this post on creating peer reviews and this post on viewing peer review comments.  Also note that there are other ways of getting peer review feedback, including Qualtrics surveys and having students use email.  Whatever method you decide on, the College of Nursing IT team can help you design and implement a peer review assignment.

Peer Reviews for Group Work

For a step-by-step guide to creating your own group work peer evaluation assignment, download this presentation: Using Canvas Peer Review for Group Peer Evaluations-1qlkjnb.

Hints and Tips

  • Peer reviews do not receive a grade—if you want to give a grade for how well a student peer reviewed another student, you have to create a separate (no submission) assignment in Canvas to allot grades.
    • Alternatively, the instructor can give a grade on the assignment being reviewed and call that the peer review grade—this does get confusing and will not work if you have two rubrics involved.
    • Grading completion of peer review vs. grading students’ work vs. grading students’ feedback can be confusing.  Feel free to consult IT about this!
  • Who can see the comments in a peer review?  Instructors and the student being reviewed can see all comments on their submission or performance. Peer reviewers can only see their own comments–the comments they made and the comments addressed directly to them.  Students cannot see comments made by students to other students. The “test student” in Canvas cannot complete peer reviews.
  • Saved by the Bell – Clicking the “bell” symbol next to a student’s name who has not yet completed a peer review sends an email to the student to complete the review along with a link to the review they need to complete. This is handy when students state they cannot find their peer review assignment. Peer reviews go directly to the person getting the review—instructors cannot read over or approve them beforehand
  • When “Saved by the Bell” doesn’t work—instructors can delete the assigned peer review and re-assign it. This will erase all record of the first peer review attempt.
  • When assigning peer reviews for evaluation of group members, there is no shortcut to have the group members evaluate each other— the instructor must manually add each student (this can be tedious).
  • Dates get wonky in peer reviews for performance rather than a submission (“due date” is really “start date”)— you will need to explain this to students so they understand that this will look like an overdue assignment. Also, changing the due dates or available dates after publishing the assignment may result in student difficulty in viewing and completing peer reviews.
  • There is no “self-review” option.  If you want your students reviewing their own work, you’ll have to do this separately or on a different platform.
    • Workaround: you could have students leave a comment on their own peer review submission page.
  • Students may be able to go back in and change rubric scores after the review period, but they cannot edit or delete comments.

If you would like help setting up a peer-to-peer evaluation of group work, please contact us at CON-IT@osu.edu

Creating a Self-Grading Quiz on H5P

In a previous entry, you learned how to create a set of flashcards on H5P. Flashcards are an excellent study tool, but some students may simply memorize the cards themselves rather than actually learning the underlying concepts. For that reason, an excellent tool to reinforce the material on the flashcards is the self-grading quiz. Below is an example quiz based on this flashcard set:

To create an interactive quiz of your own, go to the H5P content creation screen and select “single choice set” from the drop down menu.

The first dialogue box will set the title for the entire quiz.
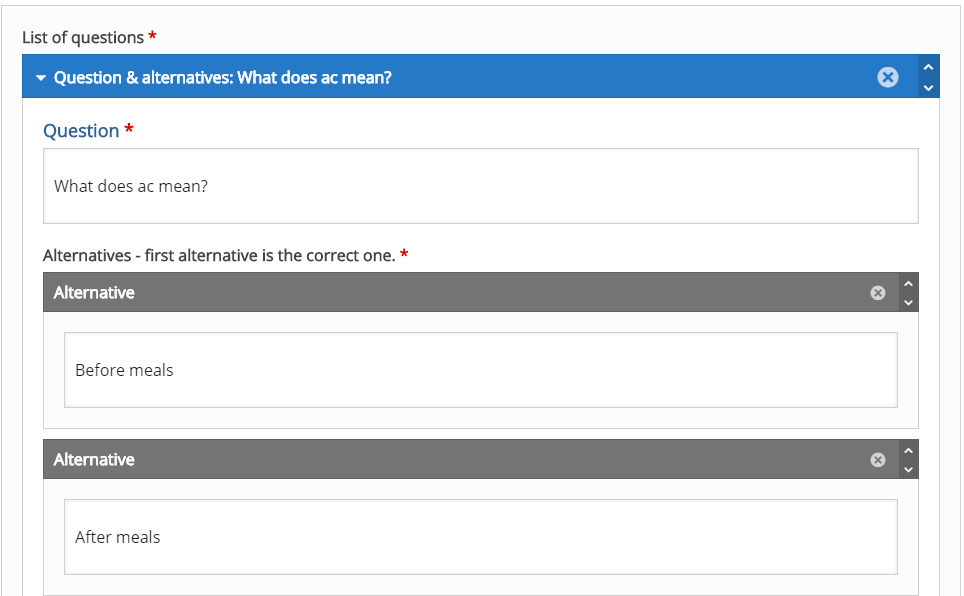
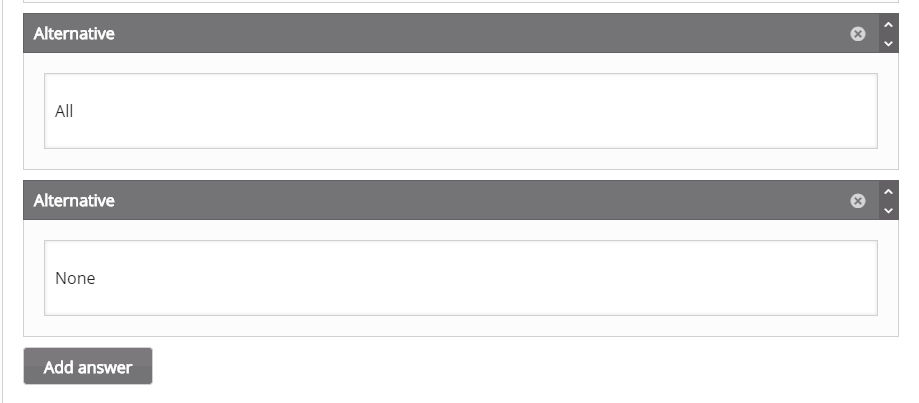
In these dialogue boxes, you will fill out the question and up to four possible answers. The form will default to two possible answers. You must click the grey “add answer” button to create new blank answer dialogue boxes. It is important to note that the first dialogue box is for the answer that you want the quiz to grade as correct. It is also important to note that the quiz will randomize the order of all four possible answers. This will be important later.
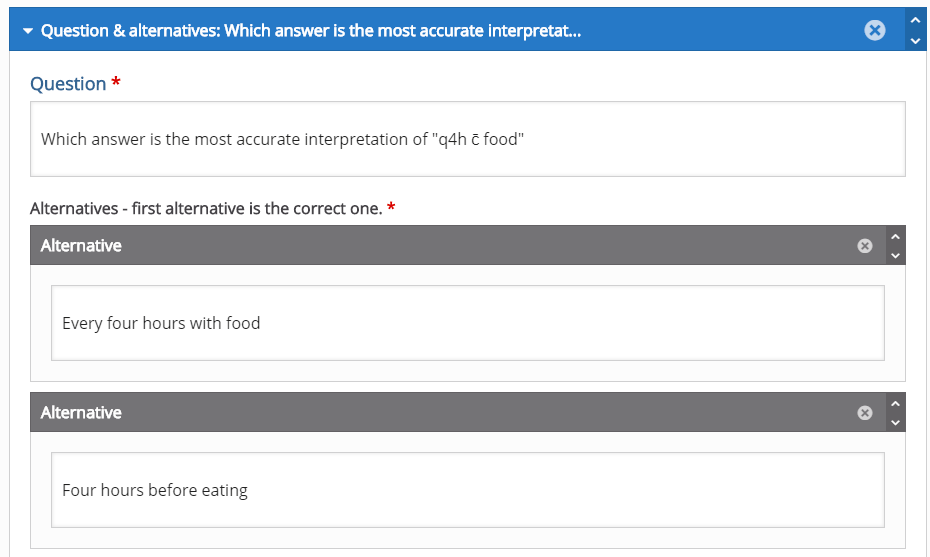
Question 5 is an important example because I chose to include an “all of the above” style answer. However, it is important to note that even though this answer is the last one on the form, it will not necessarily appear as the last question within that answer set (eg: it could appear answer 1, 2, 3, all of the above OR 1, all of the above, 3, 4 etc.). For this reason, you should choose a wording similar to “all answers are acceptable” and avoid answers that make reference to other answers in terms of their location within the answer set.
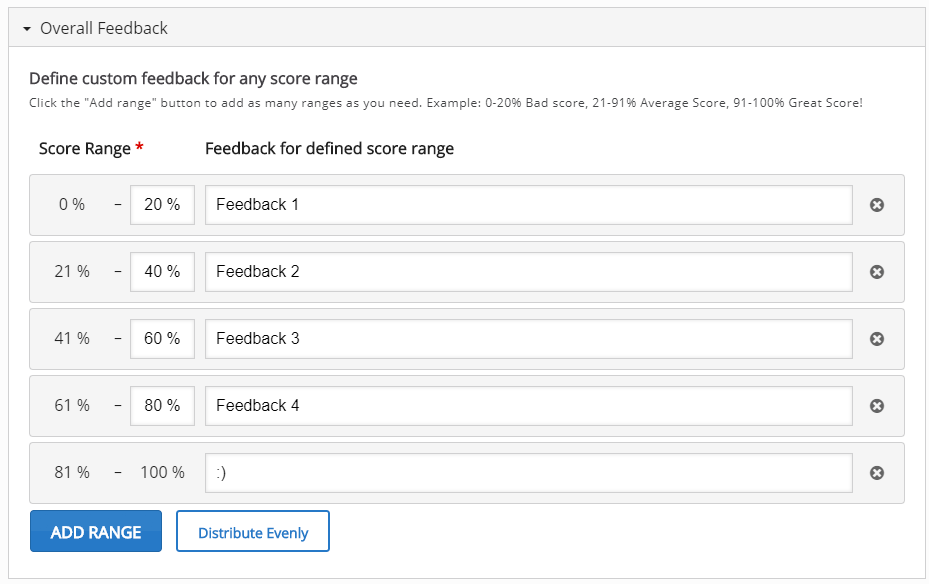
This image shows the grade ranges you can choose. This section starts relatively blank. To create the grade ranges for this quiz, I clicked the blue “add range button” until there was one grade range per question, then clicked the white “distribute evenly button.” However, If you choose to, you can manually adjust the grade ranges. The text boxes next to each grade range are the messages that will appear if a student receives a given score.
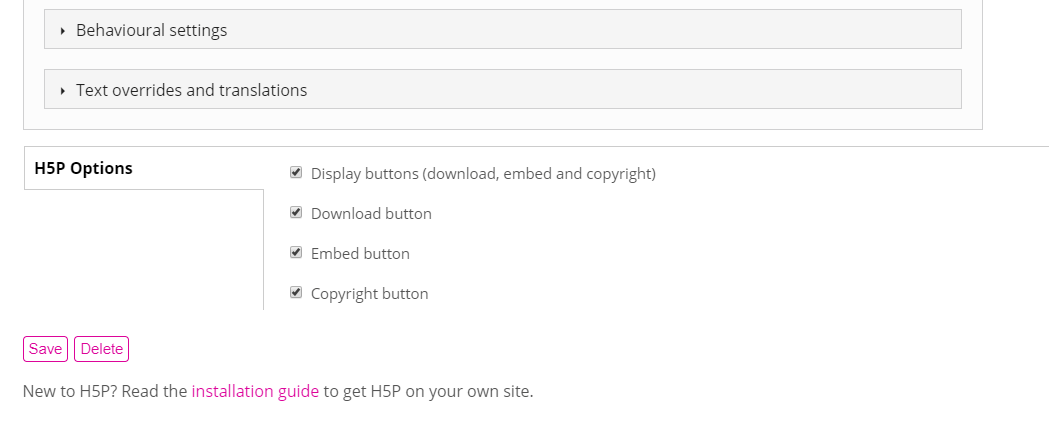
In these final steps you can further customize the behavior of the quiz and the messages and prompts that appear on the quiz. For this tutorial, these settings have been left as default, however I encourage you to play with these settings and contact CON IT for any additional assistance you may need. As with other content on H5P, you can edit the download, embed, and copyright buttons that will appear. Once you are happy with your quiz, click the pink save button. If you followed these directions, you should end up with a quiz identical to the one at the beginning of this blog post. Once you have completed your quiz, it can be embedded into Carmen or into your u.osu blog for use as a study tool. For help configuring your quiz, or assistance in implementing an H5P quiz in your classes or study groups, please contact CON IT for additional assistance.

Creating Flashcards on H5P

The previous blog entry showed how to make a basic accordion style review tool on H5P. This entry will teach you how to use H5P to create online flashcards. The online flashcard tool is a great way to present a large amount of study material, as long as the material requires only a brief explanation or rationale. The process is a bit more complex than the accordion style list, but the outcome is much more customizable. Below is an example flashcard set to study commonly used medical abbreviations. Most of these cards are simply text on both sides. Cards 3 and 4 give examples of how to use audio and image clues on a flashcard set.

To create a flashcard set, start at the H5P content screen (you will need to create a free account) and select “dialog cards” from the drop down menu.

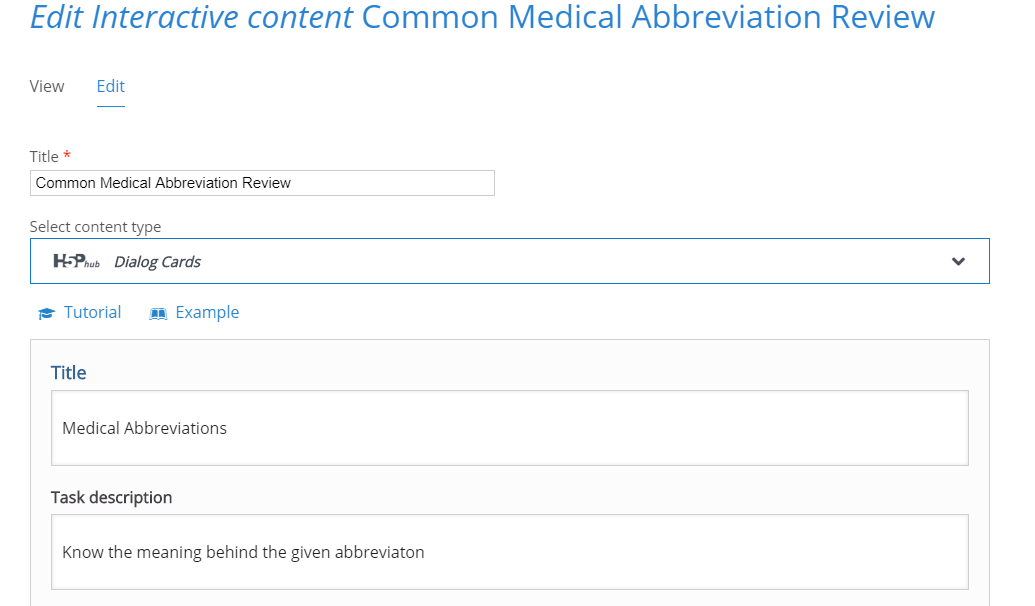
These first dialogue boxes will set the title for your project, the title that appears at the top of the card pile, and the general instructions for the card pile.

The first dialogue box for your card will determine what shows on the front of the card. The second dialogue box shows what will appear on the back of your card. Initially, you will only have one blank card. To add more cards, you must click the blue “add dialog” button on the left menu.

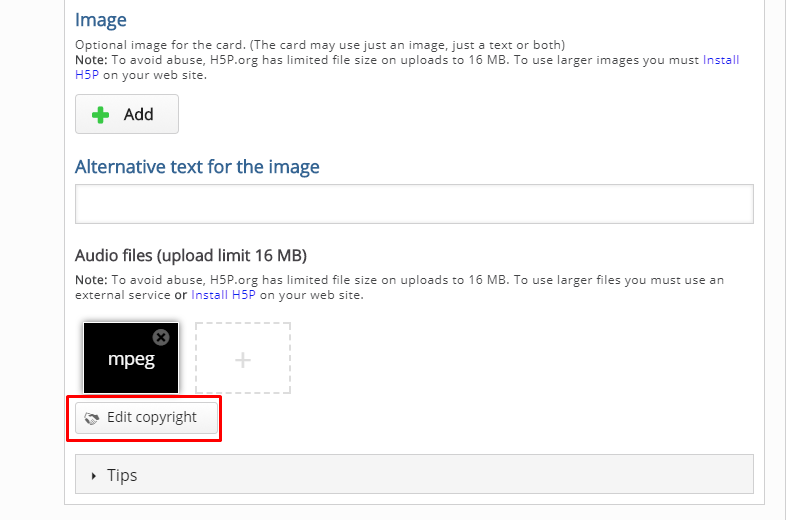
Card 3 is unique in that I added an audio clue to the card. To do this, scroll down until you see the section for “audio files” then click on the grey rectangle to upload your audio file. You can upload audio files with a URL or from uploading a saved MP3 from your computer. It’s also possible to record your own audio files to upload. It’s important to be aware of any copyrights your file may have, and to cite them properly. Citations will appear in the “Rights of Use” button on your flashcard set.

Card 4 is unique because it has a visual clue that appears on the card (images will appear on the front and back of the card). Images are uploaded just like audio files, except you will upload images under the “image” section. Just like audio files, be aware of the copyrights your image may have and cite them properly.

At the bottom of the page you will have the option to further edit actions and behaviors of the card deck. For this tutorial I left those options as default, but I encourage you to play with them and contact CON IT for any additional assistance you may need. You will also have the option of editing what buttons will appear on the final flash card deck. Once you are satisfied with your flashcard deck, click the pink “save” button. If you followed the directions posted here, you should end up with a deck identical to the one at the top of this blog post. For help configuring your deck, or assistance in implementing flashcards in your classes or study groups, please contact CON IT for additional assistance.


An Introduction to Using H5P

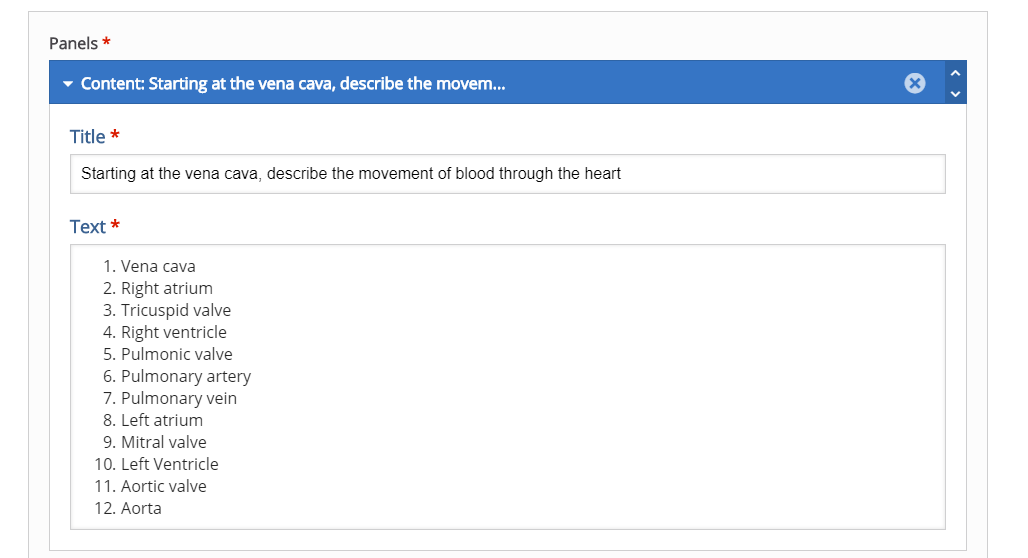
In this post, I will show you how to create an accordion list, one of the many tools on H5P. Below is an example I created of an accordion to review physiology. In this example, the student is presented with a question  to consider, and then the student can double check their answer by clicking on the accordion to reveal more information. One of the benefits of an accordion list is that it can organize and present broad answers with a lot of information. Accordion lists can be embedded into Carmen to condense large chunks of information and can be given to students as an assignment to complete or as a study guide. Accordion lists are especially useful in organizing long blocks of text into digestible pieces of information, as in complicated assignment instructions or longer discussion postings. Please try out the interactive accordion below:

The creation of an accordion list is quite simple. Follow this link  to get to H5P’s content creation page (you will also need to create a free account). Once there, click on the bar in the center of the page labeled “select content type,” and “accordion” will be the first choice. After selecting “accordion” and clicking the blue “use” button, you will be presented with a blank template. In the image below I have given the list the title “Physiology Review.” The current template has one blank form. To create a second blank form, you will need to hit the blue “add panel” button (circled in red).

The following images shows how I filled out the forms to create the interactive example at the top of the page (click on the image for a larger view):

Following these steps will create an accordion list identical to the one you see at the top of this blog post. All that’s left is to finalize the list at the bottom of the page:


If you want to add more content, you can continue to add more panels by clicking the blue “add panel” button. If you want to edit the display buttons on your accordion list, you can do so with the check boxes. If you are finished and want to see the completed list, click the pink “save” button.

Saving will take you to a finalized version of your accordion list. If you want to make edits to your list, you can do so by clicking the “edit” button. If you want to download a copy of your list or get the embed code, you can do so by clicking the respective buttons. If you don’t want the option to have download or embed buttons, you can remove them by deselecting the check boxes on the previous screen. For assistance using the H5P accordion list in your classroom, please contact the CON IT Department for support.

Flash Friday – Microsoft Sway

Microsoft Sway is a program for creation of online presentations using a combination of text, images, audio, and video. Sway is similar to PowerPoint, but the presentations are easy to create and present on the web. OSU students and faculty have free access to Sway through Office 365, so it is an excellent choice for students to share their course work in an online format. John Pryba covered the basic information you need to get started with Sway. View the recording here.

Taking Notes in Nearpod

Nearpod is a interactive classroom presentation tool that can help students become more engaged in the classroom. Not only is this tool great for professors who want their students to experience more active learning through presentations containing polls and quizzes, but it also contains features to make the classroom setting less stressful for students.

One of these features is the note-taking component. With this component, students will be able to save all of the slides in a lecture, along with extra notes they can add to each slide, to either their email or Google Docs. This will enable students to pay more attention to what their professor is saying in lecture instead of scrambling to re-type each slide in their notes. This way, the student will have all the necessary information from the lecture slides, and have the time to type out extra notes that the professor may express verbally.

How to Capture Your Notes in Nearpod

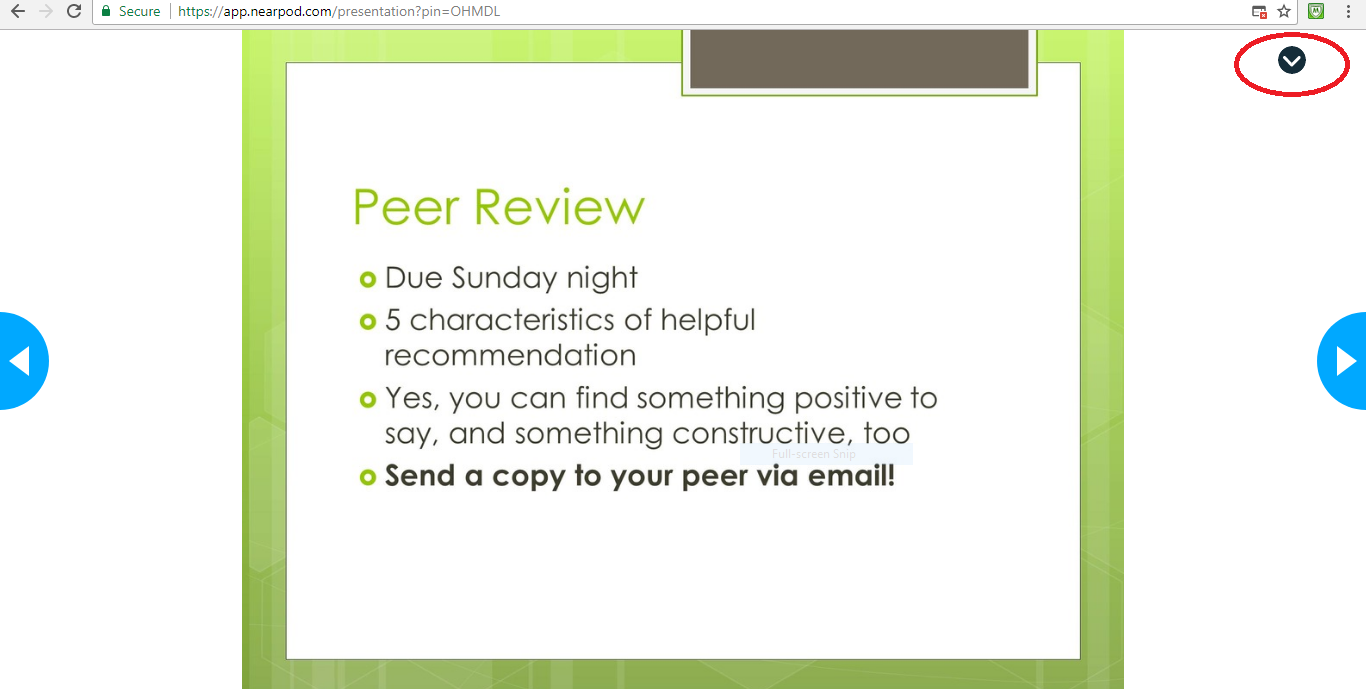
When in a Nearpod presentation, click the arrow in the upper right hand corner.


Click the option that says “Notes.”


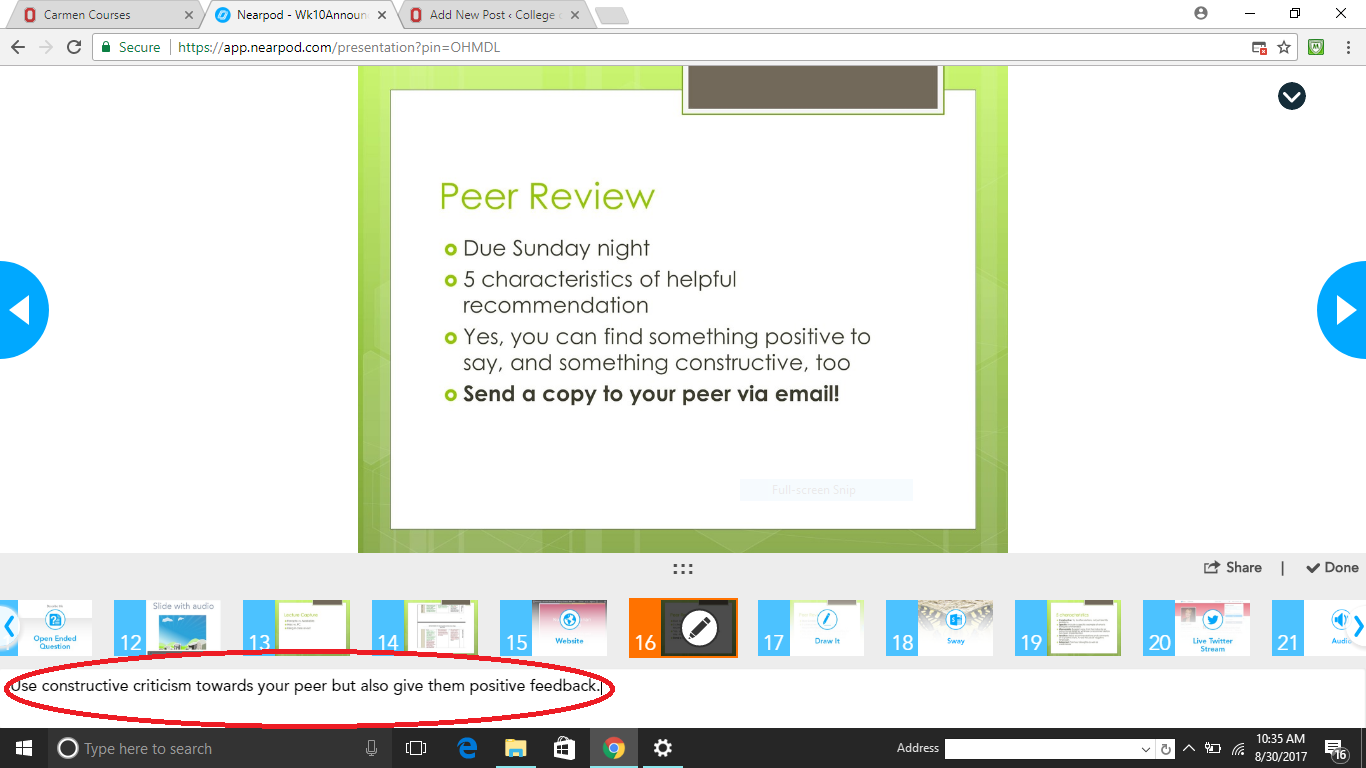
You will now be able to type extra notes in the grayed-out bar at the bottom of the screen.

This is an example of notes being typed out under the slide.


When the lecture is over, make sure to click the “Share” tab in the lower right hand corner in order to save your notes.

Now, you can either send the notes to your email or to your Google Drive.


If you send the notes to your email, it will download as a Word document. This is how your saved notes will look. They will contain all the slides, and any additional notes you added to a slide will appear under the slide.

Do you have questions about how to take notes in Nearpod? Email CON-S-help@osu.edu.

Add Recent Announcements to your Carmen (Canvas) Homepage

If you’ve ever thought that your students might not be getting all of your course communications by email or through Carmen (Canvas) announcements, try this clever idea (and best practice) from Hollie Moots.  Consistent class communication will improve, and questions directed to your email inbox will decrease.  Take 2.5 minutes to learn more from Hollie in her demonstration video (below).

Media and Your Classroom: Know Your Resources

Many instructors in the College of Nursing like to make multimedia resources available to students, whether it is through openly available online resources or password-restricted resources on the CON Nucleus server.  Some instructors may have noticed, however, that students have difficulty accessing certain resources, especially as more and more students choose to access the internet through tablets and phones.  We reached out to the Health Services Library (HSL) and the Office of Distance Education and eLearning (ODEE) to learn about what other resources may be available for instructors to use in their classes.
Nursing Education sure has changed through the years!

  • Procedures Consult: The HSL has access to procedure videos with associated text and images through ClinicalKey. You can browse the available Procedures Consult videos at the link above.
  • Films on Demand is run by the HSL and has a selection of over 3,000 videos on medicine and health topics.
  •  Adding New Purchases to HSL: When the Health Services library buys resources, physical copies will be available for checkout from the library and streaming video would be licensed for all of OSU.  If you have suggestions for resources that could be purchased and made available, you can contact Joe Payne or Kerry Dhakal.
  • ODEE Secured Media Library:  ODEE also offers a Secured Media Library where students can access and watch videos online.  To find out how to add a new title to the Secured Media Library, see the article on adding to the Secured Media Library here. To give students access to view an existing title in the Secured Media Library, an instructor must create a playlist and assign a specific video to a class for the students to have access to view it.  It’s a quick and easy procedure, but students will not have access to view videos on the Secured Media Library unless an instructor in their course (1) creates a playlist,  (2) adds a video to it, and (3) assigns a course and all of its sections to view the video.
  •  Issues with Nucleus:  If you or your students have problems watching videos on the Nucleus server, inquiries can be sent to CON-InformationTechnology@osu.edu.

Images found at the following web pages:


View Example Courses in Carmen Canvas

Did you know that Canvas has sample courses for you to view and download as templates?

ODEE has developed two courses you can peruse and download as templates if you wish.  One course is for resource-heavy supplements to face-to-face courses, and the other is a fully online course. Take a look here.

The Canvas community (operated by Instructure) also has sample course templates that you can look through and download if you are interested. Find those here.

It’s great to see what others are doing.  Comment below or email us at CON-InformationTechnology@osu.edu if you have questions or want to share your experience with course templates.