So this post is going to be a long one. I didn’t get much done last week, so I figured I’d combine my blogs for weeks 8 and 9. During week 8, the majority of what I did was got the bodypaint sorted out.
So my original plan was to take it to Dave Geist Autobody in downtown Whitehouse. But in the end, I ended up taking it to my friend Jake, who did the paint for a few cars I’ve helped restore in the past. I got the body work done well enough that all he had to do was the body color and clear coat. Took him less than a week after I dropped the parts off, ran me about a third of what I had been quoted by other places, and came out looking absolutely awesome.
- All of the bodycolor parts
- How it looks in the sunlight
The color I ended up going with was a GM WA9088 cherry red. It’s got a metallic, almost candy color to it. There are some small imperfections in the coat thanks to some pinholes in my bodyfiller work, but all in all I couldn’t be happier with the way it turned out.
The other thing I did that week was to figure out what I was going to do about the headlight. The headlight bucket I ordered fits a basic sealed beam, but the way my bike is wired, the bulb has to be 12VDC and no draw no more than 40W. Unfortunately the typical sealed beam is 40/60W, and a 23/35W bulb (which stock on the CB350) is hard to find, expensive, and most importantly, extremely dim. My solution to this was to but a sealed beam conversion kit. This way I can install a H4 LED bulb, which will be cheap and draw much less power. This is what I ordered.
It looks pretty similar to your average classic headlight, and should save me a whole lot of money. Plus, it’ll be a lot easier for me to buy an H4 LED in the future than a new sealed beam.
Over the course of week 9, I started to get the wiring loom finished and installed on the bike.
- The wiring diagram I’m using
- The coil packs
- The horn
- The ignition key
- The battery, starter relay, and regulator
- The wiring harness
This involved several steps. First, I did continuity tests with a voltmeter. This was essentially verifying that each wire run had a negligible resistance.
Then, I wrapped the harness in self-adhesive silicon tape. The tape doesn’t look the best, but it gives better protection than electrical tape and is cheaper and easier than the better looking alternatives. The idea is that after 24 hours, it should bond with itself completely, such that it is essentially a solid rubber tube.
Then, I attached the harness according to the diagram. This was probably the easiest part, as I had kept everything together fairly well through the process. It was just a matter of holding the harness up to the frame and figuring out where the wires looked like they should go.
- The petcock valve
- Fuel hose on the carbs
The next step was to attach all of the fuel hoses. This was fairly easy, just ran down to NAPA and bought a few different sizes of rubber vapor hose and cut them to size. I don’t even think I need hose clamps on a lot of the tubing, as they won’t be under much pressure.
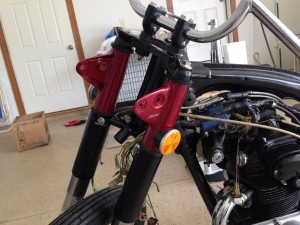
Also, before I put gas in the tank, I wanted to put on the fork covers I had painted. I don’t have a jack or any kind of stand of the bike, so when I want to take off one of the wheels, I have call my brother out to help me lift this several-hundred-pound, awkward hunk of metal, and put it down on top of some rickety plastic shelving. So I figured I’d rather not have gas in the tank while I’m trying to lift it.
Anyway, this process was more difficult than expected. It took three people to do – one to hold the rear tire and keep the bike balanced, one to hold the wheel and forks, and one to put the covers on and rebolt the forks. On top of that, a lot of stupid mistakes were made (including but not limited spilling fork oil, dinging up paint, accidentally compressing the forks). But it got done, and now the headlight is pretty much ready for mounting.
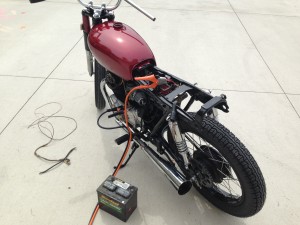
All this done, I was ready to start the bike. Unfortunately, the battery was dead. It may actually be bad, I’m not entirely sure. I seem to remember the PO saying it was new, but I may be mistaken. It’s currently charging in my garage. Worst case scenario – it won’t charge or it won’t hold a charge – I’ll just run down to Autozone and buy a new battery. Shouldn’t be any kind of issue, but it slowed me down.
In the meantime, I decided to temporarily use the battery from the family lawnmower. I hooked it up with some jumper cables. I figured the next step would be to put some gas in the tank. This was apparently a bad idea.
- The gas leak
- The culprit
- Paint in the gas under the bike
I noticed that gas was leaking somewhere. I quickly found the culprit was the fuel petcock, which was leaking like a sieve. Now typically, this wouldn’t be a huge problem. I’ll disconnect the petcock, pull it apart, and put new gaskets in it (I’d assume I must have left one out). Even if I can’t fix it, I’ll buy a replacement. The problem comes with the fact that I used oil-based grill paint on the engine. Gasoline basically works as a paint stripper for oil-based paints. Luckily, I put several coats of paint on it and only the top few came off. Also, the paint on the engine is purely aesthetic, as the engine is aluminum and will not rust. However, I’m very unhappy with this, as it left the paint a matte dark grey, as the upper coats of semigloss black were stripped.
This won’t be a huge setback, but I made me a little sad. There goes the awesome engine paint.
Anyways, I’ll pull apart the petcock and try to get the engine running this coming week.
To-do list:
OVERALL GOAL: Get the engine running
- Rebuild and test the fuel petcock / buy a new one if necessary
- Get the hand controls and ignition hooked up – may help with getting the engine started
- Set the valve clearances
- Possibly buy new battery?
Assuming I can get the engine started without too much hassle:
- Install front brake assembly
- Break, shorten, and mount drive chain
- Mount the headlight and turn signals


