The goal this week was to finish up as much of the engine as I could. The first step, now that the head was rebuilt, was to rebuild the cam case. The process for this can be seen below.
- The cam case with the cam shaft and cam sprocket installed.
- After the cam shaft was in, the end caps and rocker arms were installed.
- A better view of the rocker arms and the inside of the cam case
This part of the build took a long time, as I had to figure out how to set the valve timings, which is maybe the most important part of building the engine. For anyone who doesn’t have a basic understanding of how an engine works, here’s a basic idea of what this means:
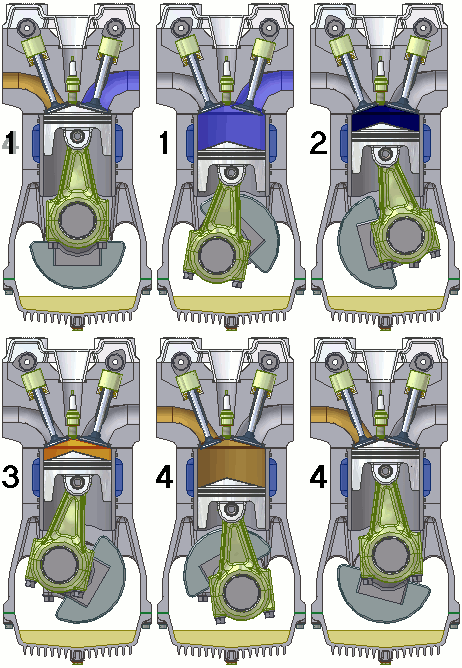
My engine is a four-stroke. This means that there are four stages to it’s running:
- Intake – As the piston goes down (creating suction), the intake valve opens and aerosolized fuel is pulled into the cylinder
- Compression – The intake valve closes and the piston goes up, compressing the mixture in the cylinder
- Power – At the top of the compression stroke, the spark plug ignites the fuel, pushing the piston downwards
- Exhaust – The exhaust valve opens and the piston moves up, pushing the exhaust out of the cylinder
Below is a gif that shows how this works.

This way, once the engine is rotated a few times (by an electric starter motor or a kickstarter), a self-perpetuating motion is created, which provides enough power to run the bike. Now, setting the timing on the valves basically means making sure the valves open at the right times to create this motion. In my case, this involved making sure that the cam chain was in the right sprocket on the cam gear, as well as tightening the rocker arms to the values specified in the Clymer manual.
After this was done, I closed up the upper engine. I also installed the points advancer into the left end cap. The points advance is a assembly the changes the timing on the spark plug ignition depending on how fast the engine is running.
- The closed upper engine
- A close up view of the points advancer, attached to the end of the cam shaft
After this, the engine was ready to be painted. I masked off all of the areas I didn’t want to get paint in, and then mounted it on a stand for painting. Also, while installing the starter motor, I cracked and dented its backing plate. Aesthetically, I didn’t have any kind of problem with this, so I just coated the cracks in some JB Weld prior to painting to keep it from breaking further with use.
- Engine with masking completed
- Cutting threaded rod to build an engine stand
- The engine mounted to the engine stand for painting
- JB Weld on the backing plate of the starter motor
With that done, the engine was ready for painting. I didn’t take any pictures of the painting as I was doing it, but here’s the finished product:
- Right side before
- Right side after
- Left side before
- Left side after
As of now, the engine is ready to be mounted on the bike! All I have to do is get the engine mounts painted. I would’ve liked to do that this week, but it got too cold today to paint the mounts. Either way, that’s a job for next week.
Also, during the week I was able to get a few minor things done. Firstly, I started doing some body work on the chain guard and the gas tank, getting rid of dents and prepping them for painting. I got rid of the dents and smoothed out curves using a mix of beating on them with a hammer and the careful application of body filler. The chain guard had some pretty nasty dents in it, but the tank didn’t seem too bad, as the PO had done some work on it. There are a few small areas on the tank which could use some work, but I may just ignore them and paint over it instead of sanding off the primer and using body filler.
- The chain guard, primer sanded
- The gas tank, prepping for body work (left)
- Gas tank (right)
I also did some repainting of the emblems that go on the gas tank, generator, and filter covers. The filter cover emblems turned out well, but I debating redoing the gas tank emblems (the ones that say Honda on them) as they didn’t turn out very well.
To do list:
- Get the engine mounts, triple tree, chain guard, and foot pegs painted
- Mount the engine in the frame
- Install the steering bearings
- Install the triple tree and steering assembly
- Order my massive shipment of replacement parts
- Ask around and get some quotes on body paint
- Find a new set of tires to replace the oversized ones the PO bought


