New Topic: MS Teams

I’ve launched some initial content relating to Microsoft Teams, and especially outlining the upcoming migration away from BuckeyeBox, that will happen before end of June, 2021.

More posts and pages will be forthcoming, as we learn more about the transition, but you can get started here.

OSU Libraries Research Commons – Computer Lab Access Now Available

Need a remote computer on which to do your research?  The University Libraries Research Commons remote computer lab could have exactly what you need!

Grad students, postdocs, faculty and staff can reserve a computer with specialized software for almost the entire day (10AM-5PM, Monday through Friday).

Check out the specs and specific software on offer, and submit your request for use by the end of the business day, before the day of your requested reservation. The “Scarlet” pod of computers is specc’ed and configured somewhat differently than the “Grey” pod, and some software is available on all lab computers.

Skype for Biz v. MS Teams v. Zoom – Which Tool Do I Use, When?

Confused on when to use MS Teams or Skype for Business or Zoom?  And what are the differences between these tools, anyway??

If you scratch your head sometimes on what to use when, you’re in good company around campus (and that confusion will get a bit deeper, as we transition away from Skype, eventually)!

I just found an excellent resource article from OCIO on the subject (7/13/2020), with a really good comparison chart; it also summarizes considerations you’ll want to think about for certain situations (e.g., “most of campus” versus MedCenter; restricted data issues, etc.).

Check it out…


MS Teams – New Features Available as of August 19, 2020

https://it.osu.edu/news/2020/08/12/new-teams-features-available-aug-19

Check out 2 new features to MSTeams that OCIO has made available to all:


“As we continue to work from home, members of the Ohio State community have been using Microsoft Teams (link is external). We’ve been working to add features to make Teams more agile and valuable to you as a collaboration tool.

On Wednesday, Aug. 19, we will enable PC-to-PC calling and dial in audio conferencing. Microsoft will notify users by email once these features are active.

  • PC to PC calls enable one-on-one or group calls with anyone in your organization directly from a chat without having to host a team meeting. It enables you to use audio and video delivered through your Internet connection. We have posted instructions in our knowledge base (link is external) so you can learn to use this feature. It is available for Ohio State faculty, staff, guests and students and for COTC accounts.
  • Audio Conferencing gives meeting attendees the ability to join a Teams meeting from a regular phone by dialing into a meeting phone number. This can be very useful for users who, for any reason, can’t attend a meeting using the Skype for Business or Microsoft Teams app on their laptops or mobile devices. Click here for more information about audio conferencing. (link is external) This feature is available for Ohio State faculty and staff and for COTC accounts.”


AU Instructor Workshops – Links to Recordings, Slides, etc.

Thanks to all who attended the AU Instructor Workshops so far… we’ve covered A LOT of ground, and I definitely want to go back and fill in on the wide variety of topics.  Thanks also for all the feedback, participation and questions – those will inform ongoing efforts.

Part I – August 7, 2020 –

Part II – August 14, 2020 – this session was much more of a walk-through on course shell setup, Carmen Key 4, Assignments, and discussion of ways to manage online teaching

Changes to CarmenCanvas for AU 2020

Check out ODEE’s article regarding the latest updates to the Canvas LMS for AU 2020…

One item you may want to test out/play with is that the new rich text editor (RTE) is available for your course(s).  The old RTE will be phased out later this year, but I think you’ll like the new one: no tools have been removed, but the rearrangement is nice, and more intuitive.

The ability to drag/drop media is a BIG advantage, IMHO… this applies to pix, videos, recordings that you’re adding.

If you want to see the difference visually, an earlier ODEE article lets you flip between old and new versions to take a look.

Zoom – Using a Second Webcam as a Document Camera

“I Need to Write on a Whiteboard/Blackboard During My Zoom Session – How Do I Do That?”

This may be the most frequent question I’ve received from PHY instructors, since we ramped up in SPR semester.  A similar situation is screen-sharing a document printout that the instructor will annotate during the session (e.g., an outline of a problem to be worked during a class meeting).

If you have an iPad (or other drawing tablet that can connect to an ink-enabled application), adding it is relatively simple.  But what if you don’t have a separate drawing-capable device?

Use a second camera (an independent webcam) as a document camera!

Basically, you’re using two cameras within your Zoom session; the primary camera (on a laptop, the “built-in” camera) stays focused on “you,” the presenter, but you’ll share your additional camera as what Zoom calls a “document camera”, and this becomes your whiteboard/blackboard/drawing area.

Note that your “whiteboard” doesn’t have to be vertically mounted; you can aim the webcam at your desktop, if you like – that’s probably an easier area to write on.  Do some testing on your setup before you use it “live”, and mount the second camera to “something” not only so you’re properly focused on your writing area, but to make it easier for you to write.

I’ve posted a tutorial vid on the Physics YouTube subchannel on how I set it up, but here are the general steps:

1. Start your Zoom meeting, and have both cameras connected to your computer (I’m assuming laptop, but desktop+ 2 webcams would work as well).

2.  Open up your video settings

Location of Zoom video settings

3.  Make sure the “Mirror my video” checkbox in Video settings is UNCHECKED.

Zoom video settings - "mirror my video" checkbox

4.  Share your screen – from the “Advanced” area, choosing your separate/second webcam.
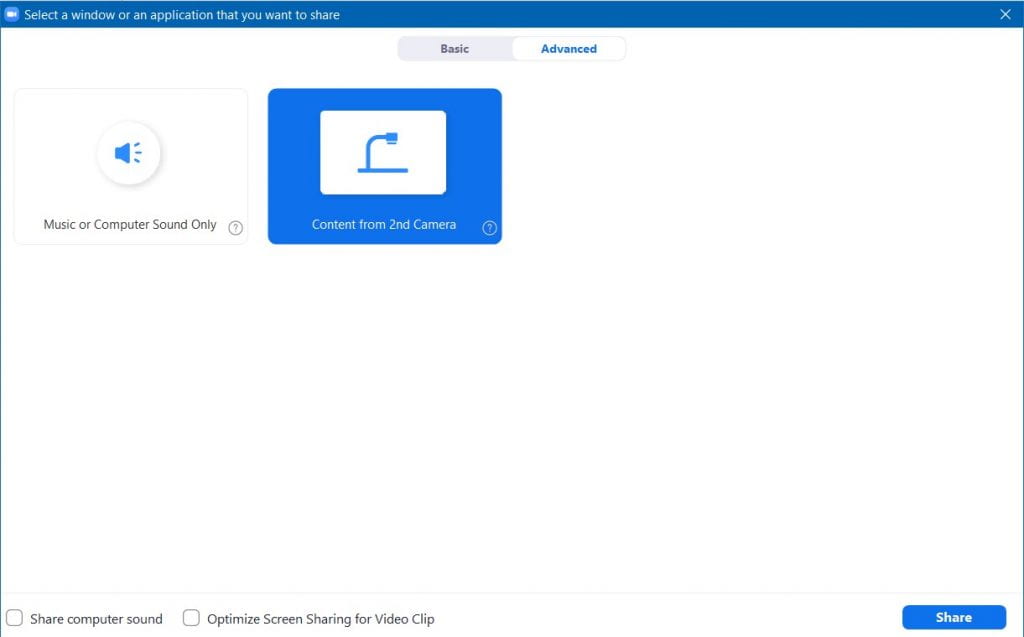
Share Screen - Advanced


5.  The webcam is displayed to your meeting Participants.  (My image is blurry on this screenshot, because my webcam is completely handheld.)

Screenshot of webcam drawing area