A few weeks back I gave a talk at OSU about how to make highly realistic looking experimental stimuli using Chrome Developer Tools.
The talk went down well and people seem to actually like the ideas. So I decided to write them down here.
So what are we talking about here?
Essentially, this simple guide will show you how to take an article you created and make it appear as though it really came from any website you choose.
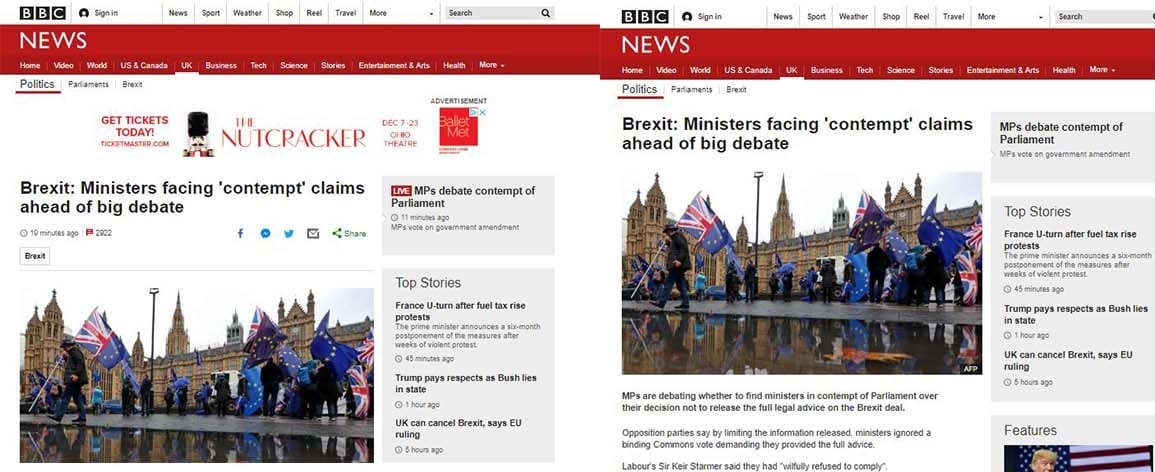
Basically, you can take a word article like this…

…And this…

….And make it look like this…

People have been doing similar things for a while using Photoshop or other image editing software. However, that approach doesn’t allow you to directly replace the text on the website. As a result, the results often a look a little off because a) you struggle to align the text and b) it can be difficult to find the exact font to match the website you want.
This approach allows you to directly replace text and images on the site, meaning you keep the site’s layout, fonts, and general aesthetic.
Why would you want to do this?
There are a few obvious applications of this:
1) You already have a near perfect article, but just need to remove distracting elements. For instance, removing adverts that may bias participants
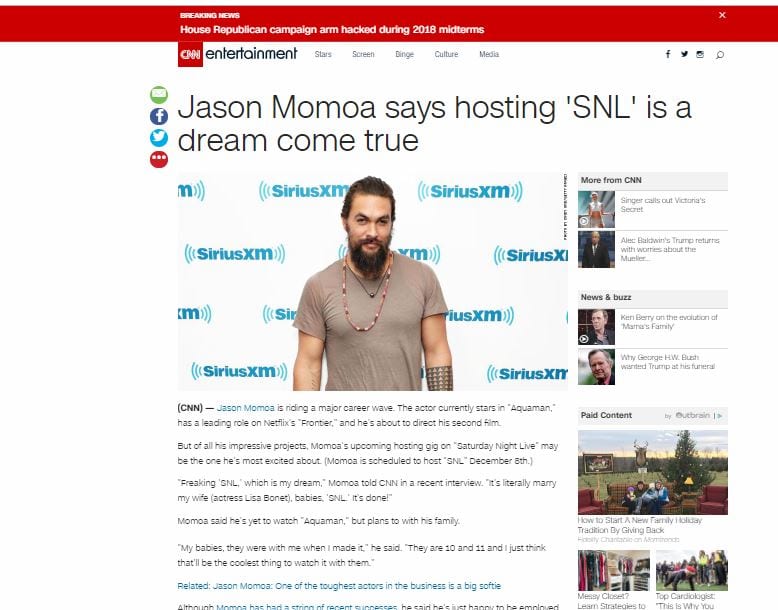
2) You want to take an article from one place and make it look like it came from another. Maybe I want to see if perceptions of bias are driven more by source than content. Well, in that case, I can take an article from Mother Jones…

And make it appear on Breitbart.

3) You want to test an article, but want to add credibility by making it seem like it came from a real website.
4) You want to test two very similar articles, only changing manipulations, but want to make them seem like they came from the same real-world site.
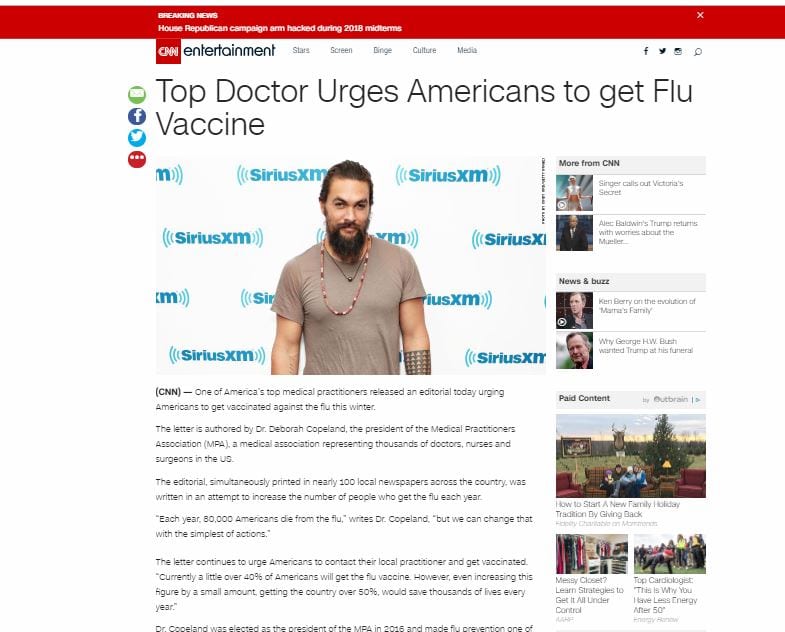
Say I wanted to test how people’s reactions to health advice from doctors differed based on the gender of the doctor. Well I can take an ordinary article and create two versions of my manipulated article that only differ based on my manipulations.

Basically, it means you can take your normal stimuli, keep all its internal validity, but add ecological validity by placing it on a real-world website.
(Quick note to say, that obviously all this is being demonstrated for educational / academic research purposes, and altering real websites probably counts as deception, and you’ll need to figure that out with your IRB).
What are Chrome Developer Tools?
This guide is going to assume you know basically nothing about web editing. In fact, if you’ve done some pretty standard CSS/HTML editing in your time, you probably already know all of this. I learned all this during my web developer days.
The actual steps are super simple, so don’t worry if you don’t know your way around code. You really don’t need to.
Chrome Developer Tools is built into Chrome. Most browsers have something similar (both Internet Explorer and Firefox do).
The idea is that it allows web developers to play around quickly and easily with the appearance of their site. Not only can developers view how edits would appear instantaneously, but importantly, the changes are all temporary – they are only on the user’s machine, so any mistakes won’t affect the real website.
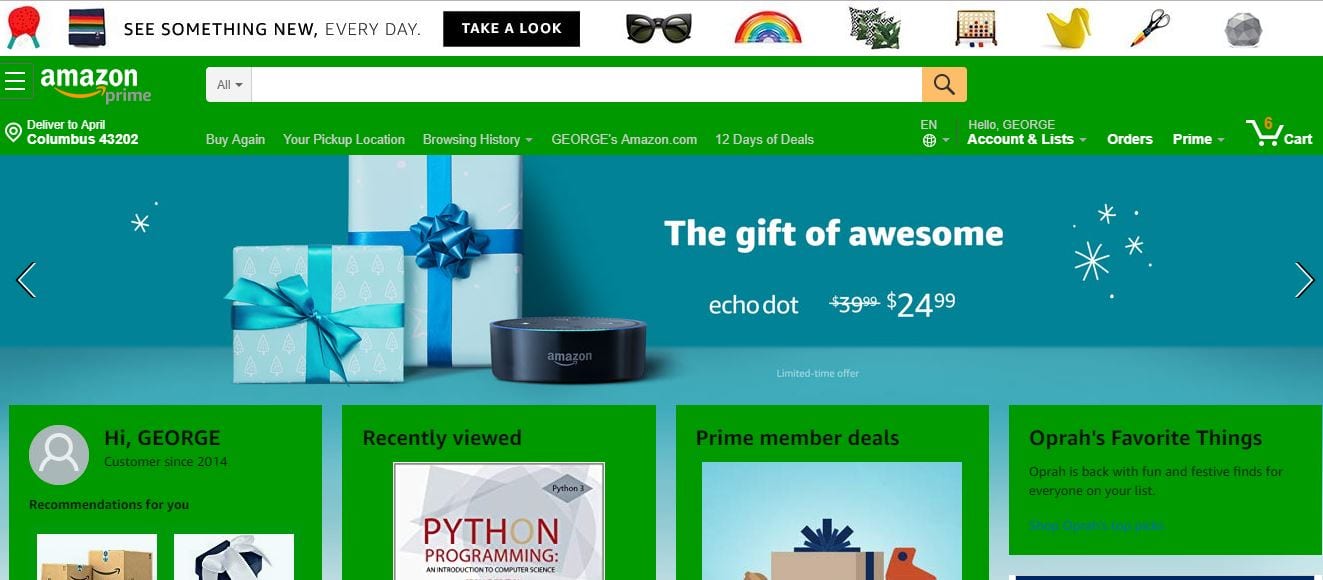
So if you are a developer at Amazon, and one day you wake up and think “maybe the whole website should have a bright green background”, you can do that quickly and easily without destroying the entire site.
That’s why you can use Developer Tools to make such large changes to sites. They are for your eyes only, they don’t affect what anyone else sees when they visit the site.
So let’s get started…
Step 1: Pick the article
How to pick a good article to edit?
To answer this question you want to think about what you can and can’t change easily.
Making stuff disappear is easy, changing text and images is easy. However, making an image appear where there was no image? Tough. Swapping elements around to different locations? Bordering on impossible.
So basically, find an article that has a similar visual structure in terms of where all the elements are to the one you want to create.
Stage 2: Open Chrome Developer Tools
- Go to your chosen article in Chrome.
- To open Developer tools, hit F12, or click the menu option in the top right-corner, and then going to More Tools, then Developer Tools.
- You should be presented with a fairly confusing wall of text and code.
Essentially, this is all the code that produces the web page you are on.
Web pages are produced by embedding elements within larger elements. For instance, the body might contain a frame that contains the main column, which contains text frames, which contain smaller text frames… and so on.
Clicking on any of those right-pointing arrows in the box will produce every element embedded within that element.

To give you an idea, let’s look at the little image of a clock in the header of my image .
That one clock is embedded in “update-time”, which is embedded in “metadata_info”, which is embedded in “1-container”, which is embedded… well you get the idea.
Thankfully, you rarely have to deal with this embedded nonsense, because you can simply click and point on what you want to edit (I’ll show you how in a second). But often if you can’t quite edit what you want to be editing, you can usually find it by going up, or drilling down, a layer or two.
Step 3: Local Overrides
One of the great things about Chrome Developer Tools is it forgets what you did. So you can make your changes, and when you refresh the page, it all returns to normal.
However, if you want to make changes over a longer period of time. You can turn on what’s called ‘Local Overrides’. This means that whenever you open Chrome Developer Tools, it will remember what changes you’ve made to that site and automatically insert them.
This is great if you want to make changes over multiple visits. That said, I usually make all my changes in one go, and I like the idea that I can return to the start just be refreshing the page. So I almost never have them on. However, if you want local overrides:
- Click the Sources option at the top of the Developer Tools window. Hit the checkbox that says ‘Enable Local Overrides’.

Step 4 – Selecting an Element
To select any element on your chosen page:
- Click the box with an arrow in it at the very top-left of the Developer Tools window.

- When you hover over the article, the page will change green and blue to highlight what element you are about to select.

(Open image in new window to view as animated GIF)
- When you are hovering over the element you want to select, click and Developer Tools will bring up all the info on that element.
Usually, the more precise an element you select, the better. In other words, if you want to edit a particular paragraph, select that paragraph, not the entire article text. If you want to remove a whole banner image, select the whole banner, not just the one image inside.
Step 5: Removing unwanted elements
This article is pretty cluttered for my liking at the moment. So let’s change that. First of all, I don’t want that advert at the top, it might distract my participants. So let’s remove it.
- First of all, click the select the element you want to remove (in this case the banner housing the advert),
- Developer Tools shows you all the elements that describe how that element is produced.
- Click to the right of where it says ‘element.style’ in the editor. This will create a flashing cursor.
- Type in “Display: None”.
- The element will disappear.

(Open image in new window to view as animated GIF)
You can repeat this process to get rid of other elements you are worried may distract, such as author information, sidebar adverts, or when the article was published.
Step 6: Altering Text
To alter any of the text on the page:
- Hover over the text you want to edit. (Be sure to select the exact paragraph you want to edit not a larger section.)
- Click to select the text.
- You can now see the text you want to change in the code in the Developer Tools window . (If you can’t, it almost certainly means you selected too high-up an element, and you need to drill down a layer or two).

- Double click on the text in the Developer Tools window. The text will be highlighted.
- Type in the new text. (You can paste in up to one paragraph of text at a time.)

- Press enter or click away and the text in Developer Tools and on the website will change to your inputted text.
- Repeat this process for each paragraph you want to change.
- Use the “Display: None” trick from Step 5 to remove any excess paragraphs.
Step 7: Setting up Developer Tools to Change Images
This step contains a few difficult elements you will have to do the first time you want to change images on a page. Once you’ve done this once, you won’t need to do them ever again. But you have to set Chrome Developer Tools up to change images.
There may be an easier workaround, but this is the best I have come across. It may seem a little scary for those that don’t feel great around technology, but you will be fine.
Also, full disclosure, this solution isn’t mine, I got it from this great Stack Exchange post. So full credit to Rob Donovan who worked this out.
To set up Developer Tools so that you can use your own images:
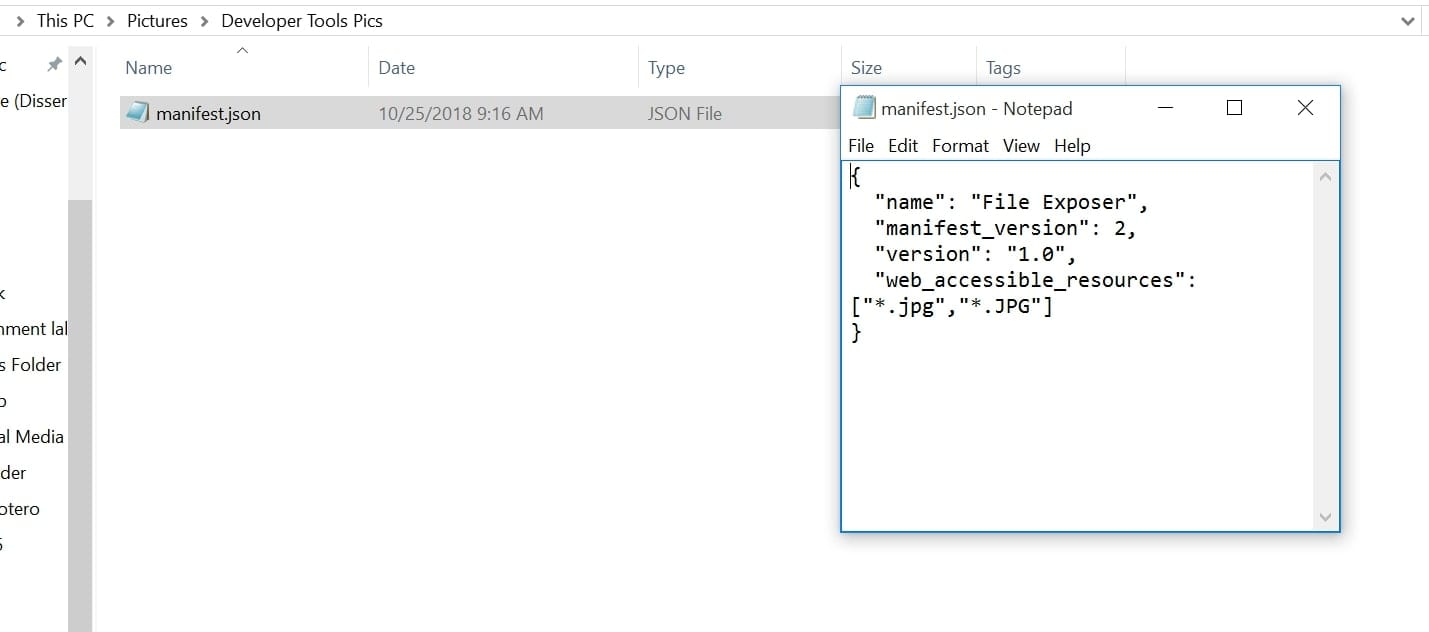
- Create a folder on your computer where you will store the images you want to use in Developer Tools.

- Inside this folder you need to create a file. To make your lives easier, I have created a ready-to-go version of the file which you can download here. However, if for whatever reason, you want to make the file yourself:
- Open up a simple text editor – Notepad will work perfectly.
- Save the file. Call the file manifest.json (Note: .json is the file extension – same as .doc or .xls – so you will need to be able to edit that or Notepad will save the file as manifest.json.txt, which won’t work.)
- Insert the following text and save the file:
{
“name”: “File Exposer”,
“manifest_version”: 2,
“version”: “1.0”,
“web_accessible_resources”: [“*.jpg”,”*.JPG”]
}
- Place the file inside the same folder where you keep the images you want to use with Developer Tools.
What this file actually is, is a super simple Chrome Extension that allows Chrome to read files in a certain folder on your computer. So next, you need to add the extension to Chrome.
- Go to your extensions. You can get there by typing “chrome://extensions/” in the address bar in Chrome, or going to the menu and selecting More Tools, then Extensions.
- In the top-right, turn on Developer Mode.
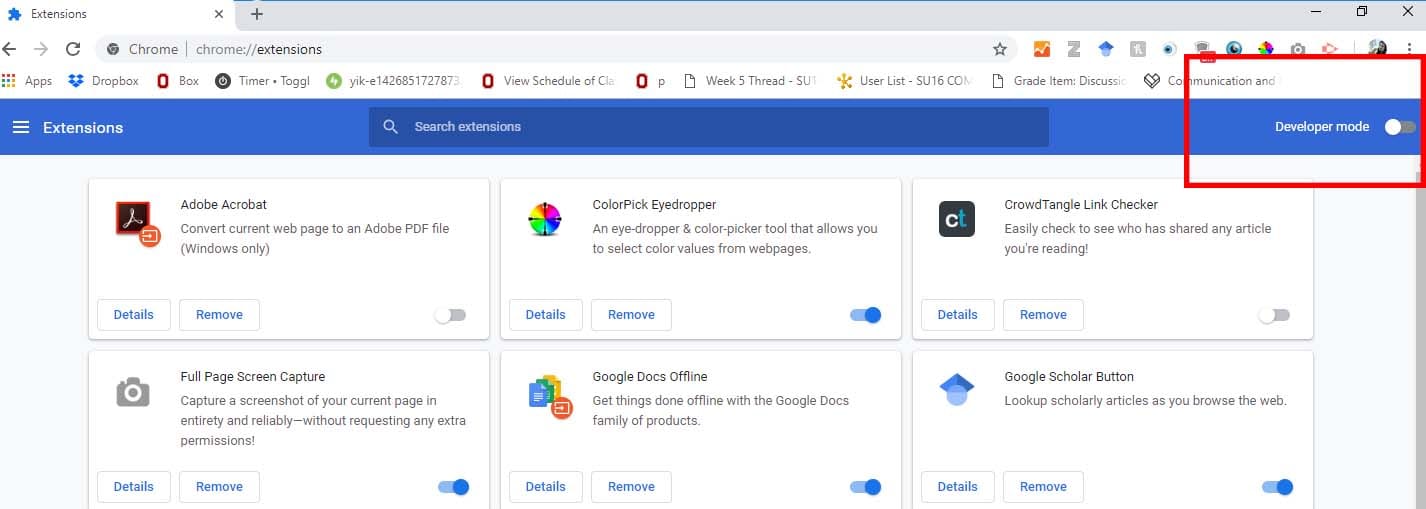
- You will see some new menu buttons appear just beneath the search menu.
- Click the option that says “Load unpacked”.
- Find the folder where you placed the manifest.json file and select okay.

- A new extension will appear on your Chrome Extensions called File Exposer.

- On the case for your new extension, you can see Chrome has given it a random ID. In my case, the catchy ID of “phdinbgocipcemkfcelmopapmlmbhilk”.
(Total coincidence by the way that it starts with “PhD” for me, but I love how poetic that is.)
- Make a note of this ID (e.g. copy and paste it to a notepad file). You will need it in a moment.
- Turn off Developer Mode in your Chrome Extensions menu. (Note: you can only see the ID when Developer Mode is on, hence you need to make a note of it before you turn Developer Mode off.)
You only ever have to do the above once. Once the extension is in place we are good to go with changing images on any site we wish.
Step 8: Changing images
To change images on an article:
- Save any image you want to add to your article on your computer, in the same folder as your manifest.json file.
- Change the name of the file so that it is easy to remember and all one word so that it’s easier to use.

- Go back to your article you are editing.
- Use the selection tool to select the image you want to replace.
- If you have selected the image correctly, code will open up with ‘<img’. (Depending on the website it may be quite a short piece of code, or a whole paragraph like in the screenshot below. However, if it starts with the ‘<img’ tag, you have the correct one. If it doesn’t start with ‘<img’, it most likely means you have selected an element that is too high up in the hierarchy and you need to drill down a layer or two.)

- Read the text following ‘<img’ until you come across a section that reads ‘src=’. After the equals sign there will be a file path that ends with a .jpg or .jpeg (or maybe even a .png or .gif).
- Double click on this file path and it will be highlighted.

- Replace the file path with the following: “‘chrome-extension://[extension_id]/[your image.jpeg/jpg]'”.
- For instance, my image in my folder is called :female_doctor.jpg.” As noted earlier, my extension ID was “phdinbgocipcemkfcelmopapmlmbhilk”. So I want the code in my Developer Tools to say “src = ‘chrome-extension://phdinbgocipcemkfcelmopapmlmbhilk/female_doctor.jpg’

(Open image in new window to view as animated GIF)
- Press enter or click away, the image on my article will change.
- Repeat for any images you want to change.
Your new article is now complete.
Step 9 – Keeping a Version of Your Article
There are a few options here. I will be honest, I haven’t found a perfect one yet. Developer Tools isn’t really designed to do this. So please, if someone has a better idea, let me know.
I will run through each of the three options I know as well as their pros and cons.
Option 1: Save the web page as an HTML file
- Right-click on your article and click save as.
- Save the web page where you wish. This will save the file on your computer as an HTML file which can be opened.
Pros: It keeps it as a web page, so it will open in a browser, all the text is screen-readable etc. Basically, it really is a web page.
Cons: There are some major downsides. Most importantly, not all elements are saved. Often graphics will fail to load when you open up the HTML file, and unless you open it on your computer, you’ll probably lose any links to images you’ve added. Also, be aware that all the links will still work, so you run the risk of some participant clicking something, being redirected off to another page, and no longer viewing your stimuli.
Option 2: Save as a PDF
- In Chrome, click the options menu, and then select Print.
- Select Adobe PDF as your destination.
- Click the More Settings option, and ensure that Headers and Footers is set to off and Background Graphics is set to on.
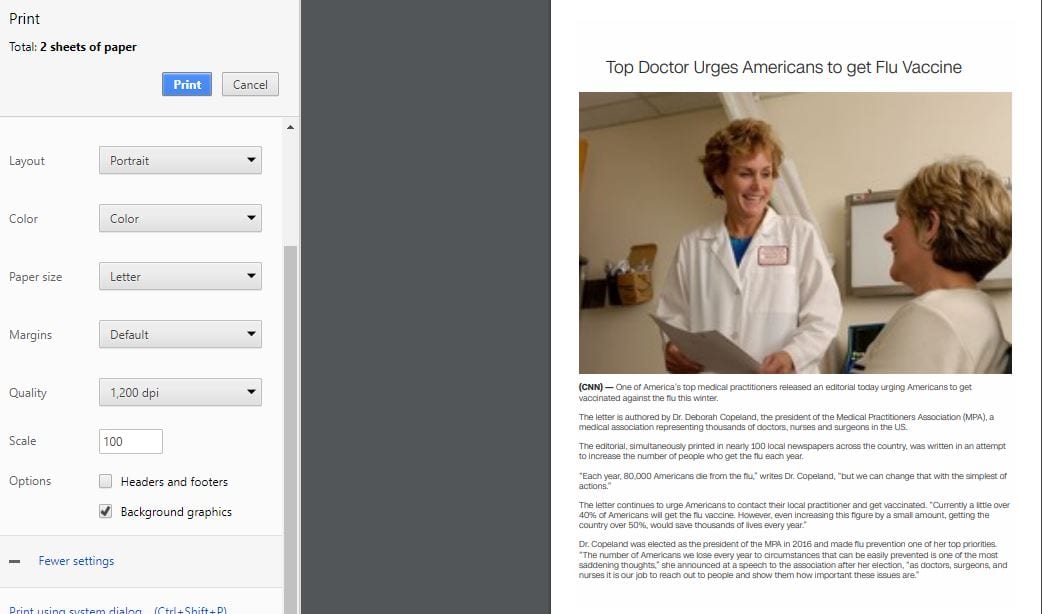
- Click print to print your article as a PDF.
The problem, as you will know if you’ve ever printed any web page, is that printed web pages don’t look the same as they do online. You’ll have the same issue here. It’s a perfect recreation of a print out, but not of the web page itself.
Pros: All the elements are there.
Cons: It doesn’t look like a web page. No links work.
Option 3: Export as an image
This is the best method I have found so far.
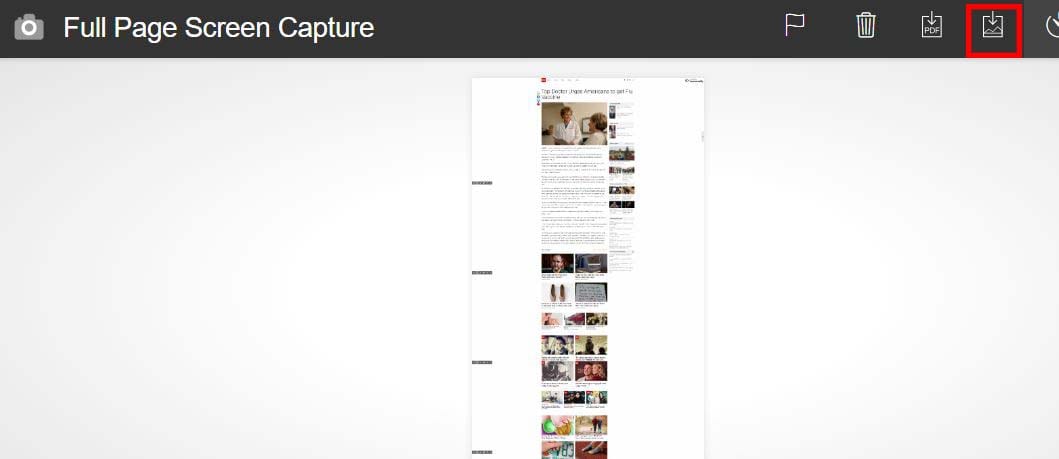
- Add the Extension: Full Page Screen Capture.
- Once the extension is added, you will see a small icon of a camera in your Chrome browser.

- Click this icon. The extension immediately gets to work. You will see the extension scroll down your page automatically as a delightful animation of Pacman consumes little dots in the top-right of your screen.
- Once the extension has finished (usually a couple of seconds), you will be down a full image of your web page.
- In the top-right, click the download image option.
This will give you an image of your web page.
I would usually then recommend opening it and cropping out elements you don’t want. For instance, in my version I would crop the endless display of related articles at the bottom.
One other nice bonus of this system is you can take your image and embed it in other places. For instance, I could make the whole article appear in a Qualtrics survey.

Pros: Looks correct. None of the links work, so no danger of participants going anywhere. Easy to embed.
Cons: None of the links work and it won’t open in a web browser (basically, it isn’t a web page). Also, all text has been converted to an image, meaning it’s no longer machine-readable so your study no longer meets major accessibility criteria.
Step 10 – Run your study
Whatever your chosen option, you now have a custom web page that looks like it came directly from whatever website you chose.
Happy data collection!
Thanks…
To anyone who read this far.
If you have any comments, queries, or suggestions, feel free to post them below.
Alternatively, you can get in touch at pearson.325@osu.edu.
I can also be found on Twitter.